

This applies to the following countries
- All countries
Approval Guidance requires that you are set up as an approver. If you are not an approver, you will not see the statuses. See Approving reports for how the approval flow works.
Before you start
- You are set up as an approver in the organisation.
- Your organisation has Approval Guidance enabled. It is on by default, but administrators can turn it off.
- Works in both the mobile app and the web interface.
How it works
When an expense is submitted, the system compares the receipt image, amount, and policy against similar expenses submitted by the same user, the organisation, and all users. The expense then appears in your approval list with one of two statuses:- ✨ Ready for approval — The expense matches the receipt, complies with policy, and is low-risk. Can be approved right away.
- ✨ Needs review — The expense has a possible policy issue or something that does not match. Open it and read the reason before you approve or reject.
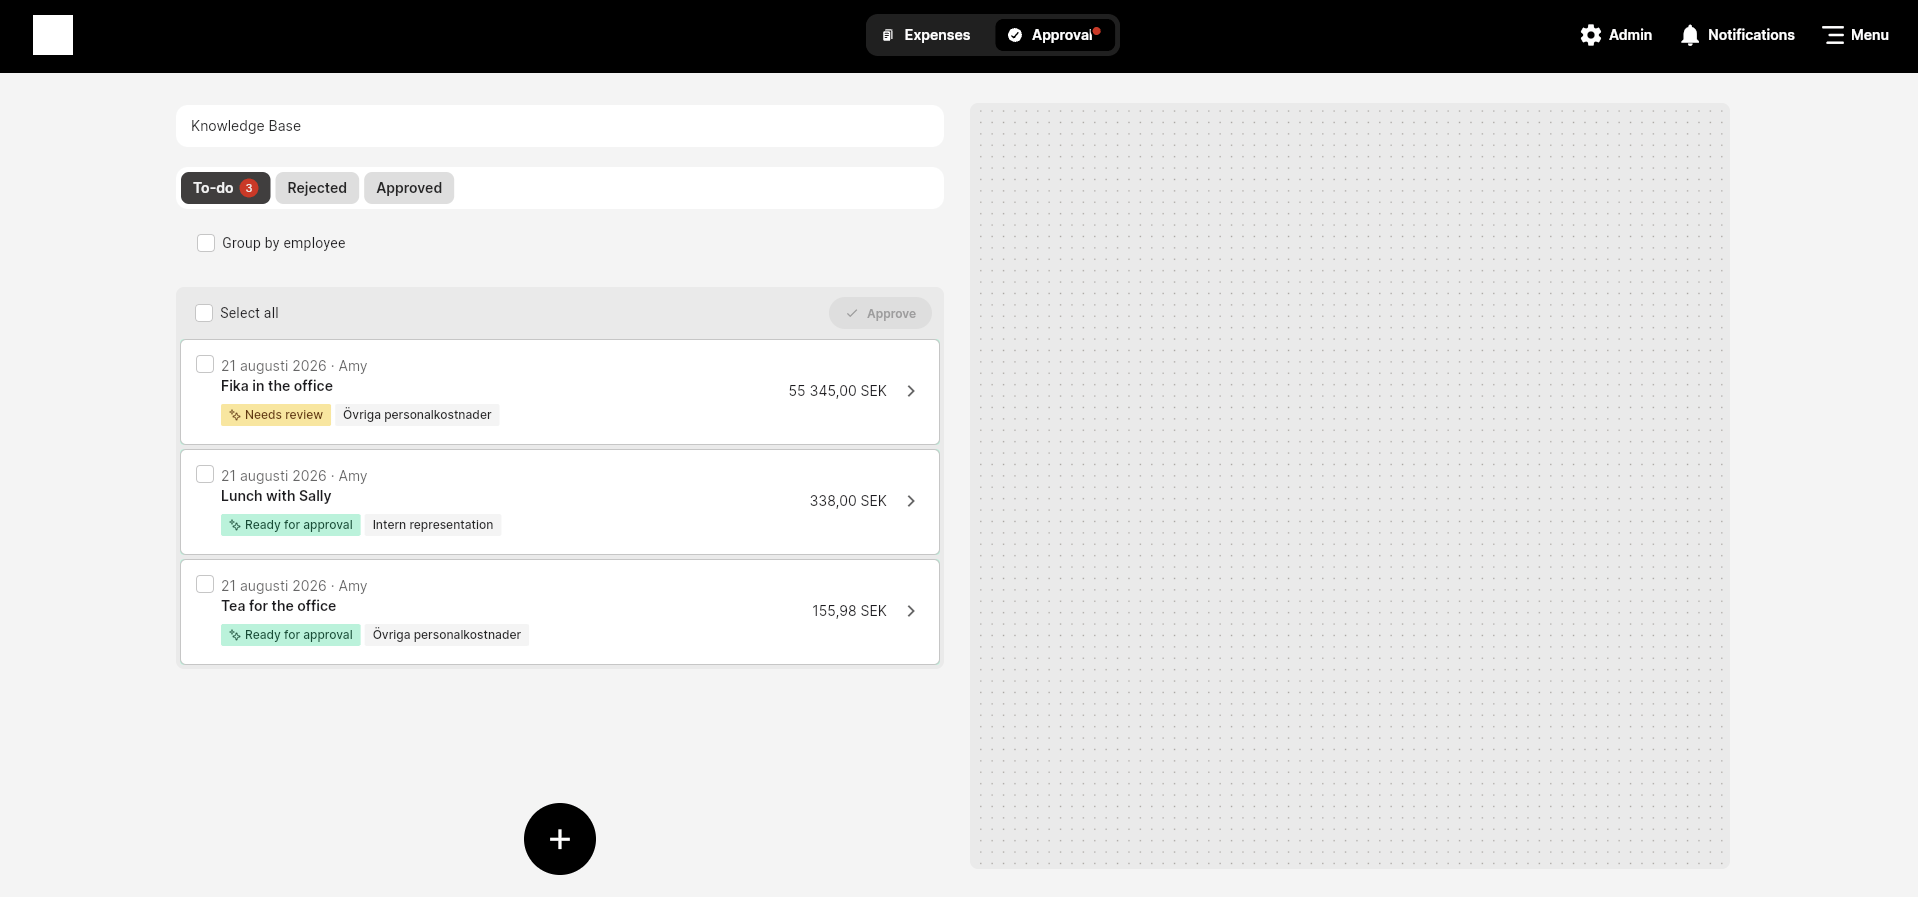
Review and approve expenses
1
Open the approval list
Go to Approval in the app or on the web and open the To-do tab.
2
Read the statuses
Expenses marked ✨ Ready for approval can be processed right away. Expenses marked ✨ Needs review show a reason — start with those.
3
Review a single expense
Click an expense to see the details and the reason for the status before you approve or reject it.
4
Approve several at once
Tick the checkboxes next to the expenses you want to approve, or tick the top checkbox to select all. Then click Approve.
Good to know
- The statuses are guidance, not a decision. You are still the one who approves or rejects.
- Ready for approval means low risk, not that the policy has been checked in every detail. Open the expense if you are unsure.
- The system learns continuously from previous approvals and rejections in the organisation.
For administrators
Approval Guidance is on by default for new organisations. To turn it off for the whole organisation:1
Open the admin view
Go to the organisation’s Admin view.
2
Navigate to the settings
Go to Settings → Expense management → Report workflow / Advanced settings.
3
Disable AI features
Tick Disable all AI features and save. All AI features in the expense management platform are turned off for the organisation from that point on.
Next steps
Approving reports
How the approval flow works end to end.
Your account and settings
Set up notifications for new reports to approve.
FAQ
Why is an expense marked Needs review?
Why is an expense marked Needs review?
Open the expense — the reason is shown in the expense view. Common reasons are an invalid receipt, a policy deviation, or that similar expenses have previously been rejected.
Can I approve an expense marked Needs review?
Can I approve an expense marked Needs review?
Yes. The status is guidance — you decide. Read the reason first and approve if the expense is in order.
Is the AI score shown anywhere?
Is the AI score shown anywhere?
No. The system uses an internal confidence score that is not shown. You only see the status and, for Needs review, the reason.
Does Approval Guidance work in both the app and the web?
Does Approval Guidance work in both the app and the web?
Yes. The statuses are shown in both places.
What happens if the administrator turns the feature off?
What happens if the administrator turns the feature off?
The statuses disappear from the approval list and you review reports as usual. See Approving reports.