How do I set up Dimensions?

Written by Cecilia Bäckström
Updated at March 24th, 2023
Table of Contents
The function Dimensions can be used in many different ways and forms. This article will give you good basic knowledge on how to set up and use dimensions and hopefully also ideas on how you, as an administrator, can customize them, to make them fit your company's needs.
Click on the field below to see how you make basic settings for Dimensions.
Set up Dimensions (basic settings)
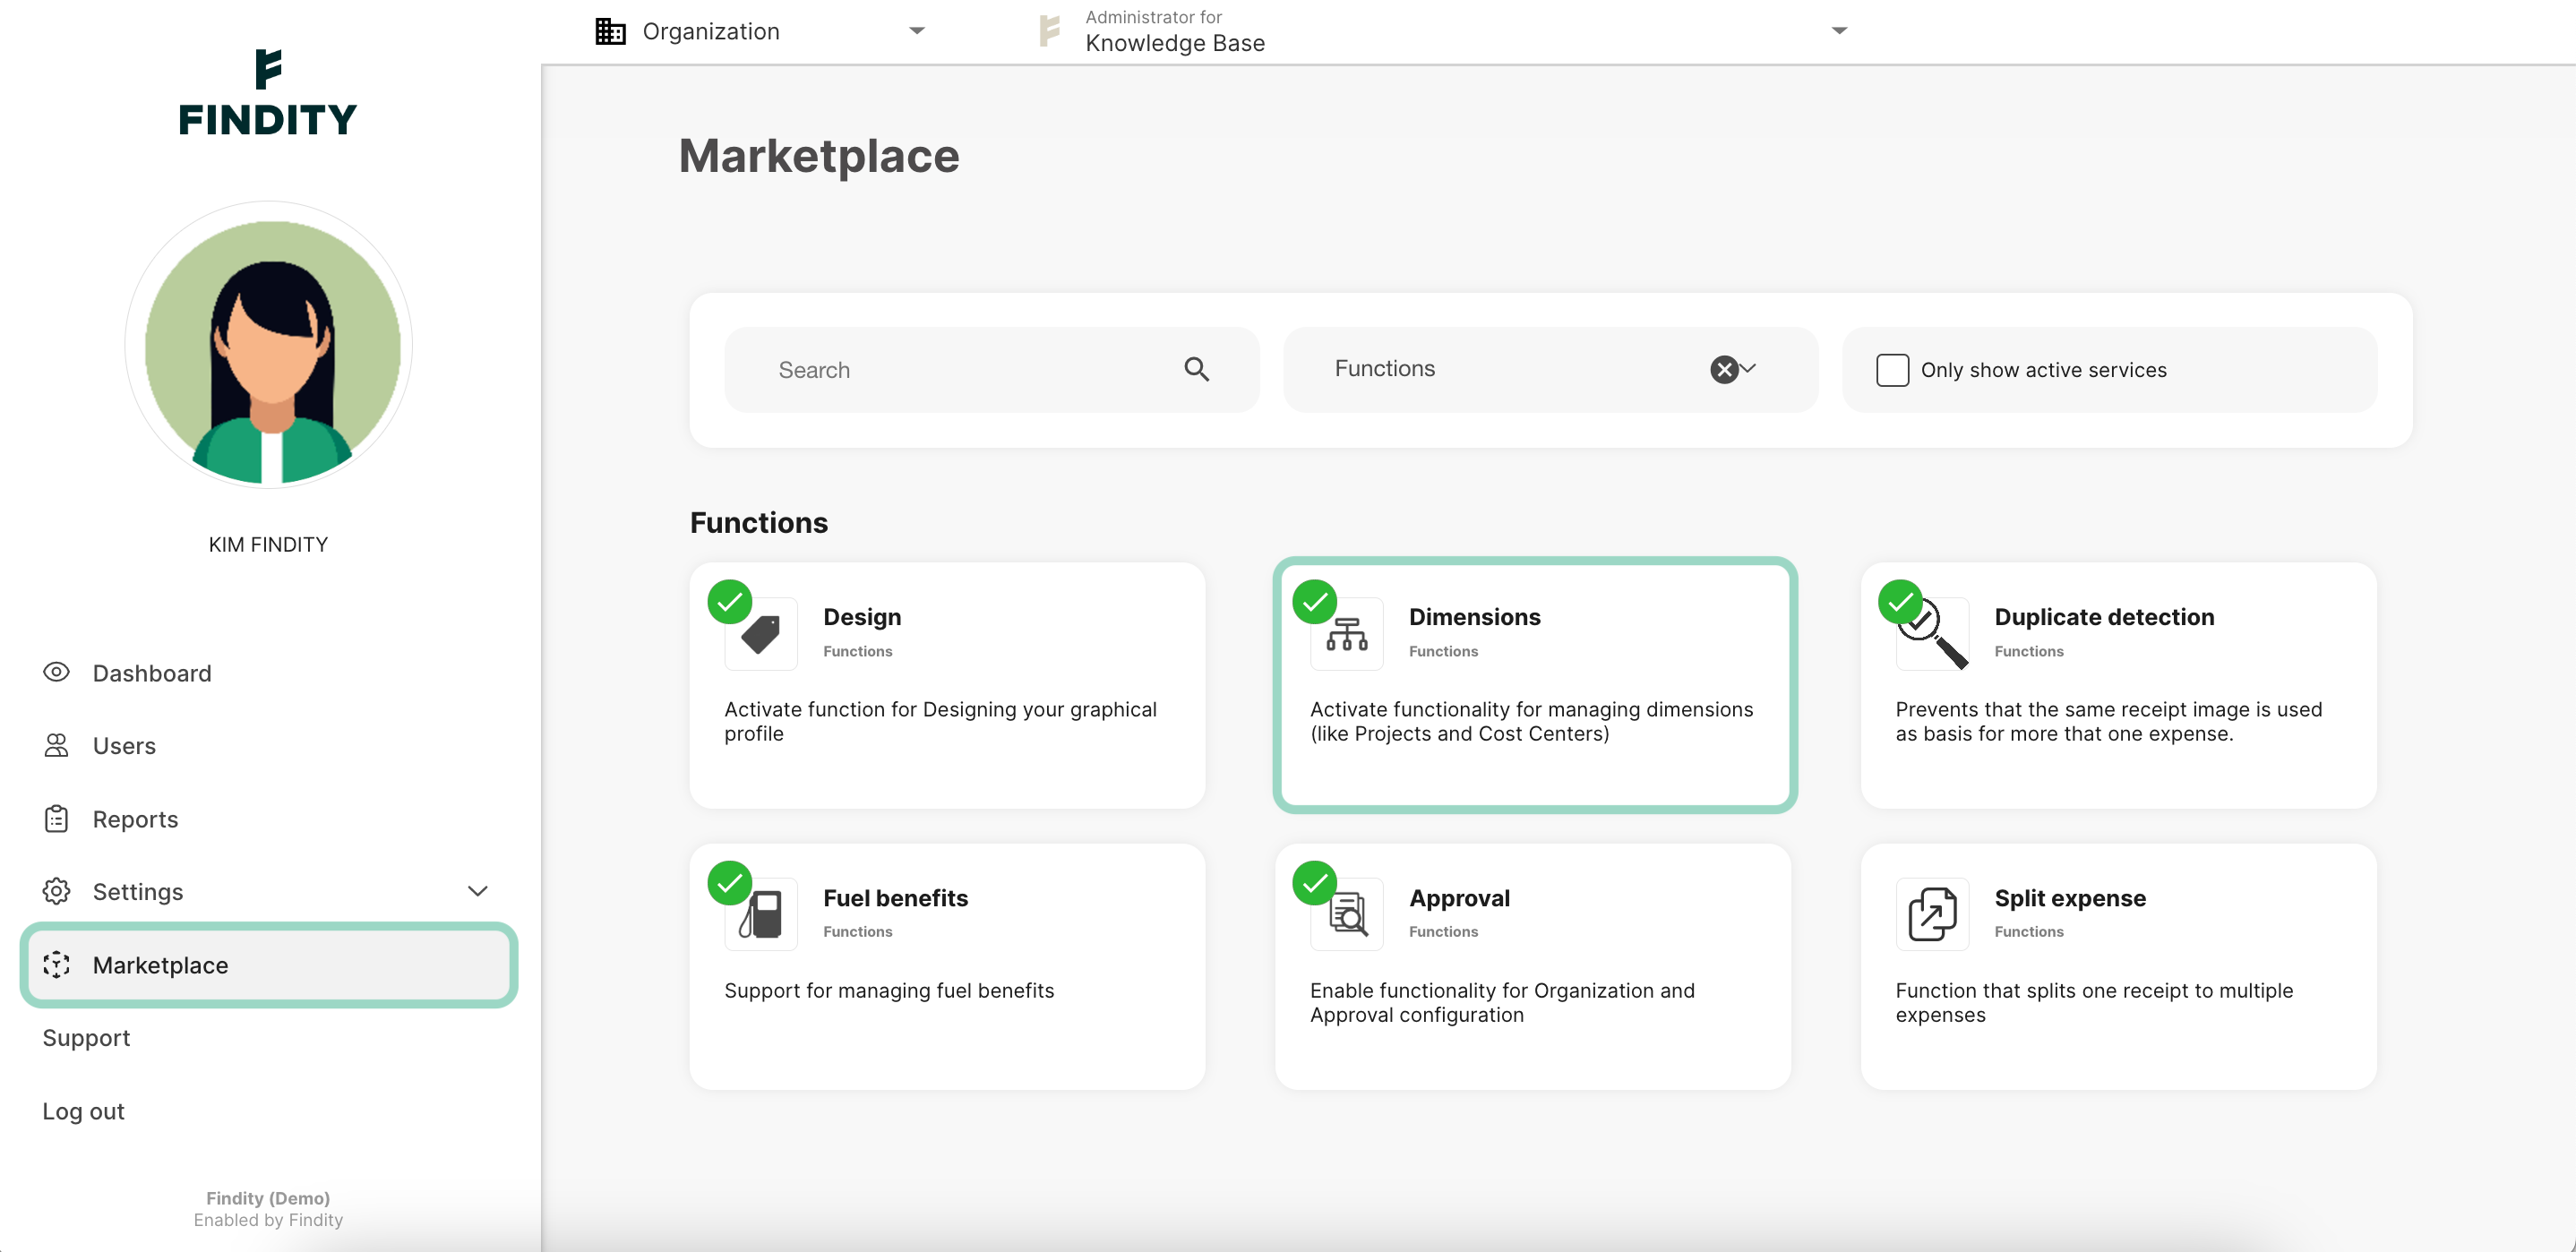
Activate Dimensions in Marketplace
First of all, you need to activate the function Dimensions in Marketplace on organization level. Click on Dimensions and Activate.
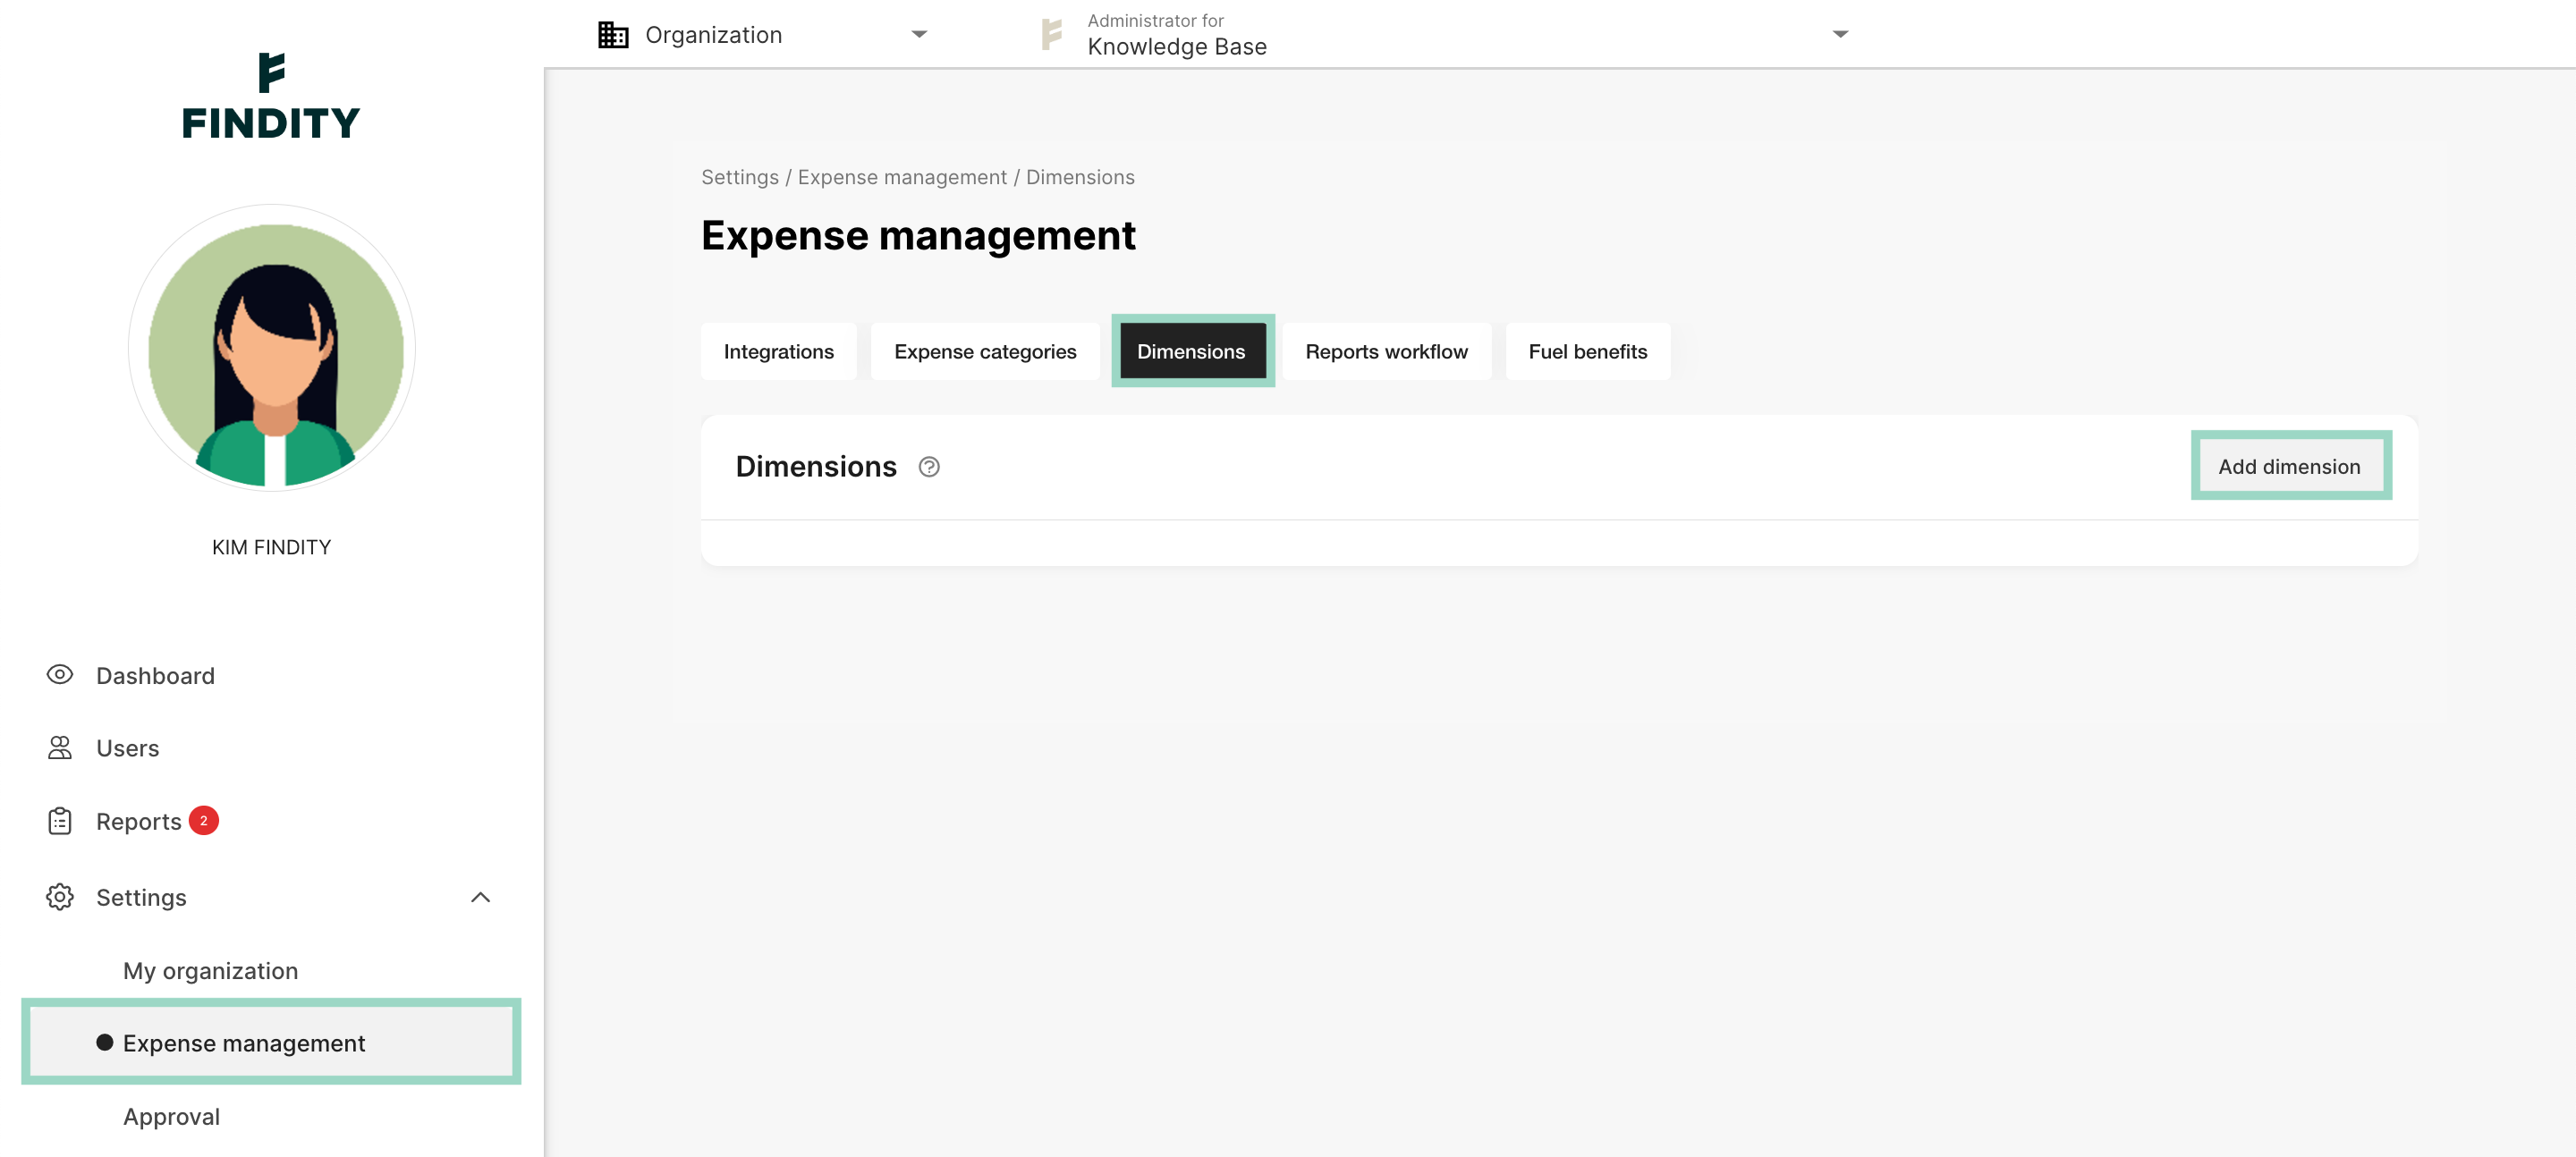
Add dimension
Now you can start to set up the dimension. Go to Settings > Expense management > Dimensions and click on Add dimension.
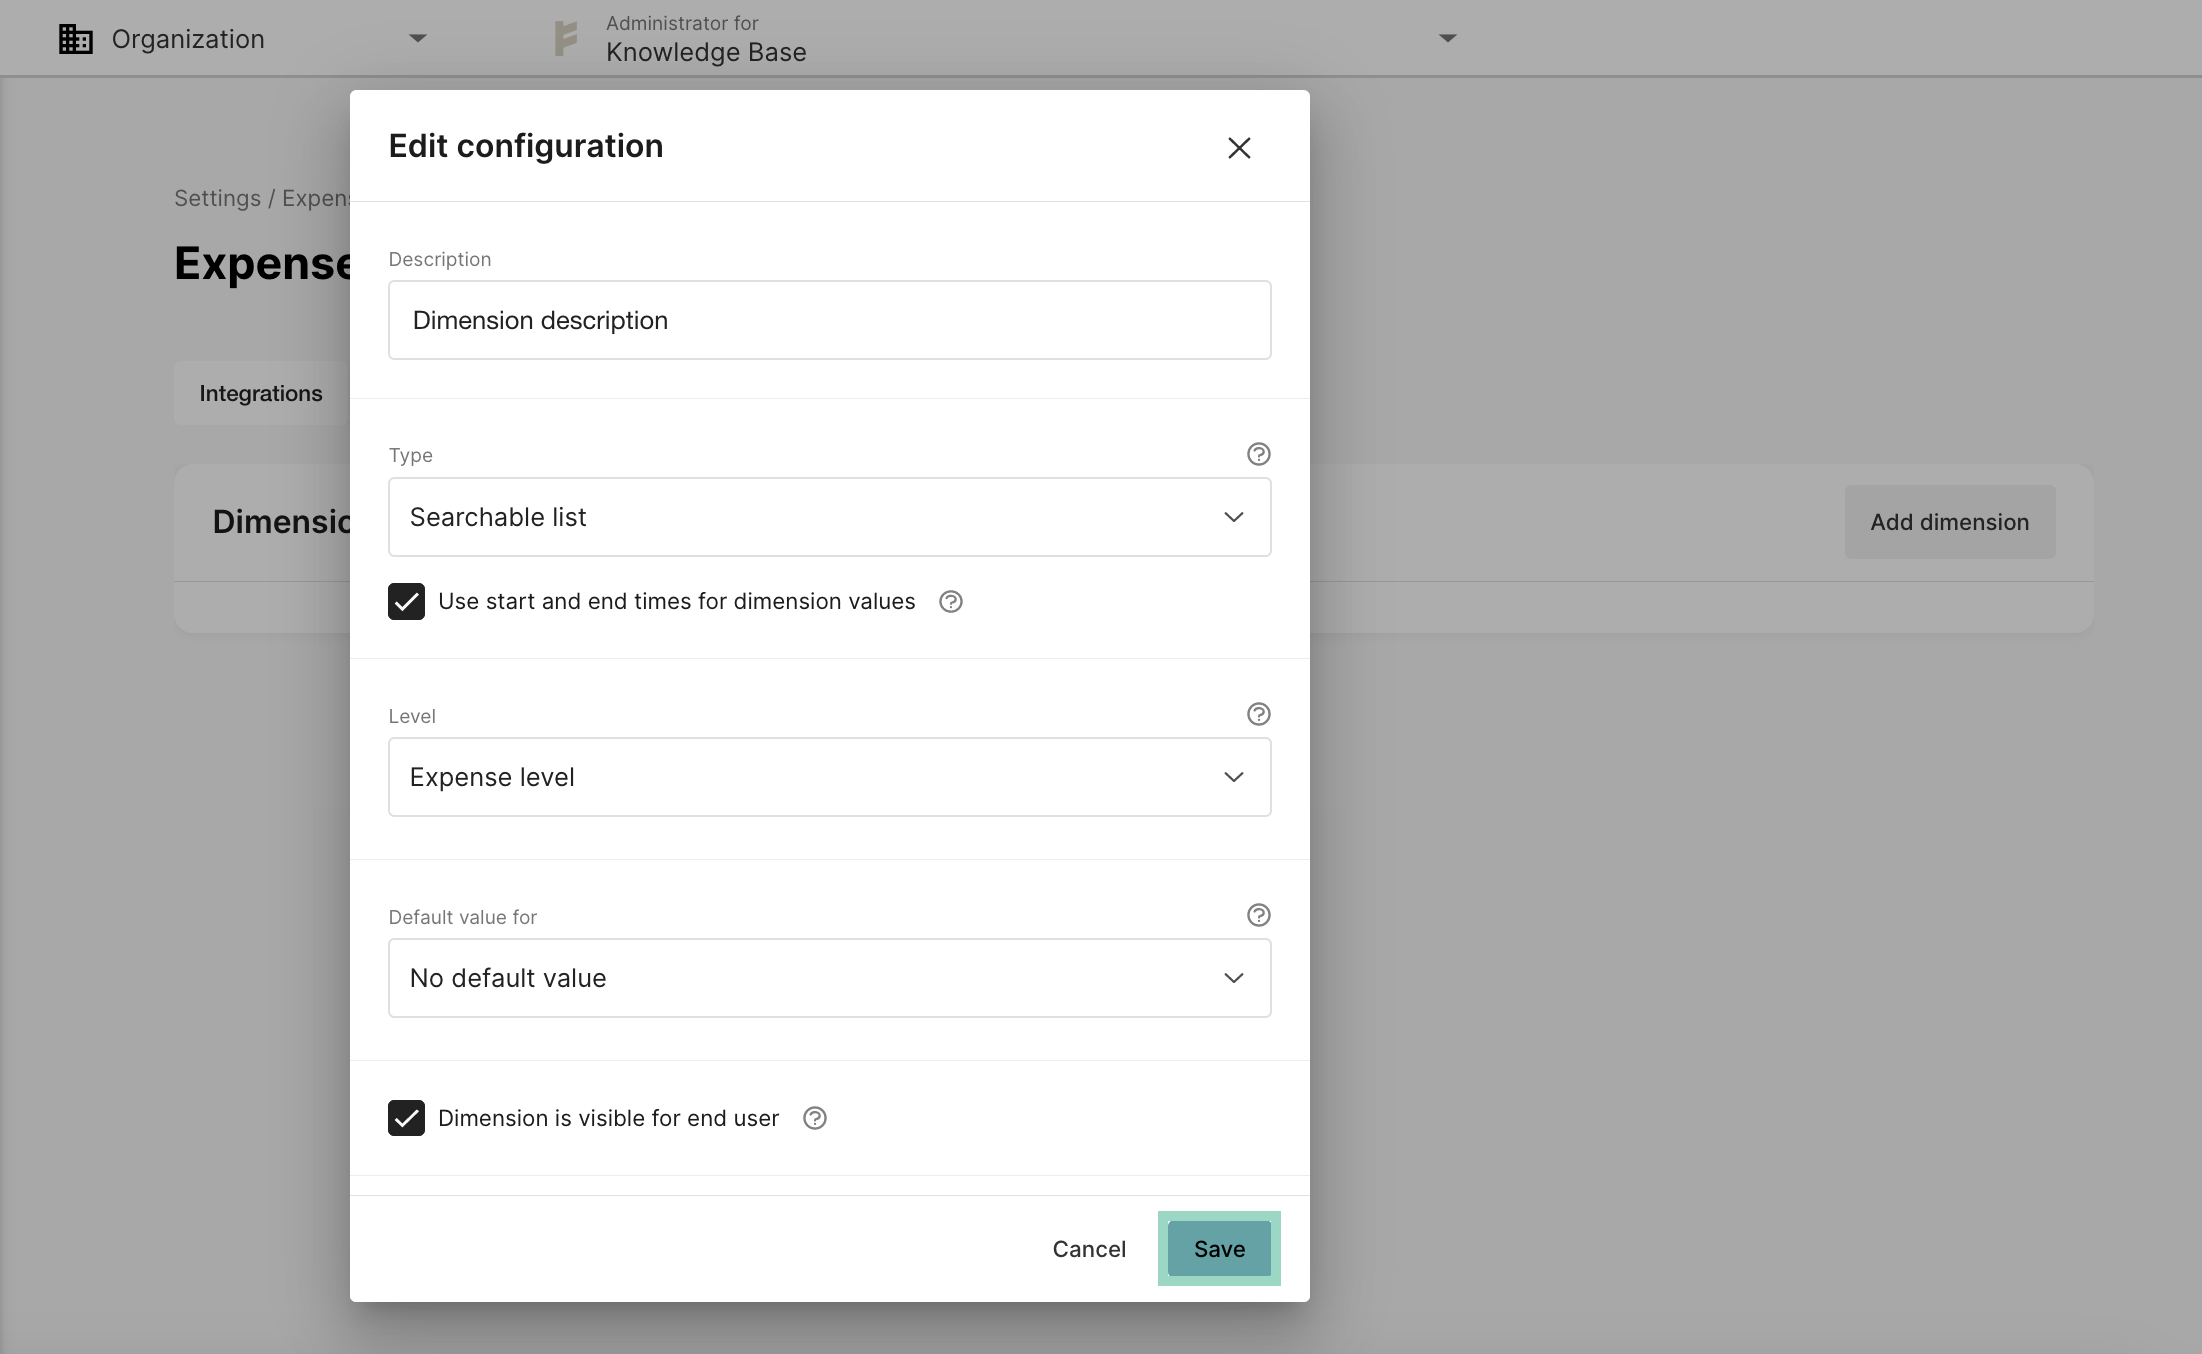
Edit configuration
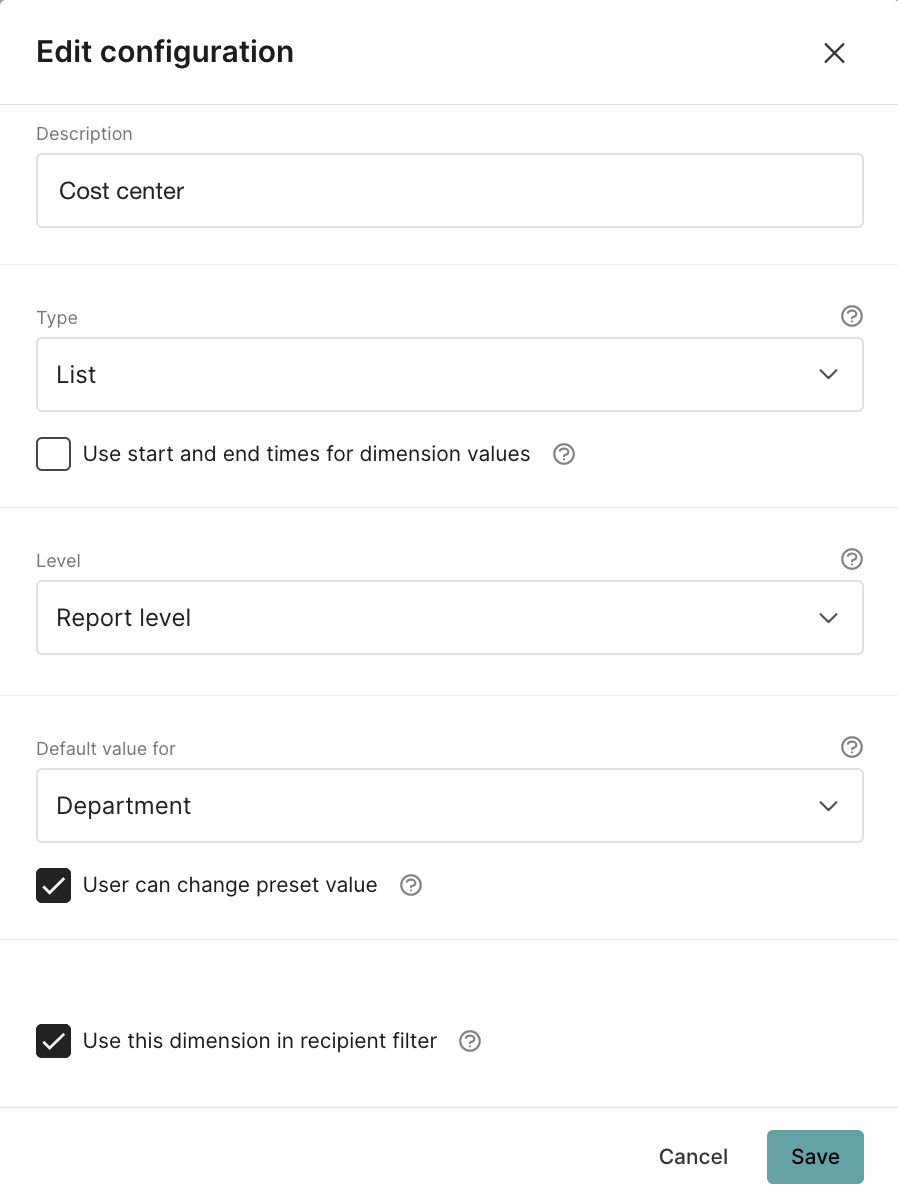
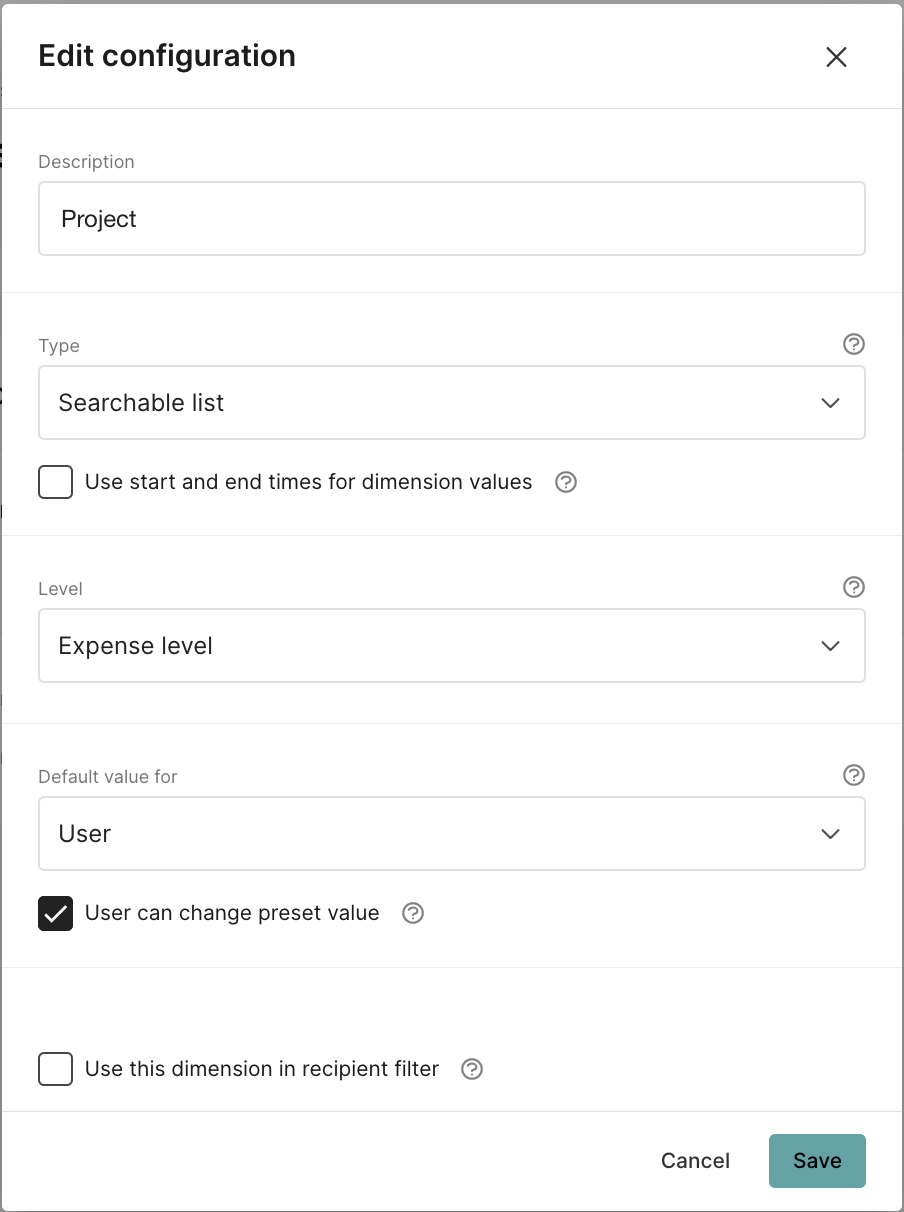
Now it's time to define the settings for your new dimension.
- Description - Choose a description of what you would like to call the dimension.
-
Type - Decide what type of dimension you want to use.
- Free text: The user enters any text value.
- List: The user selects a value from a list.
- Searchable list: The user can search for a value or select from the list. - Use start and end times for dimension values (check box that is only visible if you choose to have a searchable list or list as Type) - It's possible to choose as start and end date on a dimension value. For example, to stop the user from using a completed project.
-
Level - You can link the dimension to an entire report or to an expense.
- Report level: The dimension is chosen on report level for the entire report.
- Expense level: You choose the dimension on each expense in the report.
- Dimension not activated: the dimension should not be used and you want to keep it, but be deactivated. -
Default value for - You can choose to make a value in the dimension default.
- User: Assign a preset value to each or selected users.
- Category: Assign a preset value to each or selected expense categories.
- No default value: The value is entered by the user. - User can change preset value (check box that is only visible if you choose a default value on the User or on the Department) - If you want to let the user change the value even though you have chosen to use a default value.
- Dimension is visible for end user (check box) - You choose whether the dimension should be visible to the user or not. You can go to "Manage more input fields" and specify whether the dimension should be mandatory. Also, note that this check box will not appear and be usable if you have chosen to have a default value.
- Use this dimension in recipient filter (check box) - Choose if you want to use the dimension in the receiver filter (then do the settings under Settings > Expense management > Integrations and Choose expense types to include for each report recipient). If you do, the dimension can be exported to a separate output file.
- Hide dimension values (check box) - When it's time to add values to the dimension (next step) you can here choose if you only would like to show the description of the value, and not the specific value, for the user.
- Configure how this dimension will be mapped in report recipient outputs (only visible if you have an integration where you have mapping) - Choose how to map the dimensions in the report recipient outputs.
When you have defined your settings. Save the Dimension.
Edit values
When you have configured your dimension and you have chosen to add values to your dimension, it's now time to add the values. If you have chosen to have the type Free text, you are now done with the basic settings for your dimension and the users will now be able to see the Free text input field when doing an expense or a report (depending on which Level you choose).
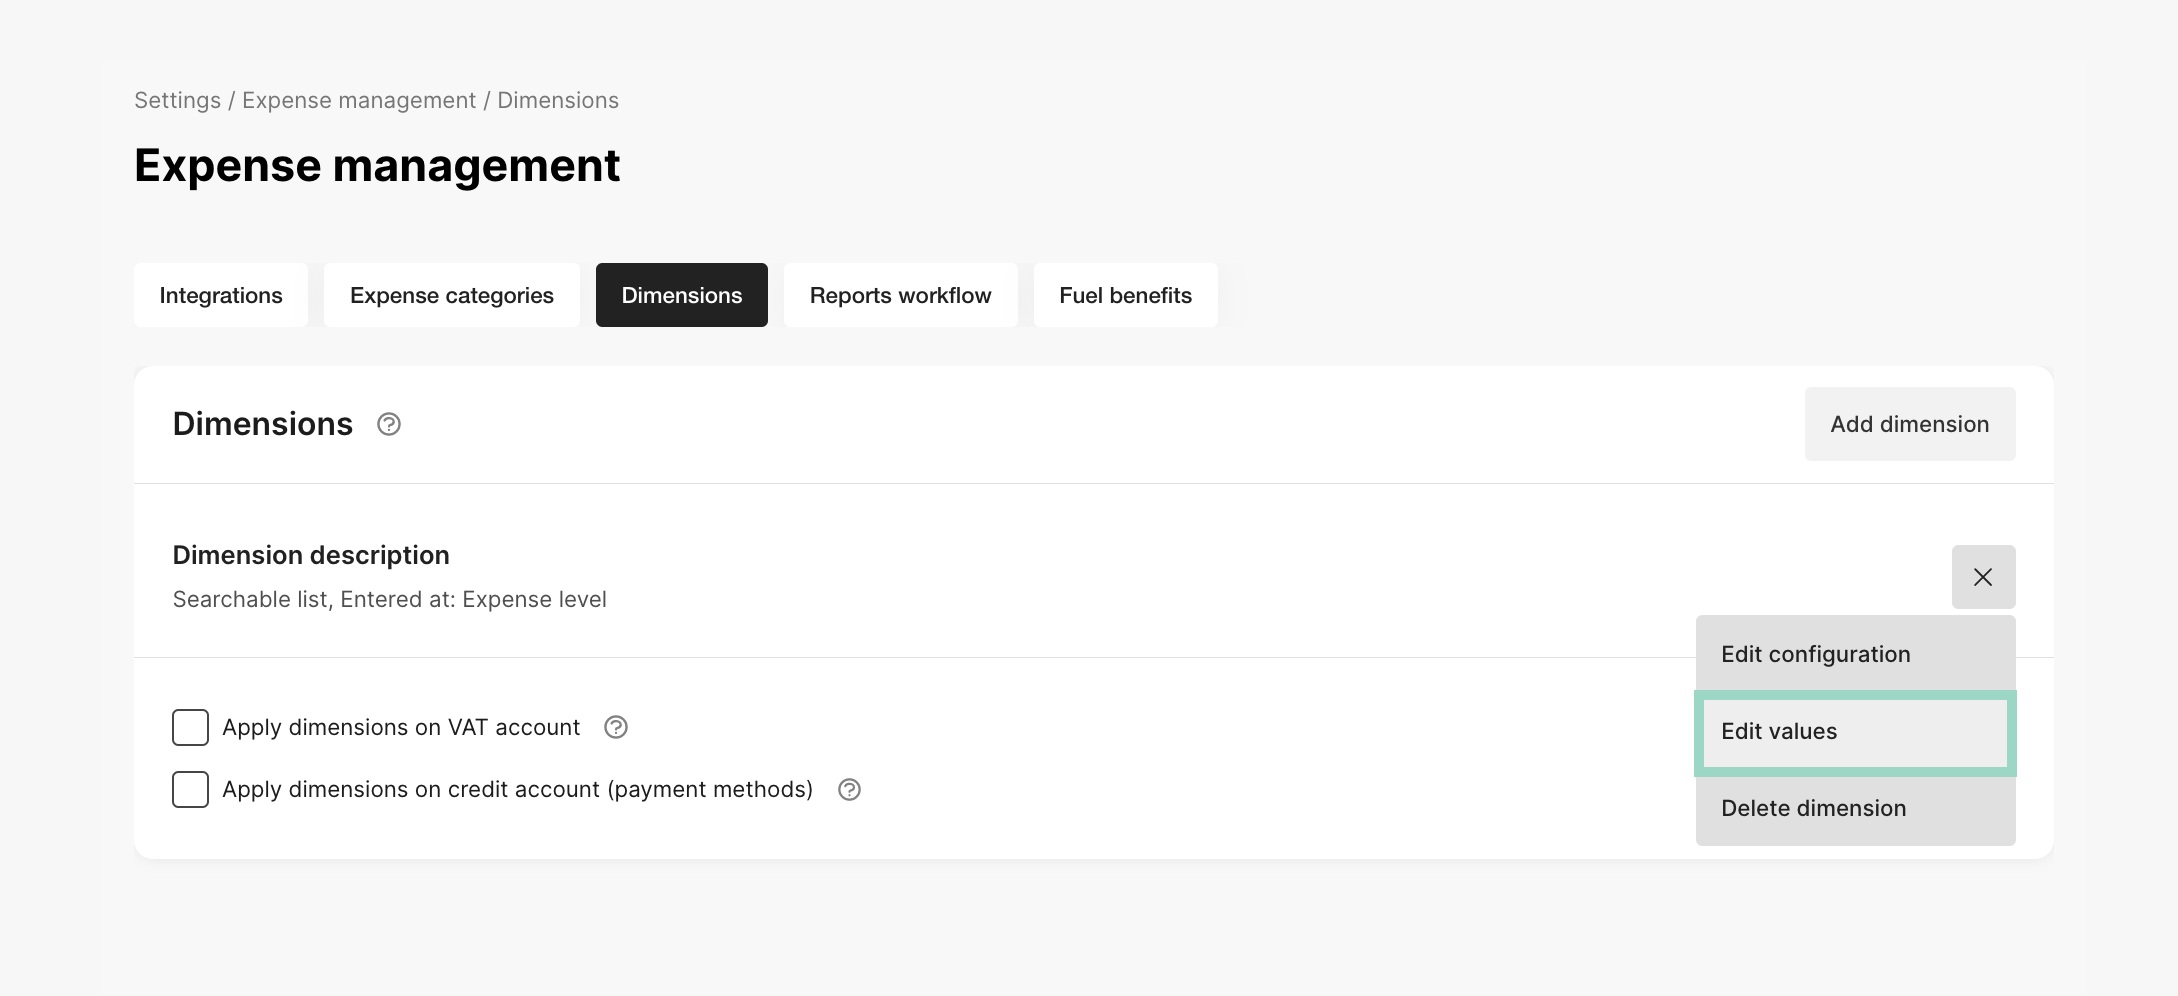
To add values, click on "the three dots" on the right-hand side of the dimension that you created. Choose Edit values in the drop-down list.
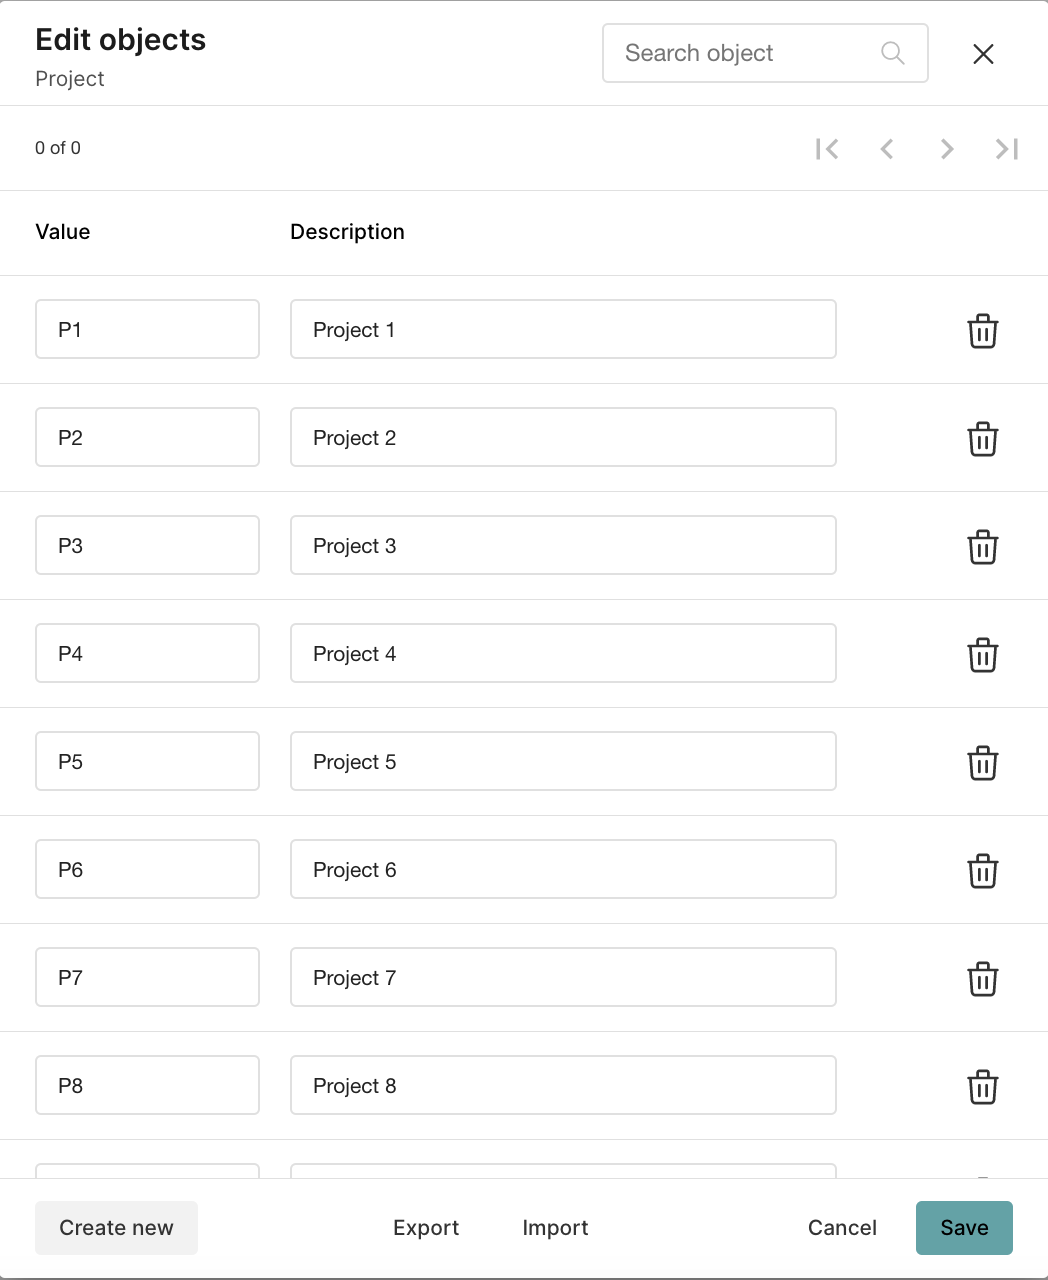
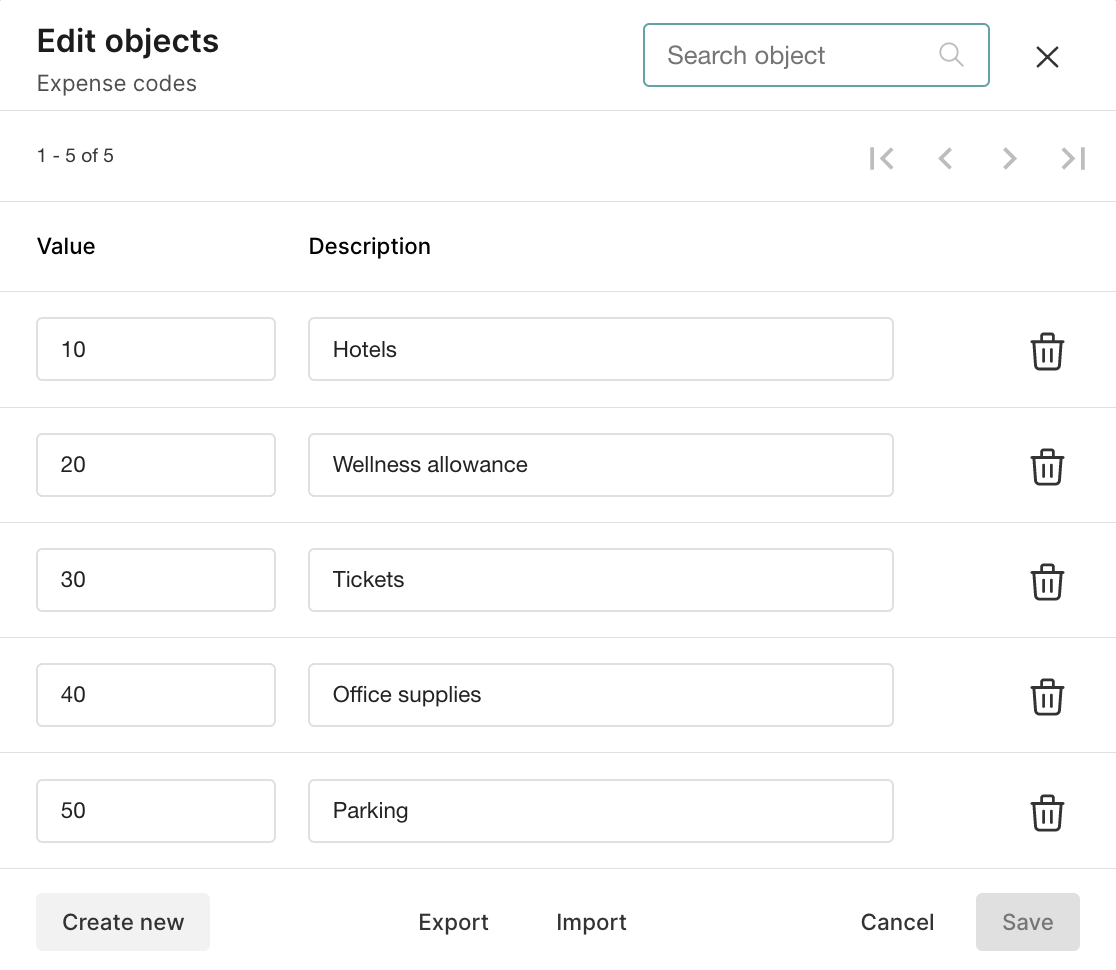
In the new pop-up window, click on Create new, and a new row will be added for you to add the value. Add a value, a description of the value and also start/end date for the value (if you chose that setting in the configuration part).
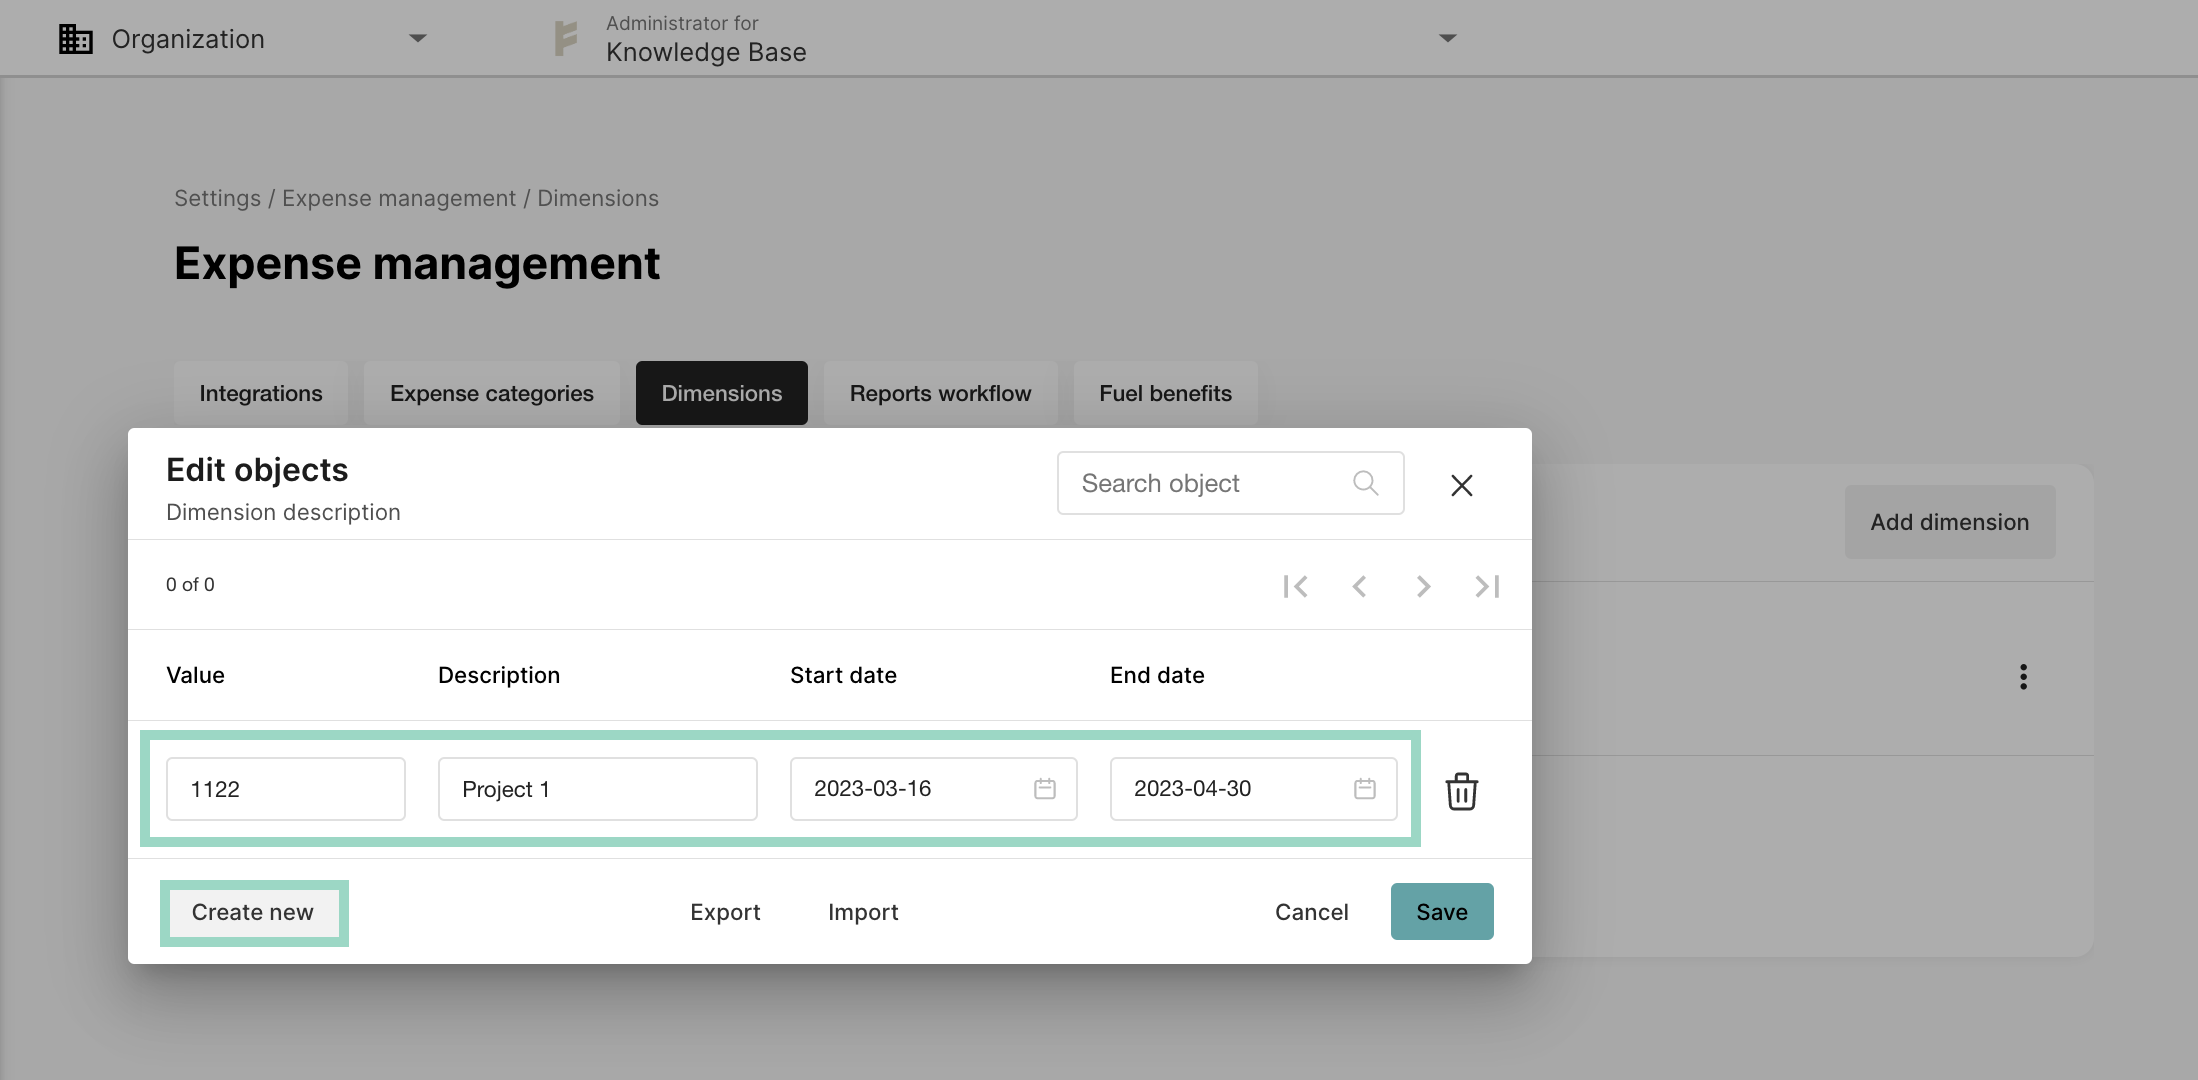
When you have added the value you can choose to add another value by clicking Create new again and a new row will appear for the next value. Otherwise, you press Save, to save the settings.
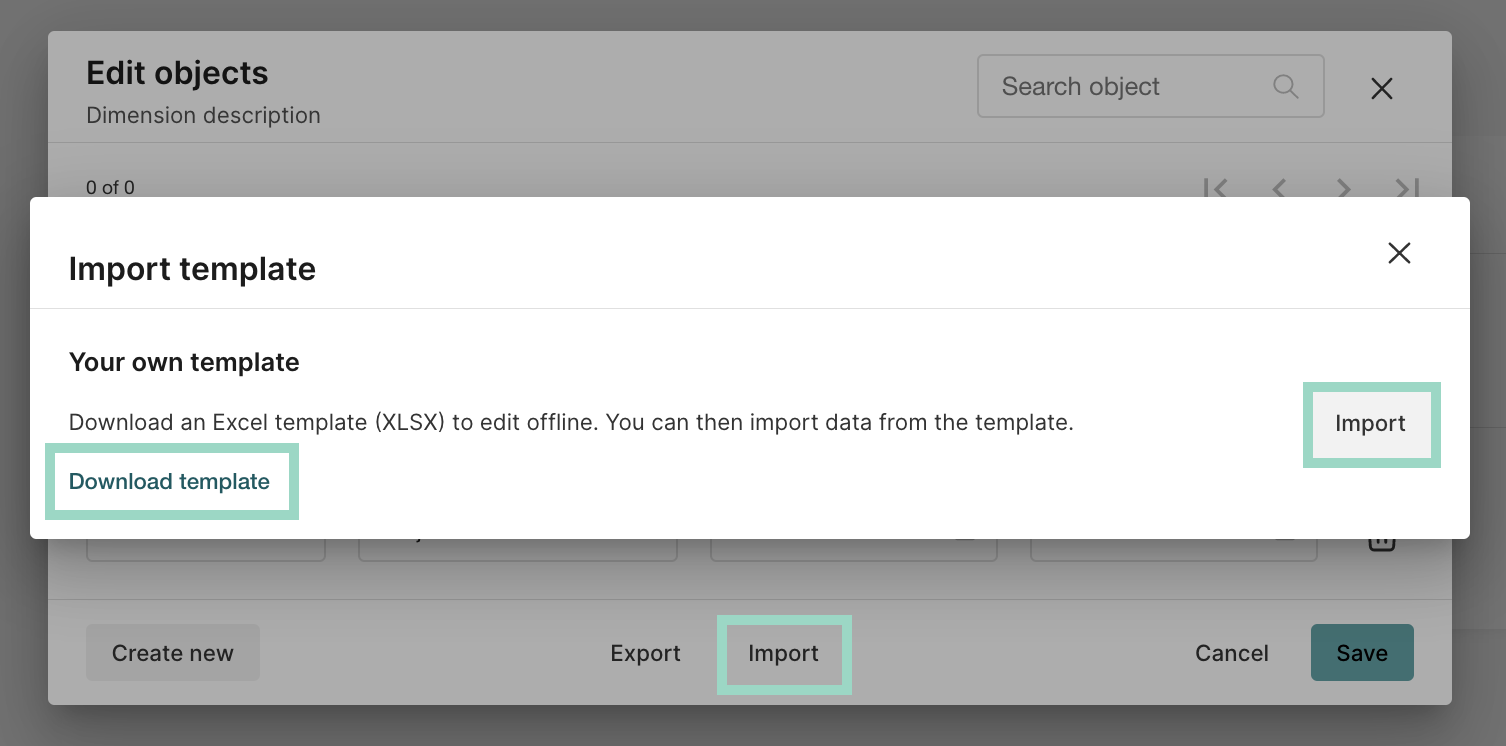
You can also choose Import, to import and download values from an Excel file. It's also possible to download a template for this.
How will the dimension be shown to the user?
In the example above we choose to have 2 values in the dimension and a searchable list for the user on expense level, and then the dimension will be shown as below:
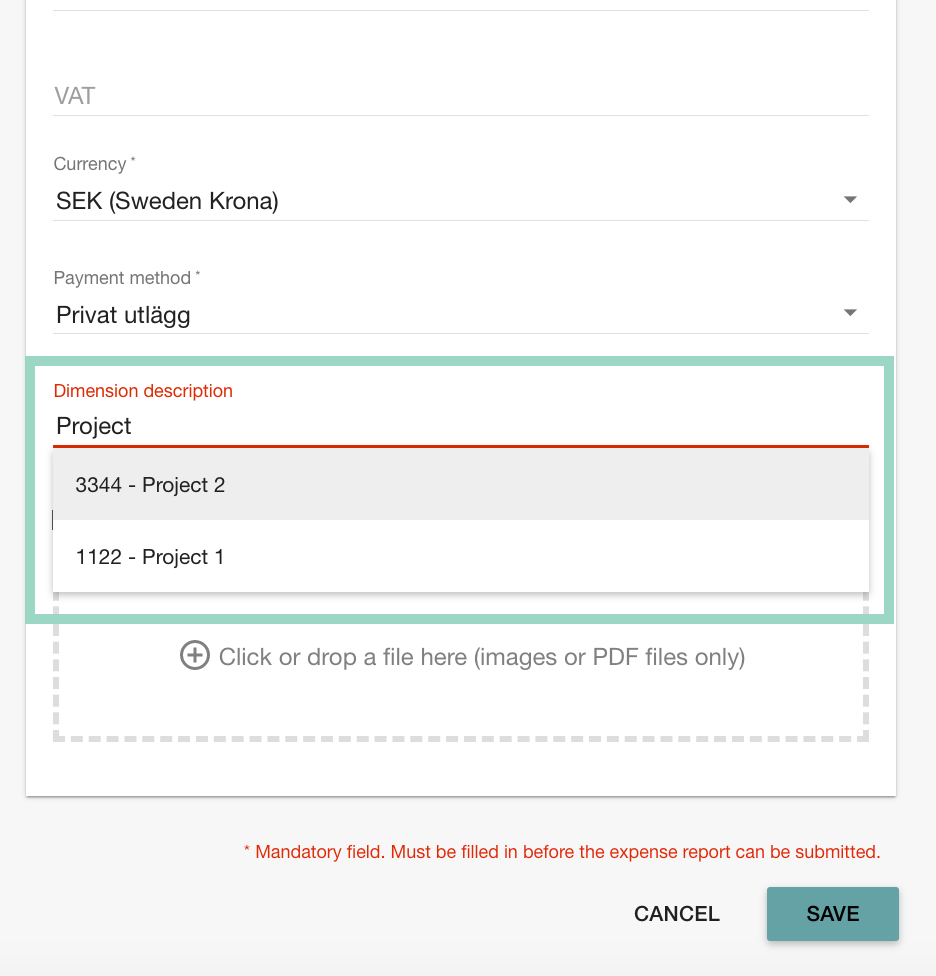
Here the user can both search for the value or the description and also look for it in the list.
Delete
Now you learned how to make basic settings for Dimensions, so we will continue on with some more advanced settings.
Handle dimensions in Edit more input fields
Edit more input fields
You can make more settings to your dimension if you go to Settings > Expense management > Expense categories and click on Edit more input fields. A new pop up window will open and here you will see a row for your dimension in either the different expense category tabs or in the tab for expense report (if you chose to link the dimension to report level). Make sure to add your settings to all the category tabs wanted.
Mandatory and visible dimension
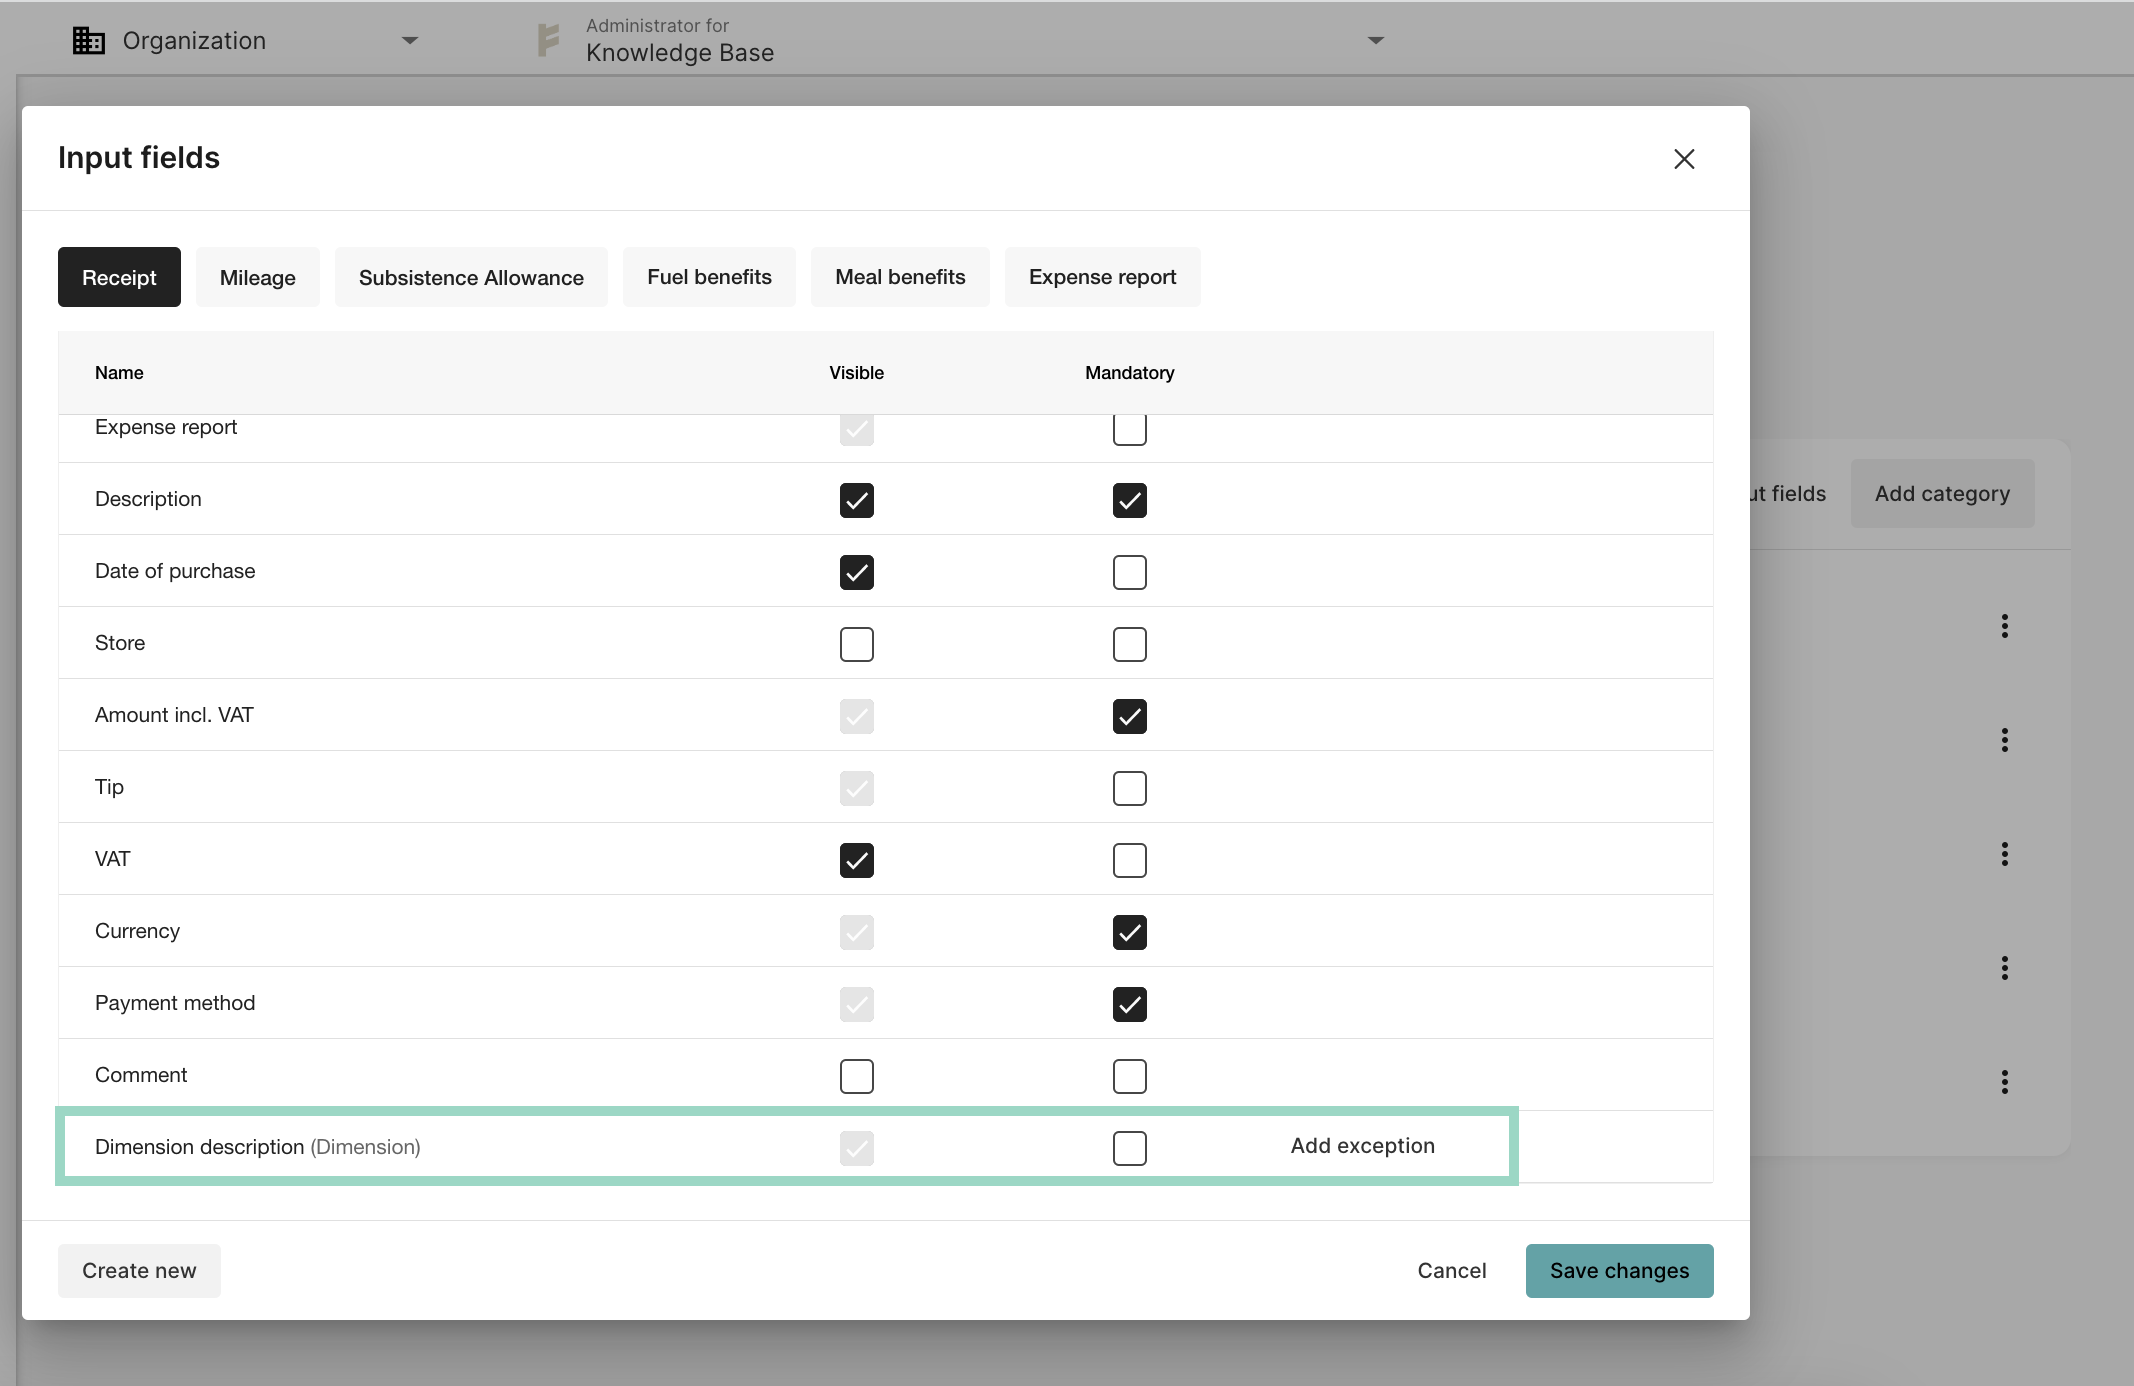
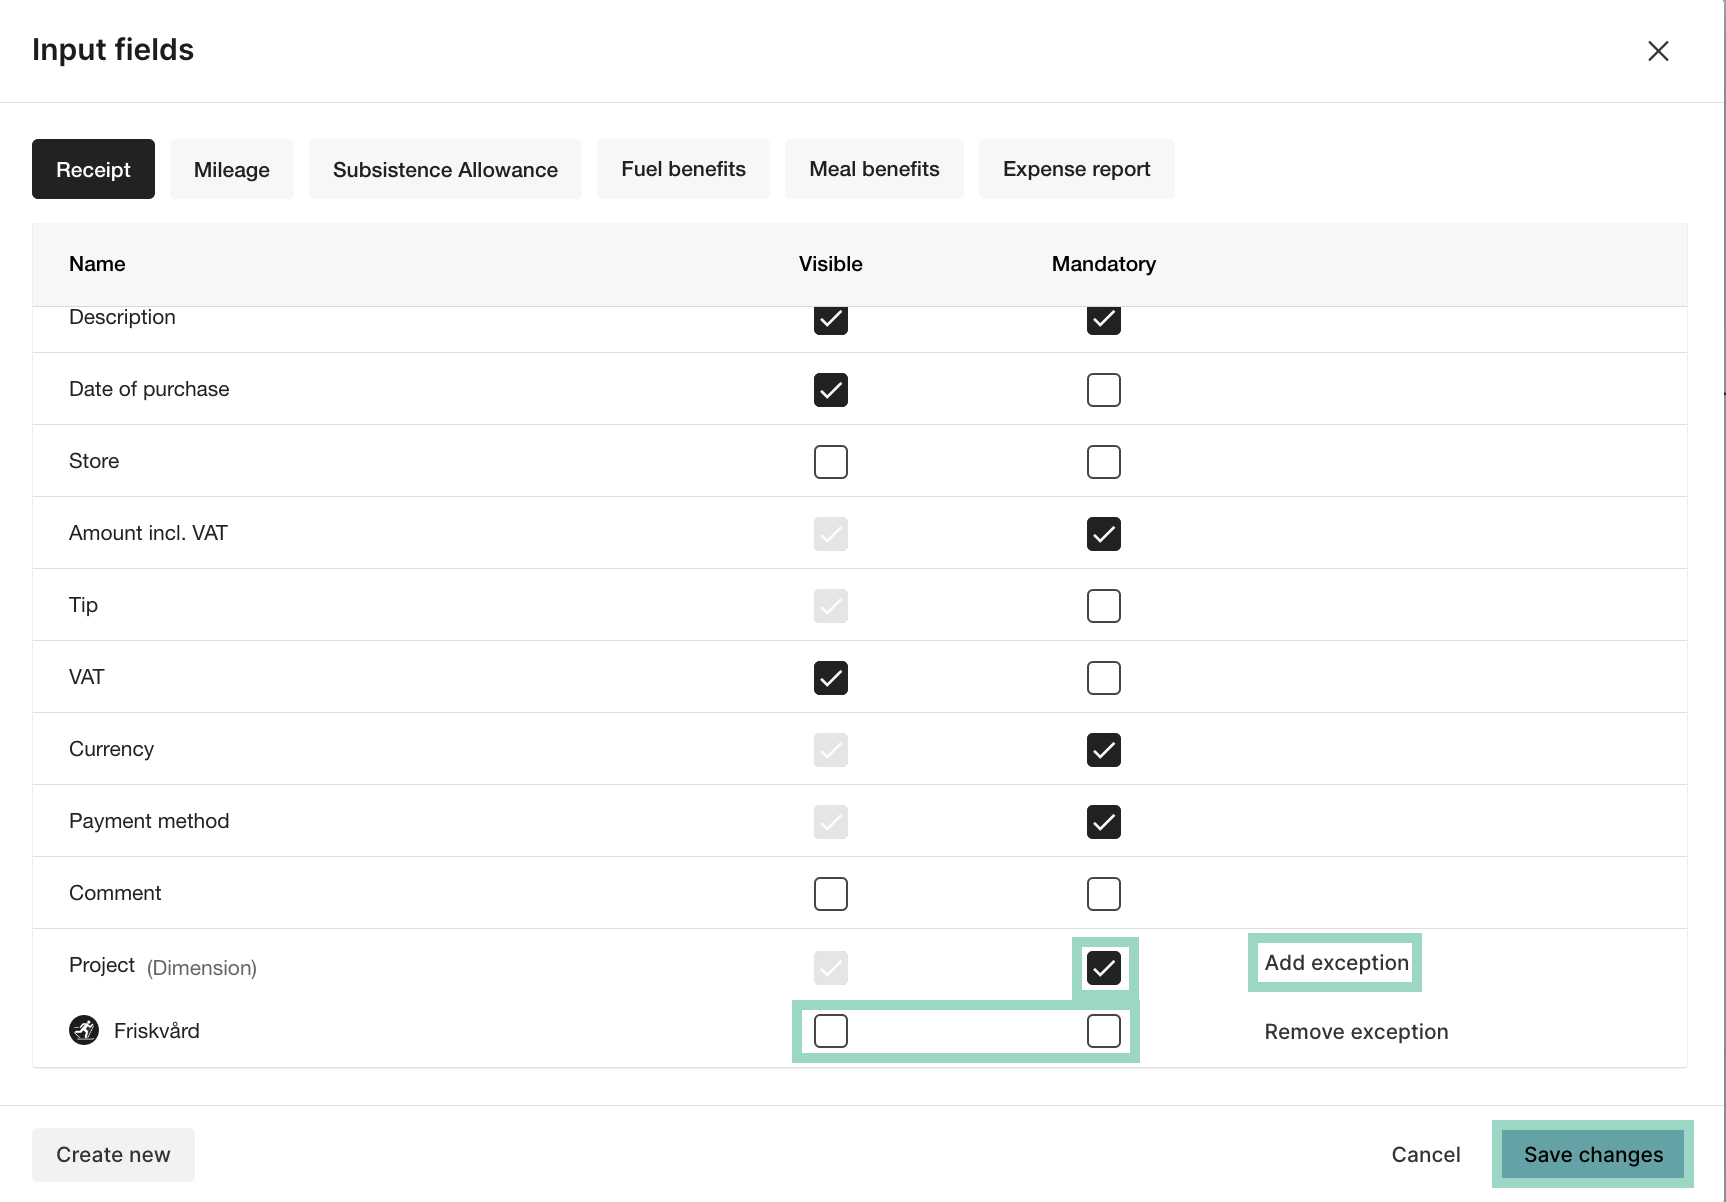
Here is where you can choose if the dimension should be mandatory or not for the user to add (in this case) on expense level, by ticking or un-tick in the box under Mandatory.
This Visible-box is not editable since the visibility for the user is chosen under the configuration for the dimension.
Here is also where you can Add exception for the dimension on expense categories. More about that further down.
Preset value and number of values to show
If you click on the name of your dimension a new pop-up window will open.
Here can choose to add the setting Preset users last selected value in new expense, which means that the last chosen value in the dimension will be preset when the users next expense. This setting is good if your users often are supposed to choose the same value but you don't want to have a default value on the user.
If you choose to tick in Show last selected options in top of list, you will also get the option to add Numbers of values to show in the top of list. Then the user will see the last selected chosen values in the top of the list of the dimension values and the chosen number controls how many values that should be shown in the list.
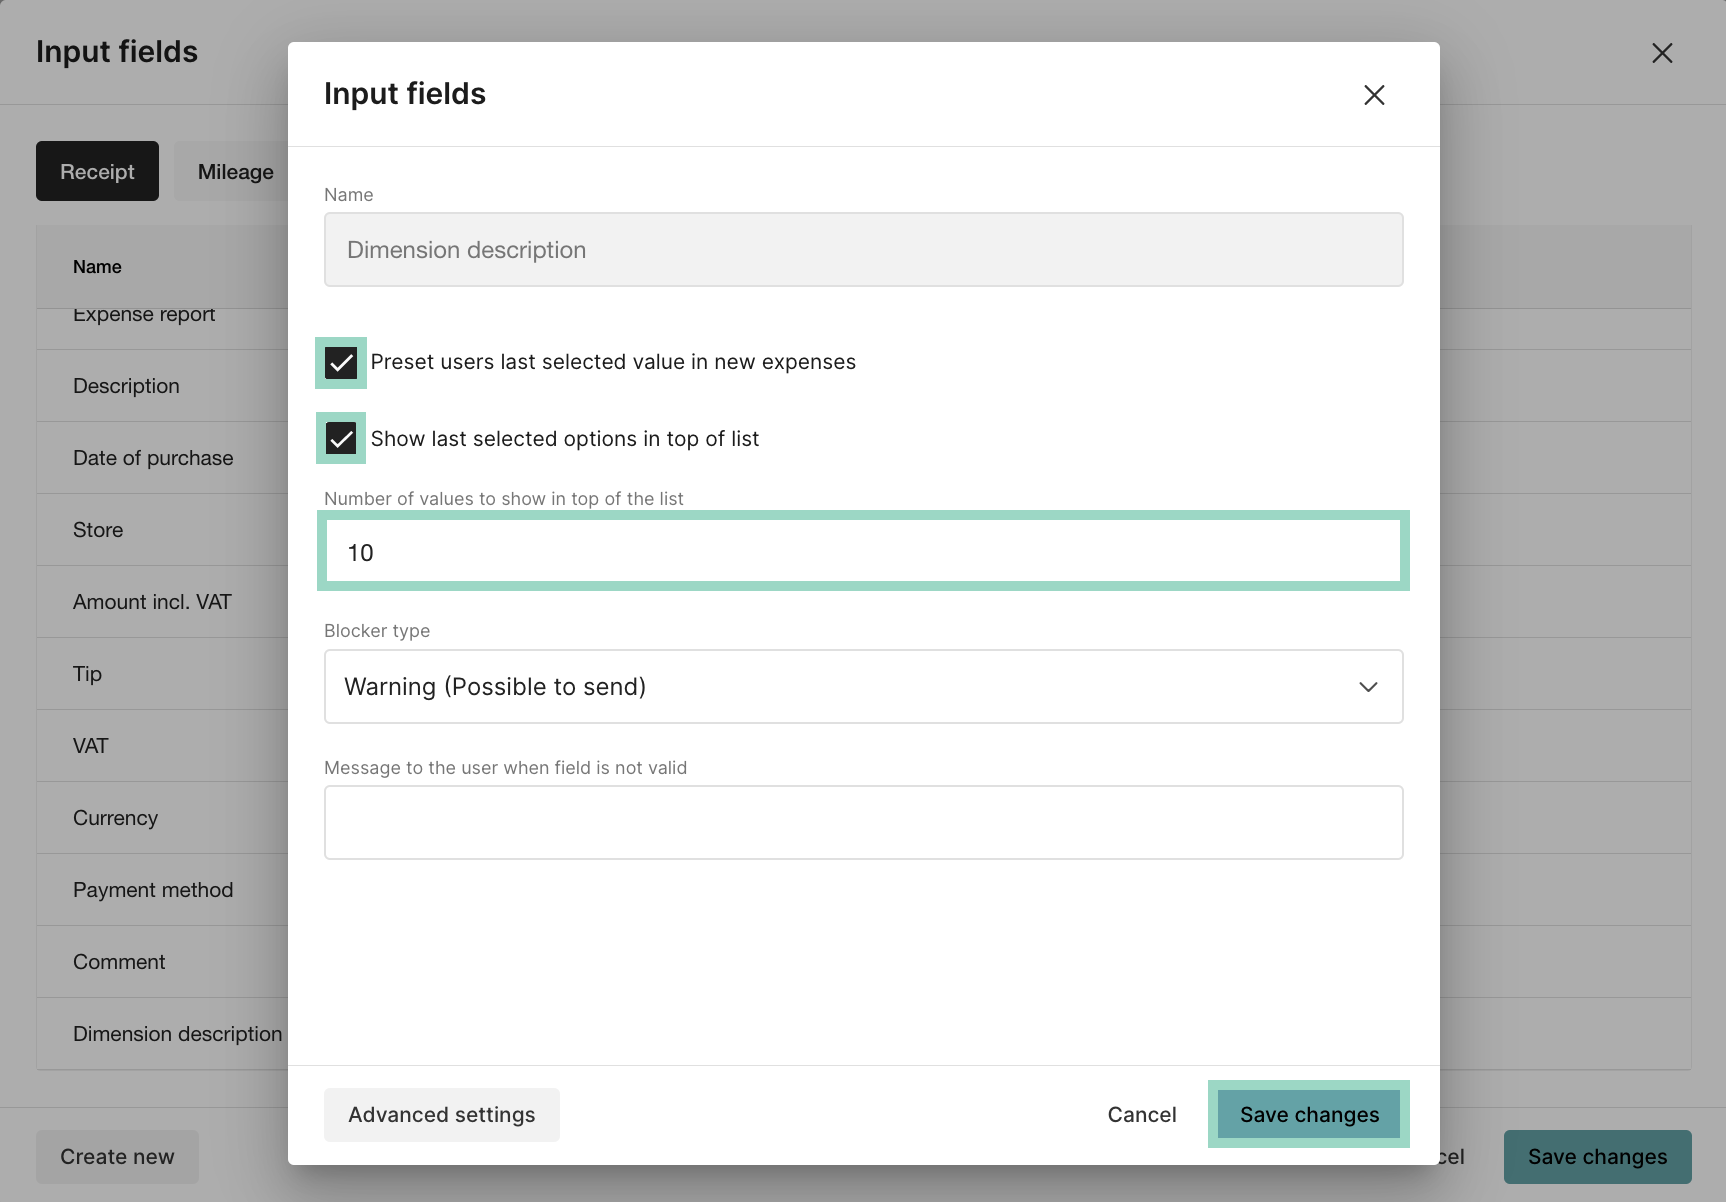
Save changes when you defined your settings.
Add exception
As mentioned further up in this article, you can click on Add exception. Hold your cursor over the field on the empty spot on the right-hand side and it will show.

A new window will open and here you can choose to select an expense category that you want to add an exception to. Click on the expense category and it will appear under the dimension in the main window:
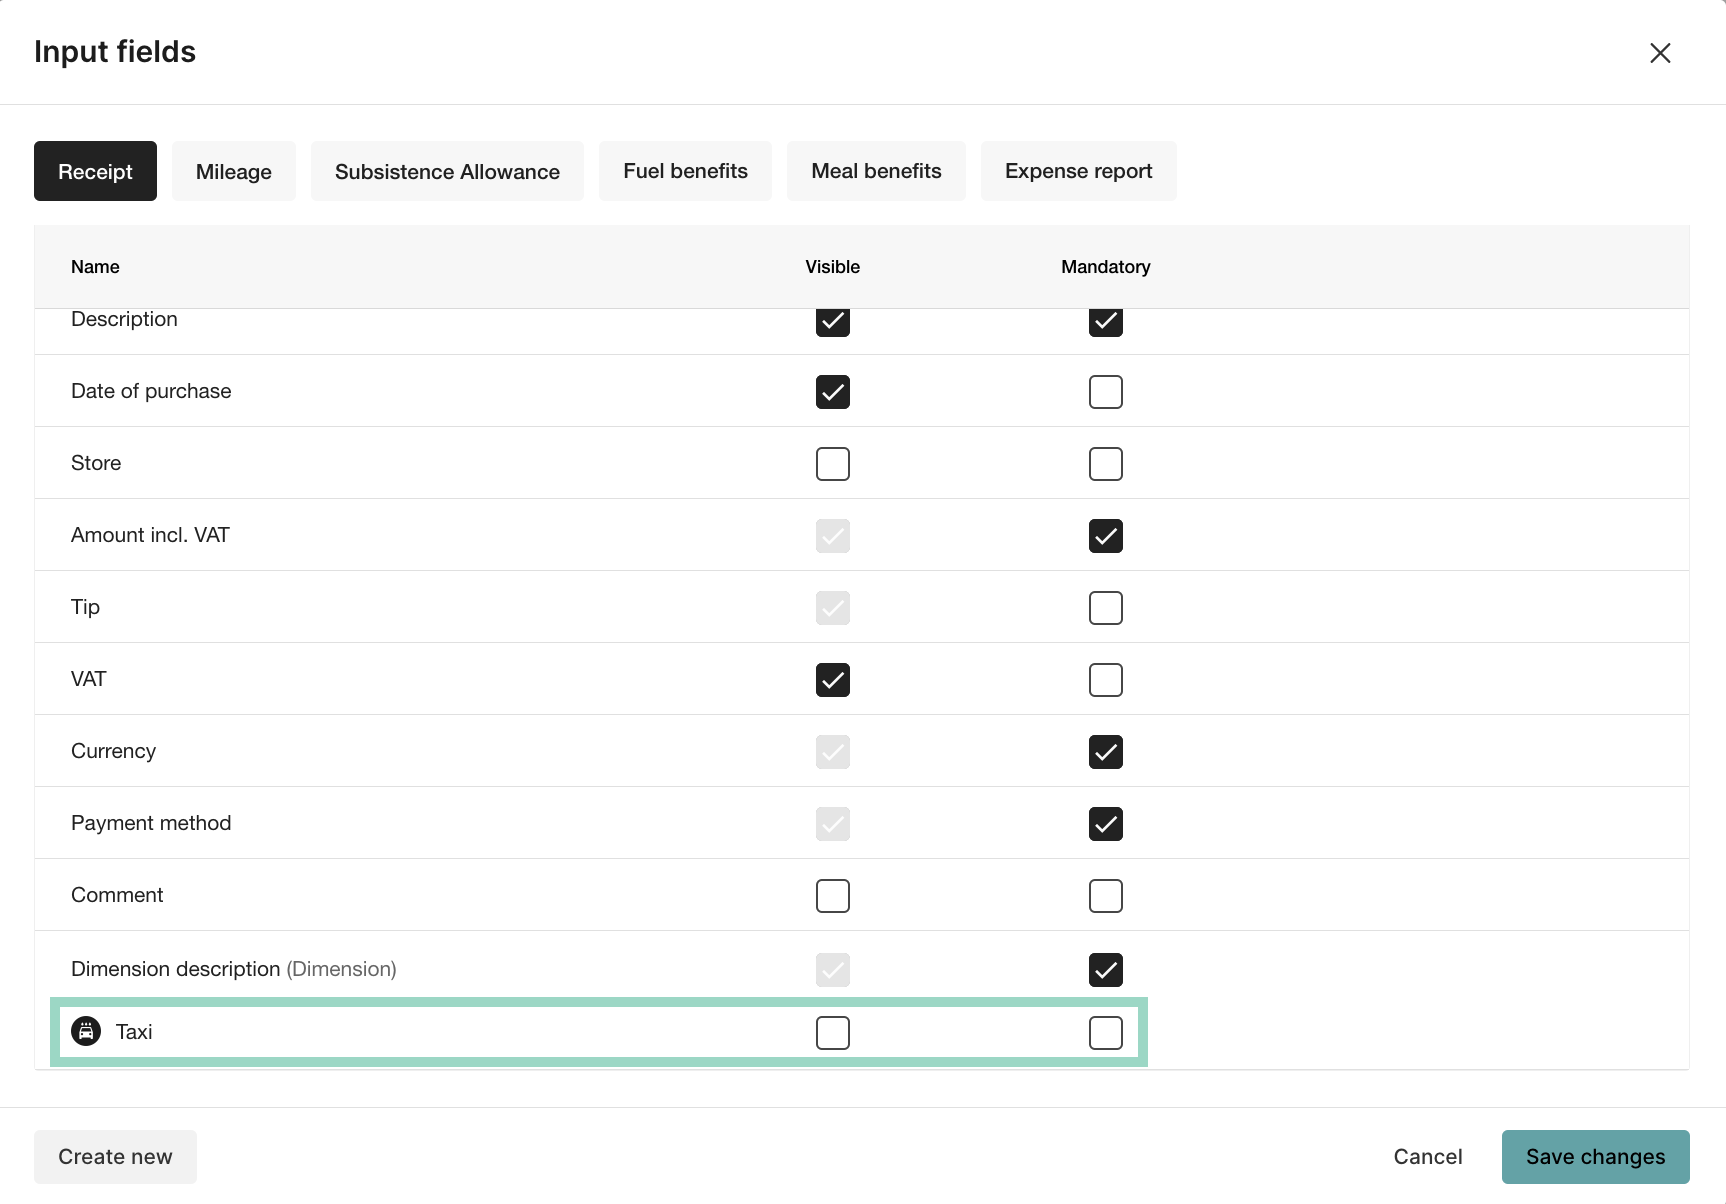
In this case above, we choose to make the dimension mandatory on all expense categories except for Taxi. We don't want the dimension to be visible nor mandatory for expenses where you choose Taxi as expense category.
You can add as many exceptions as you want.
DeleteDimension settings for report recipient
Settings for dimensions in the report recipient
How you make settings for how your dimension should be presented in the outputs depends on your chosen report recipient. We will give some examples here below for some different types of report recipients and how it works for each one. If you have questions about how to handle dimensions in the outputs for your specific integration, please contact Customer support.
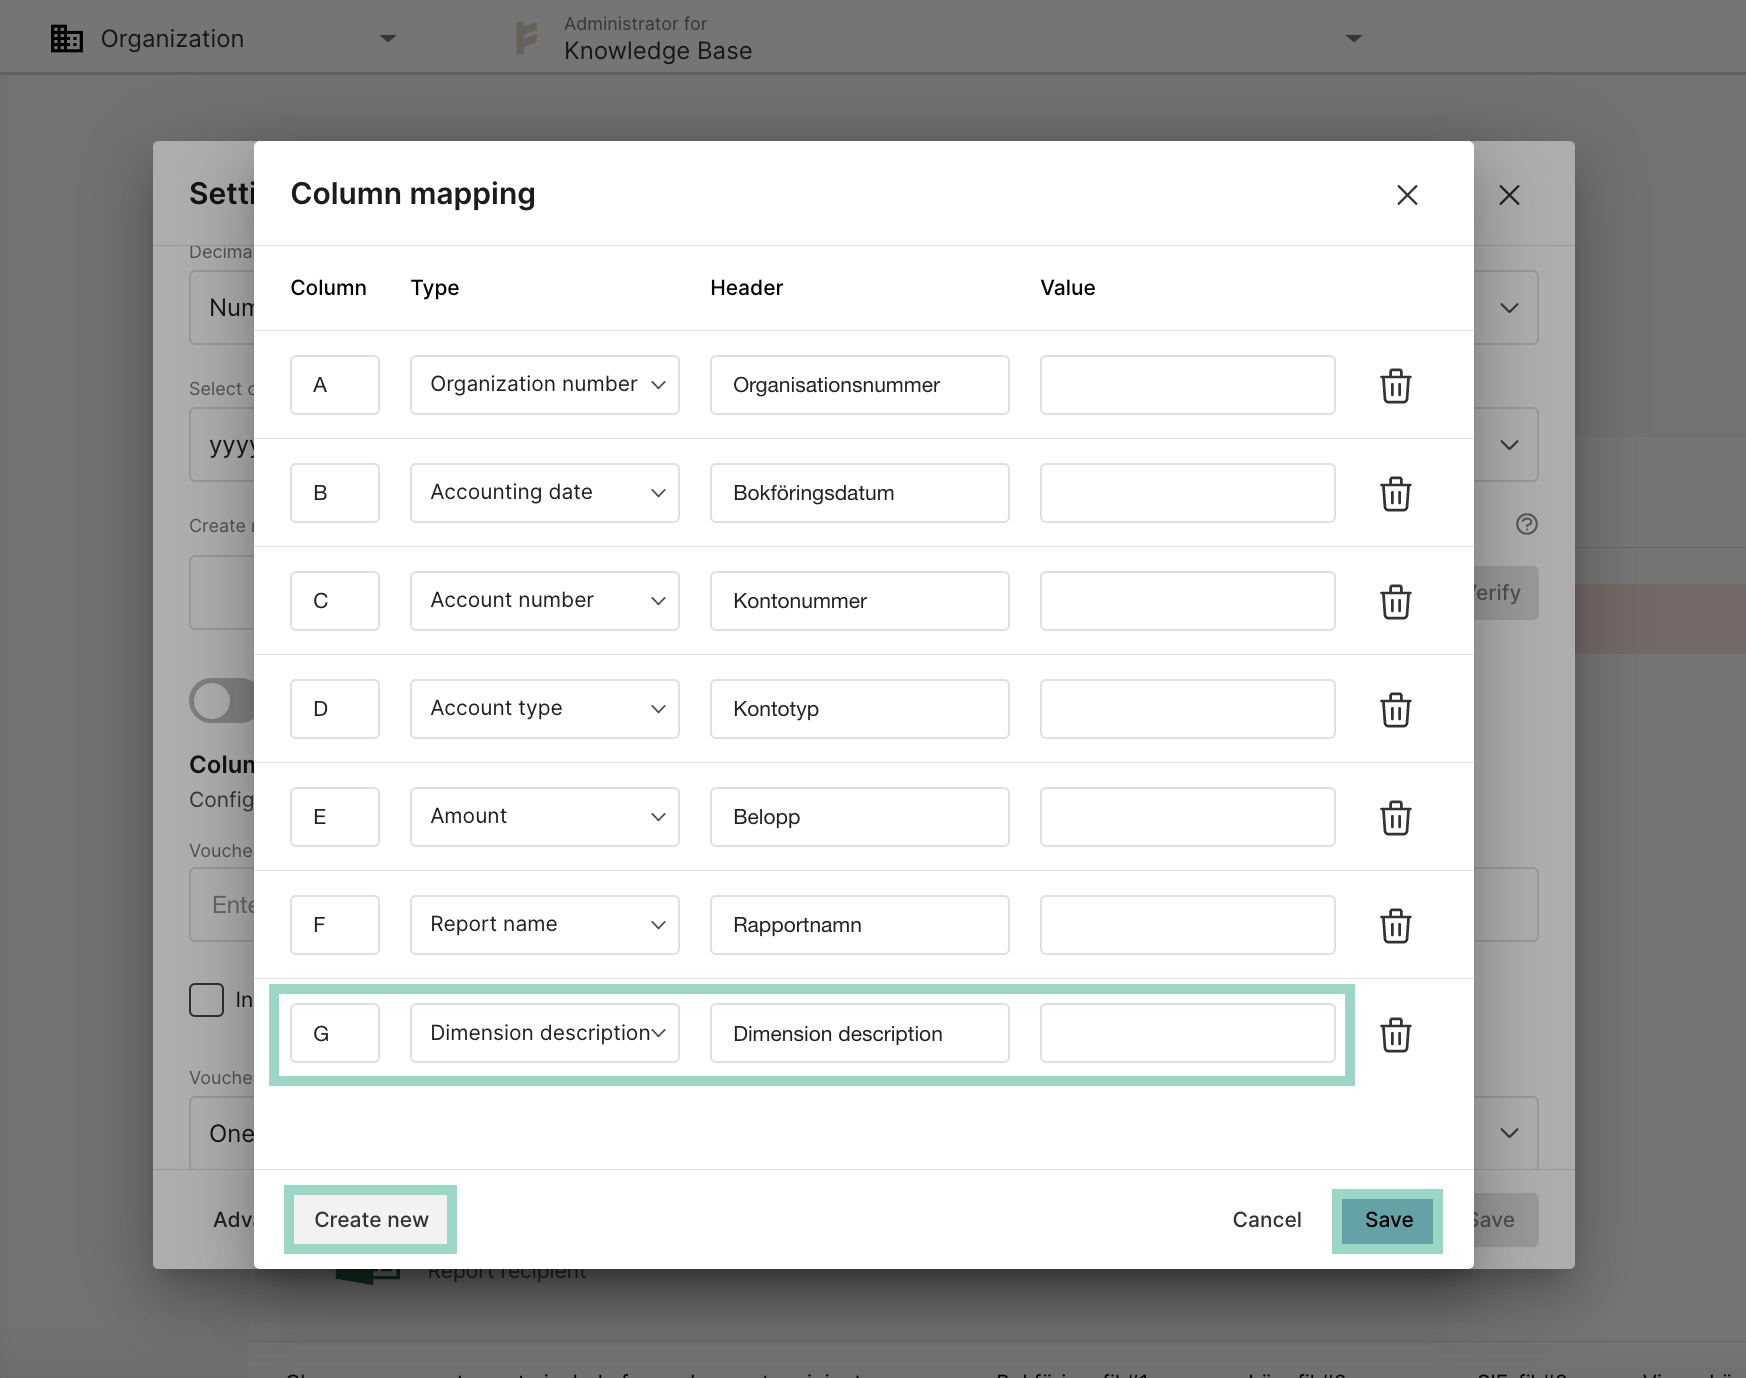
Excel - For the Excel recipient you will have so-called "Column mapping". In this case, you will have to go to Settings > Expense management > Integrations and click on the Excel integration and scroll down and click on Column mapping.
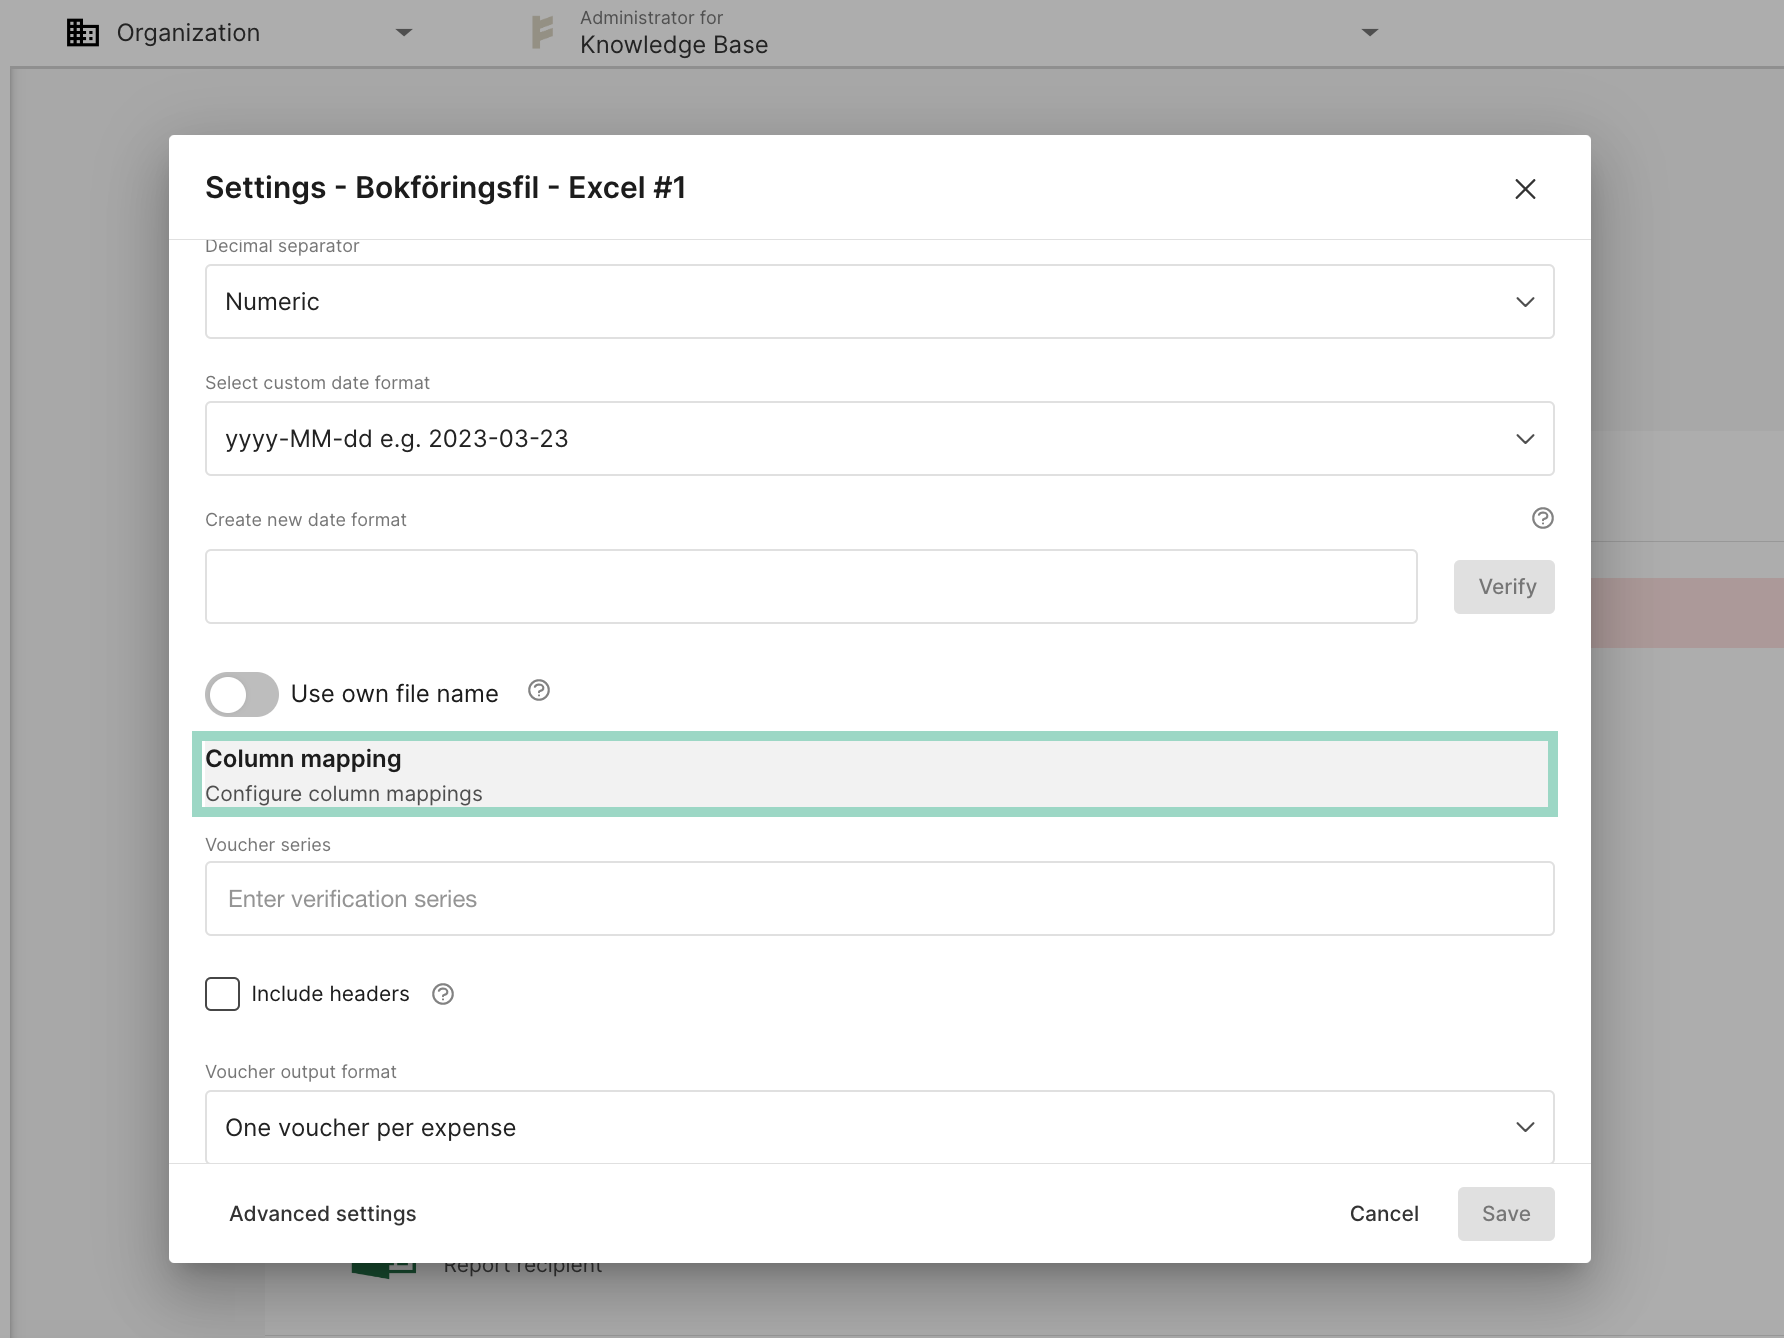
Here you will have to add the dimension to the Excel file as a column. Click on Create new and choose the following:
- Column - Under which column letter you want to add the dimension to.
- Type - Here you choose the dimension that you have created (the name of the dimension will be shown)
-
Header - What headline you want for the dimension (will be shown under the chosen column letter)
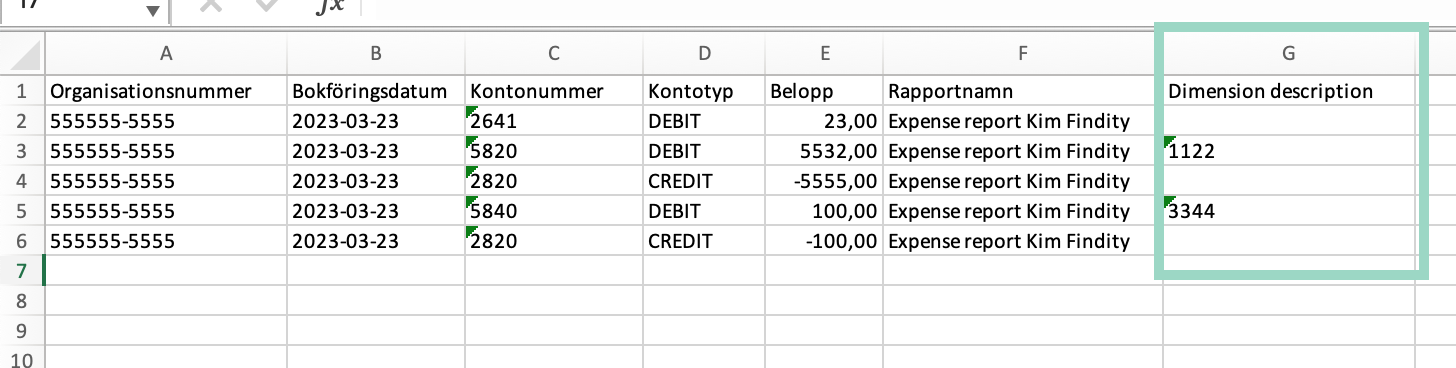
Now the dimension will be presented as follows in the Excel file:
TLU file/SIE File/Visma Agda/Fortnox - If you have any of these types of report recipients you need to configure how this dimension will be mapped in report recipient outputs under Edit configuration in the Dimensions tab.
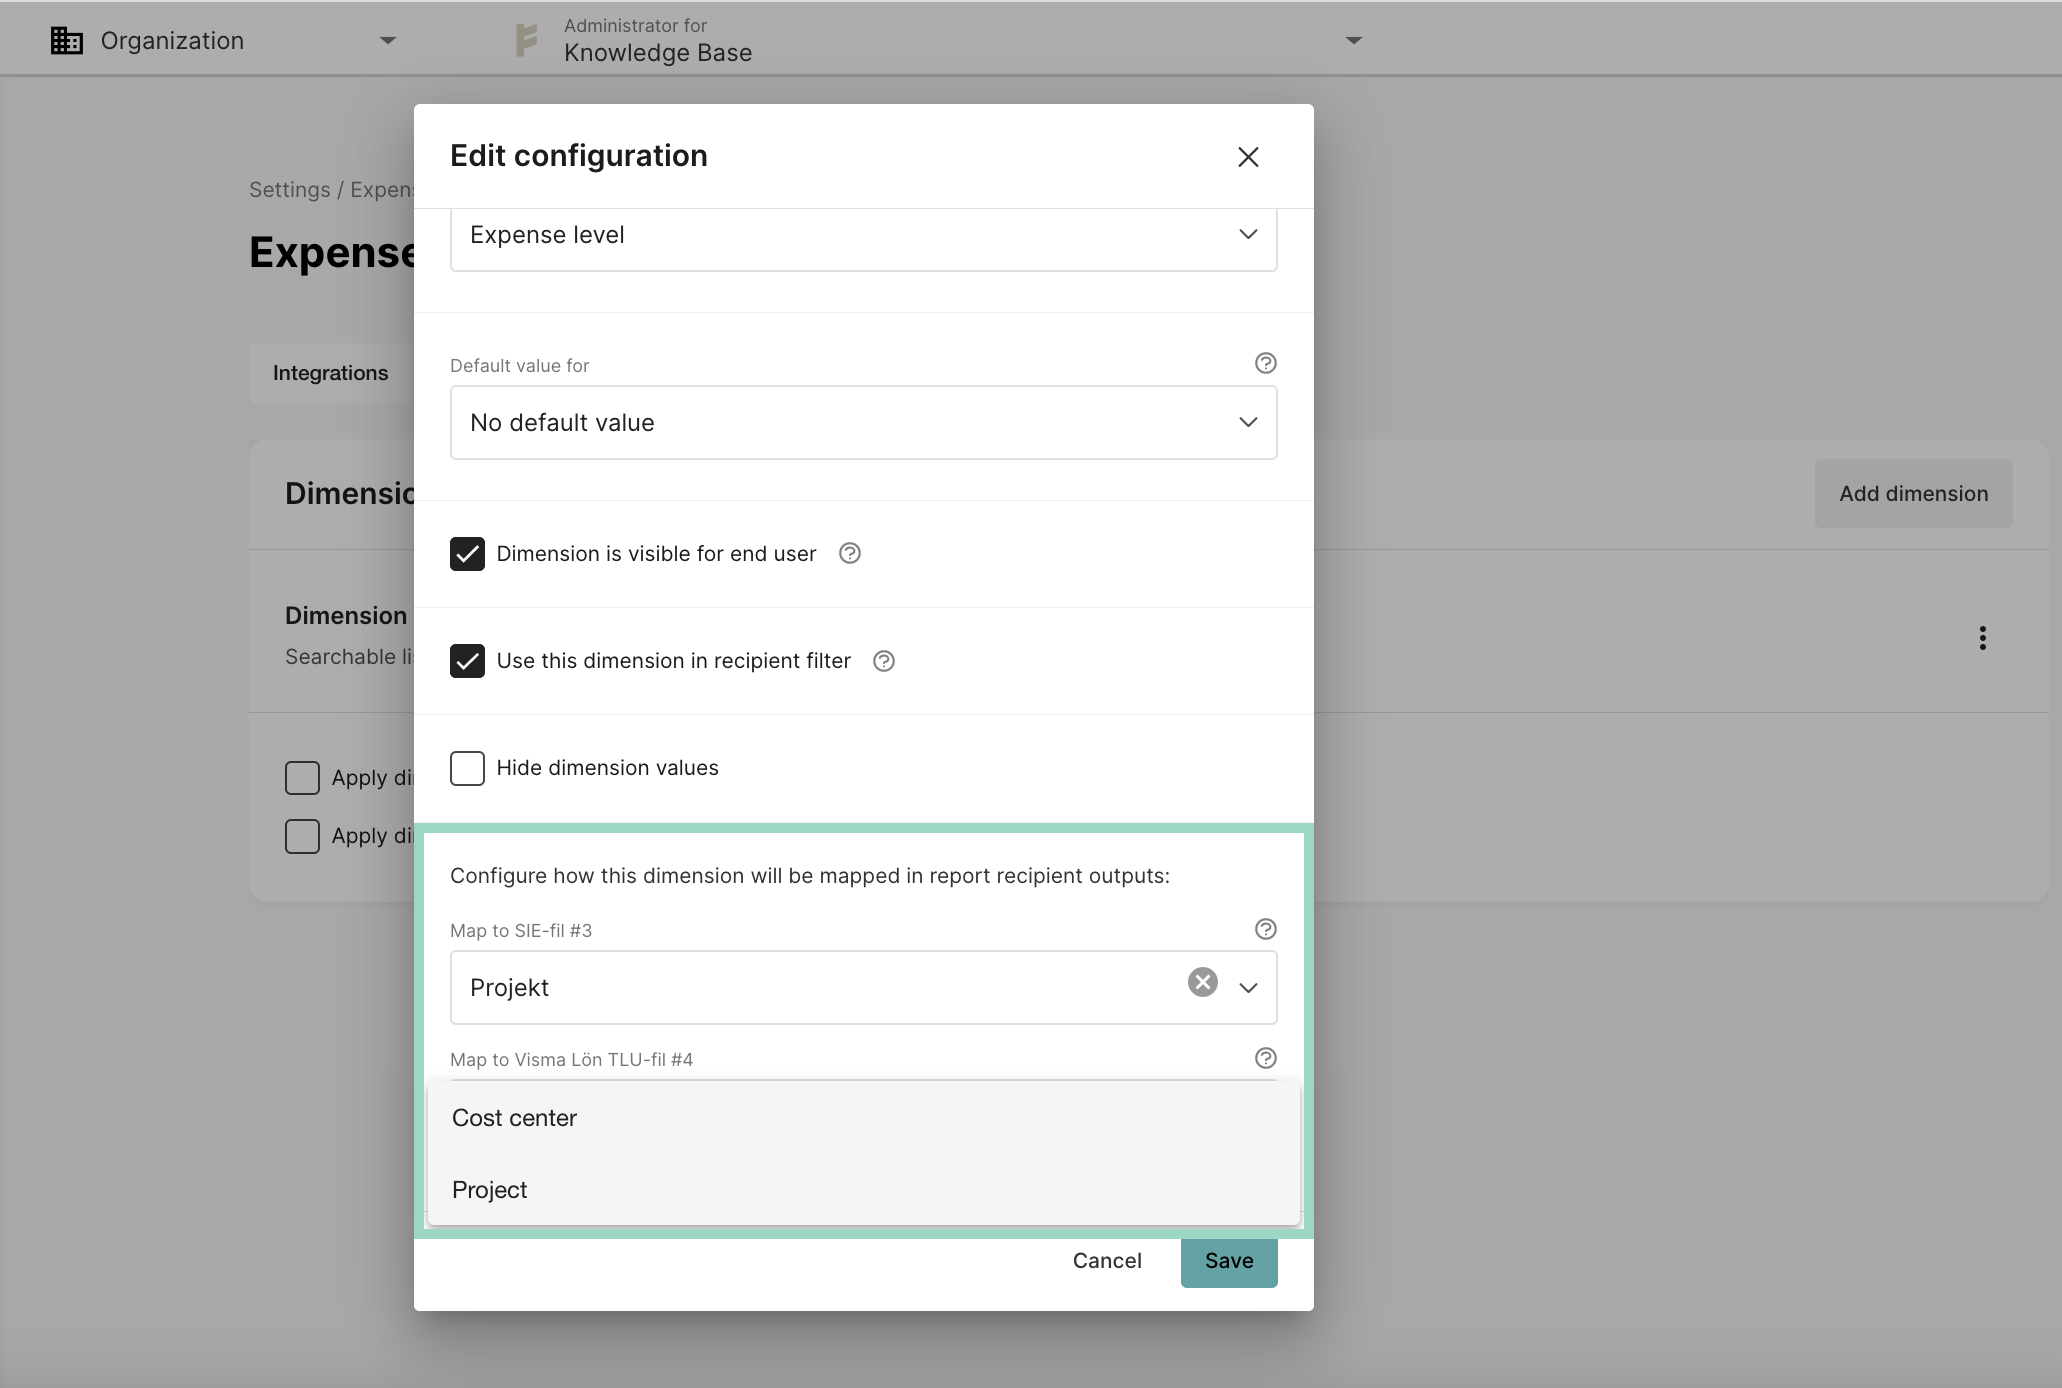
This determined where in the output file the dimension value should end up. Enter the field to which it will be mapped.
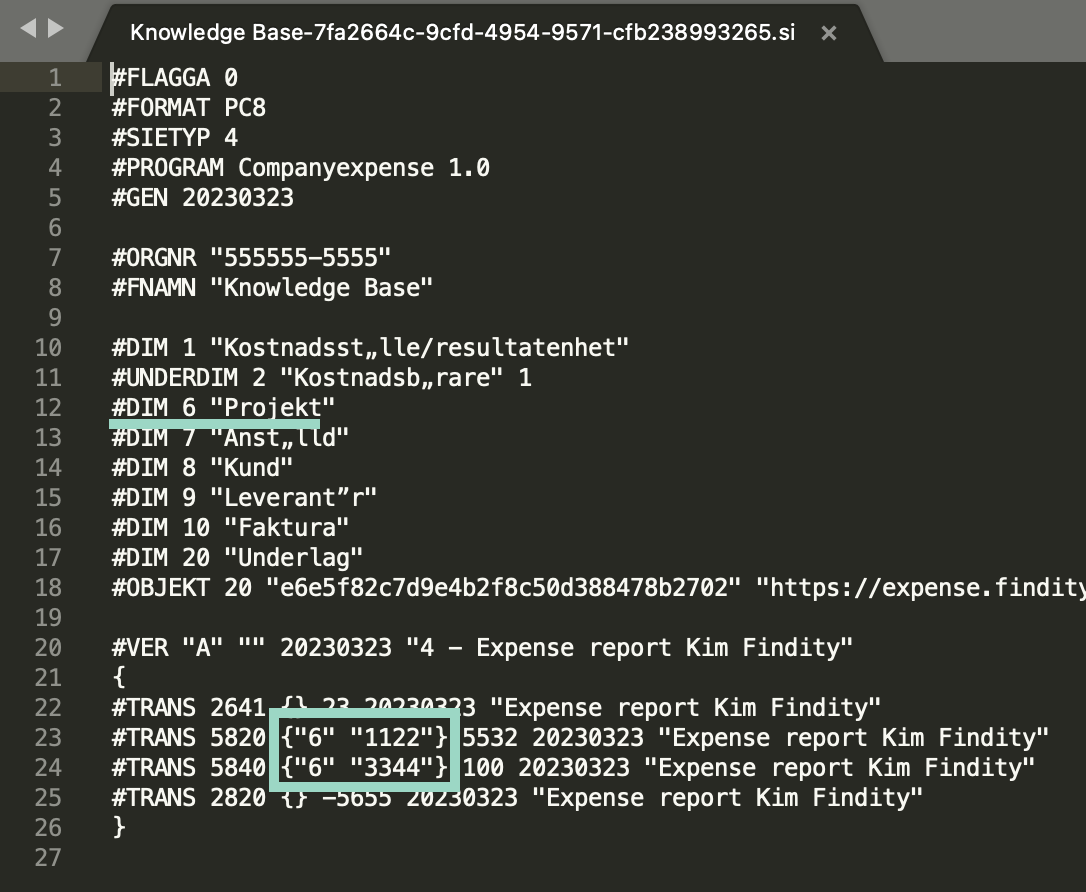
See example from a SIE file:
In the SIE file Integration settings, you can also add more dimension fields under Advanced settings if needed.
Separate file for expenses with dimension
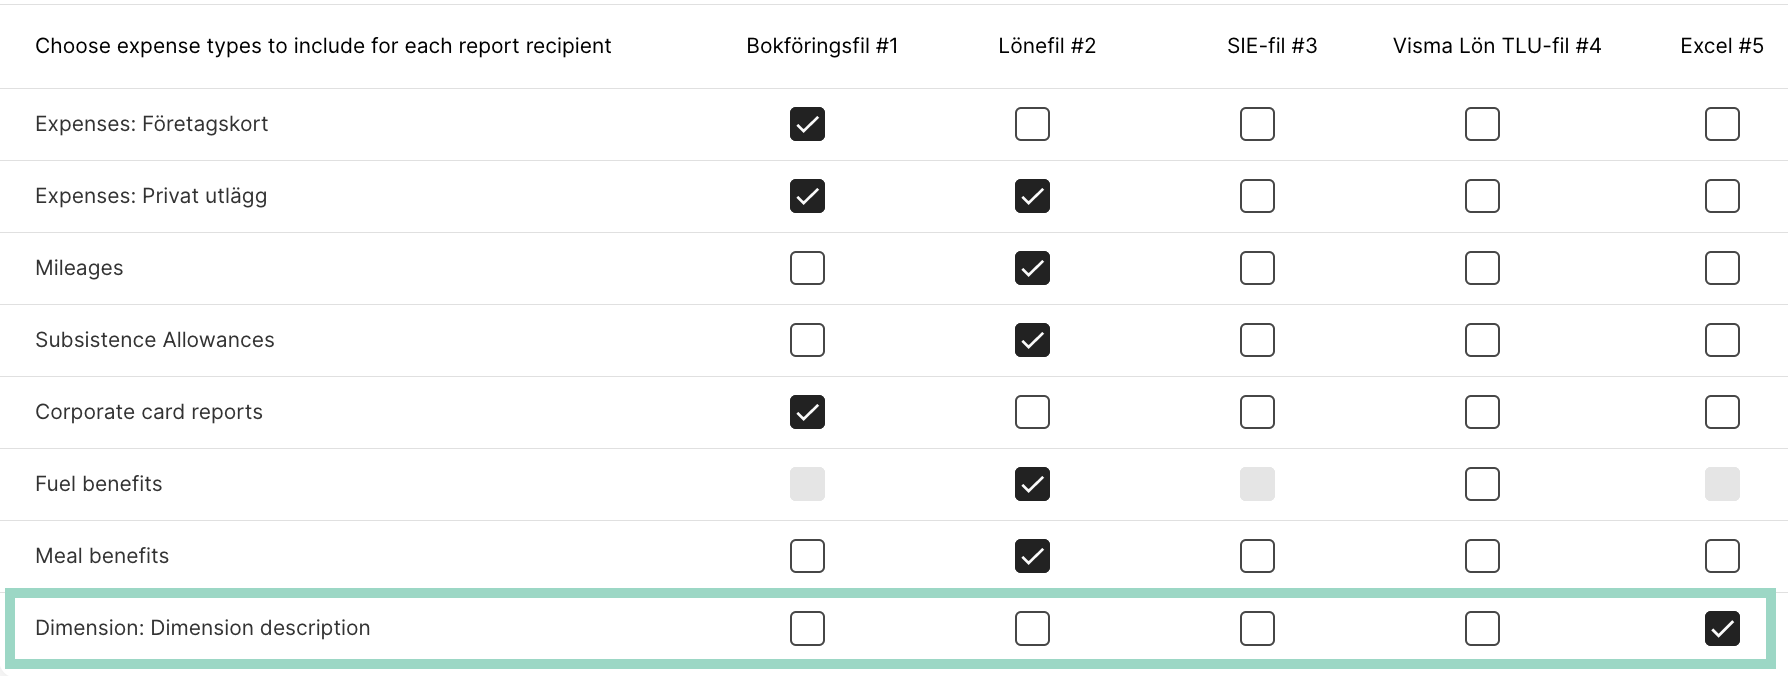
In case you want only expenses with the dimension to be sent to, for example, one specific recipient, you will have to choose where you want to include the dimension under Settings > Expense management > Integrations and Choose expense types to include for each report recipient.
In this example below we only want expenses that include the dimension "Dimension description" to be sent to the Excel #5 recipient.
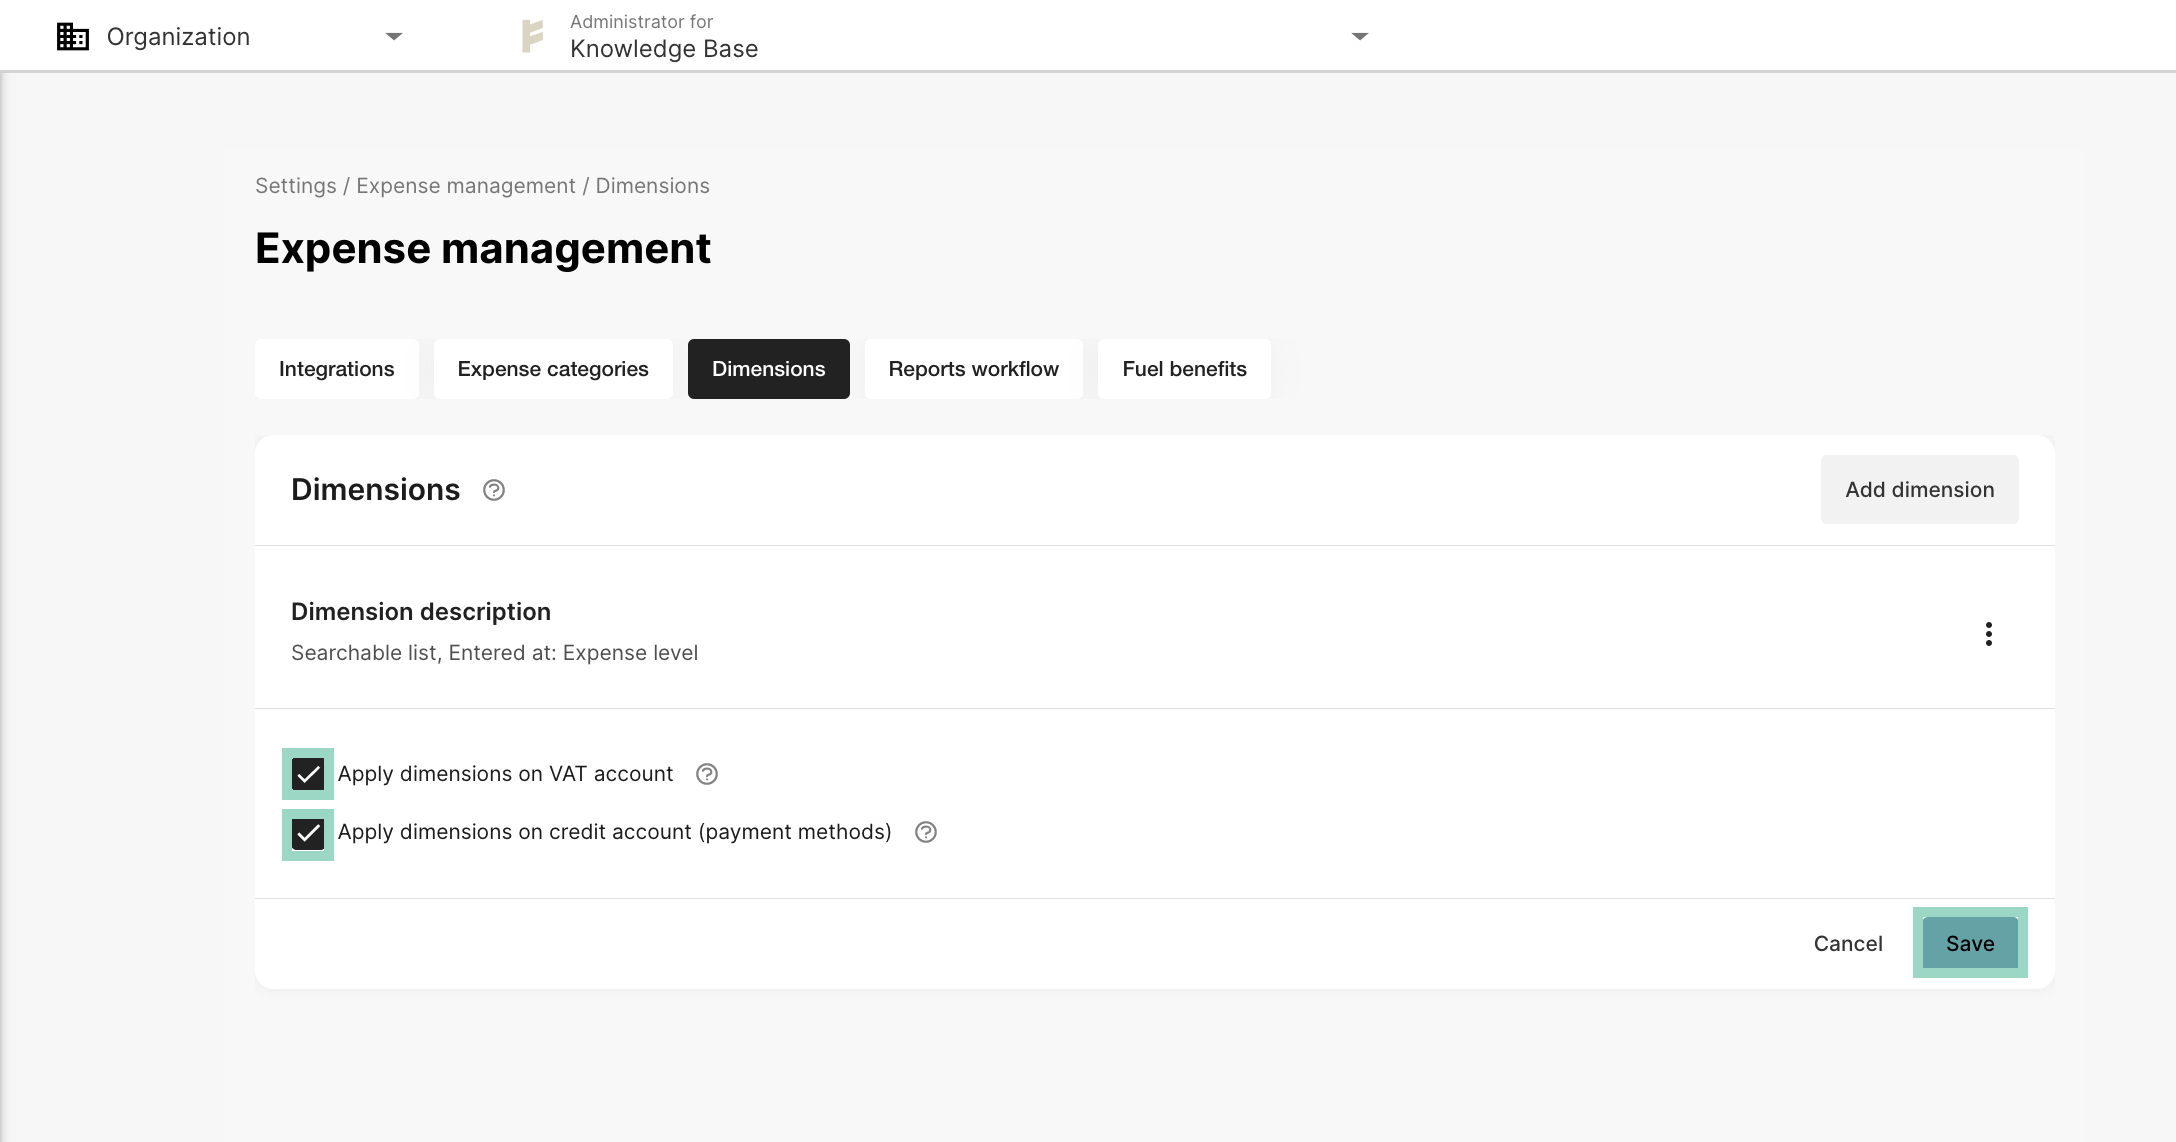
Apply dimensions on VAT and credit account
You can choose to apply the dimensions chosen on the expenses on both VAT and credit account if wanted. Then you have to tick in the boxes for this under Settings > Expense management > Dimensions. Then Save the new settings.
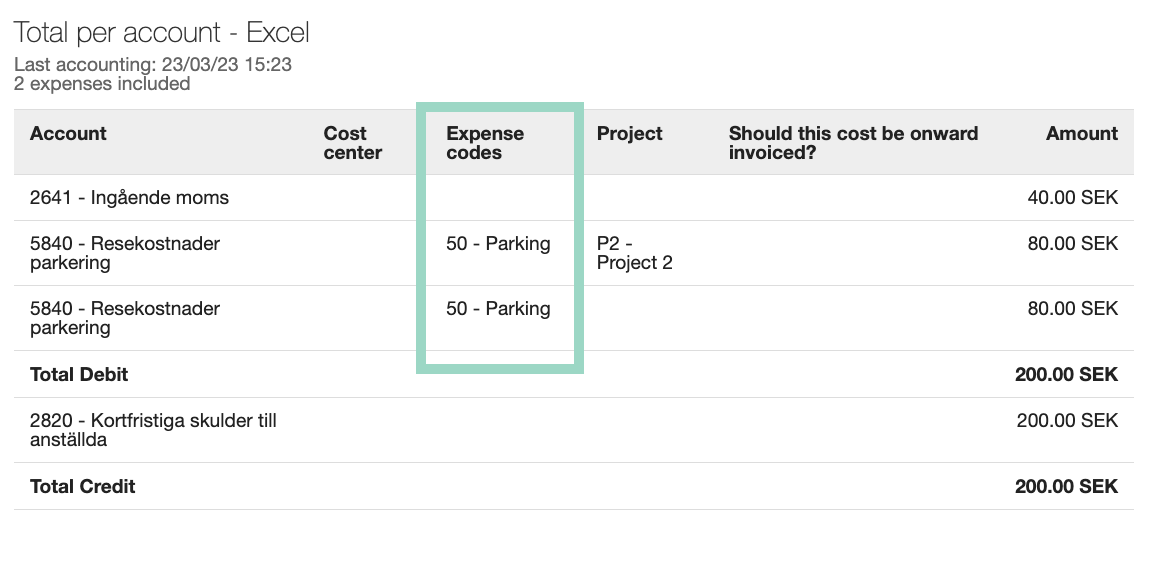
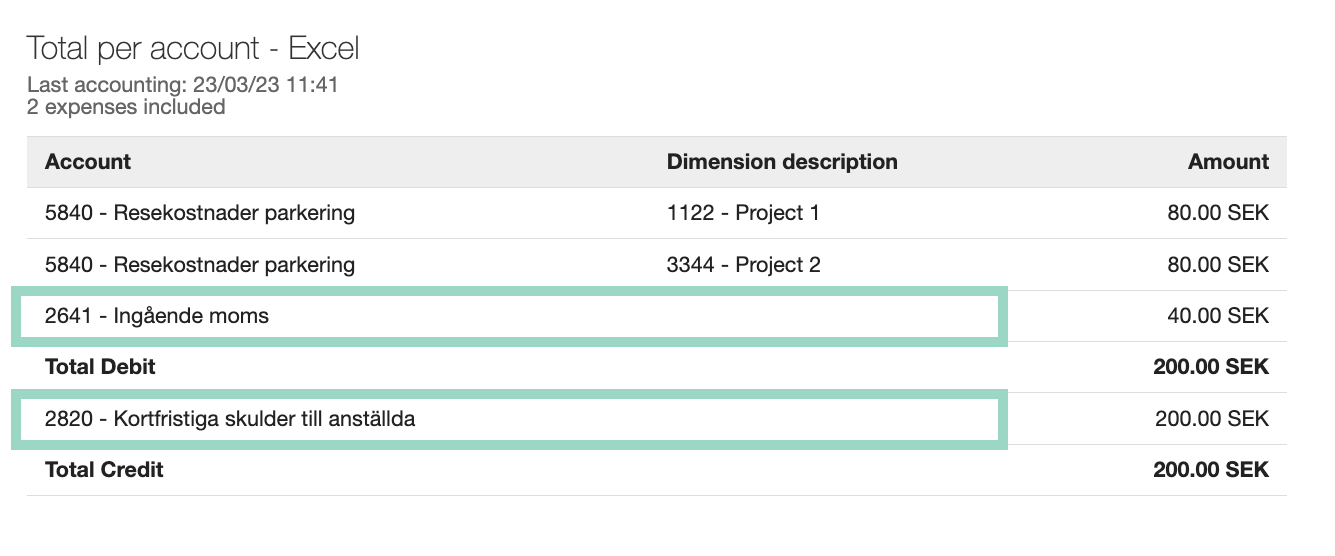
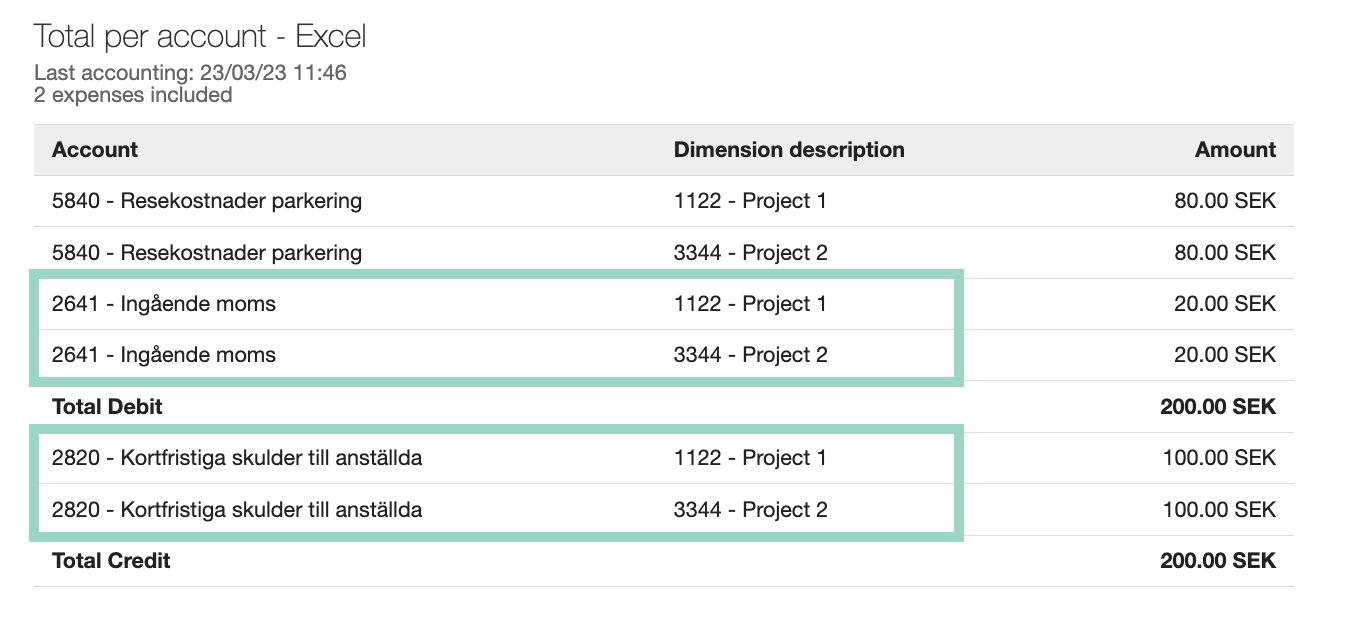
Now the dimension will show in the accounting part in the report in the VAT and Credit account fields.
Accounting before adding settings:
Accounting after adding settings:
The following part will show examples of how you can customize dimensions with the different settings you just learned. Click on the tabs below, to read about some different scenarios and how you can do the setup for each dimension type.
Cost center
In this scenario we have the following requirements:
- Preset value on department (user can change preset value)
- List as type
- Report level
- Not mandatory
- Visible for user
In the configuration we choose the following settings:
We add the following values:

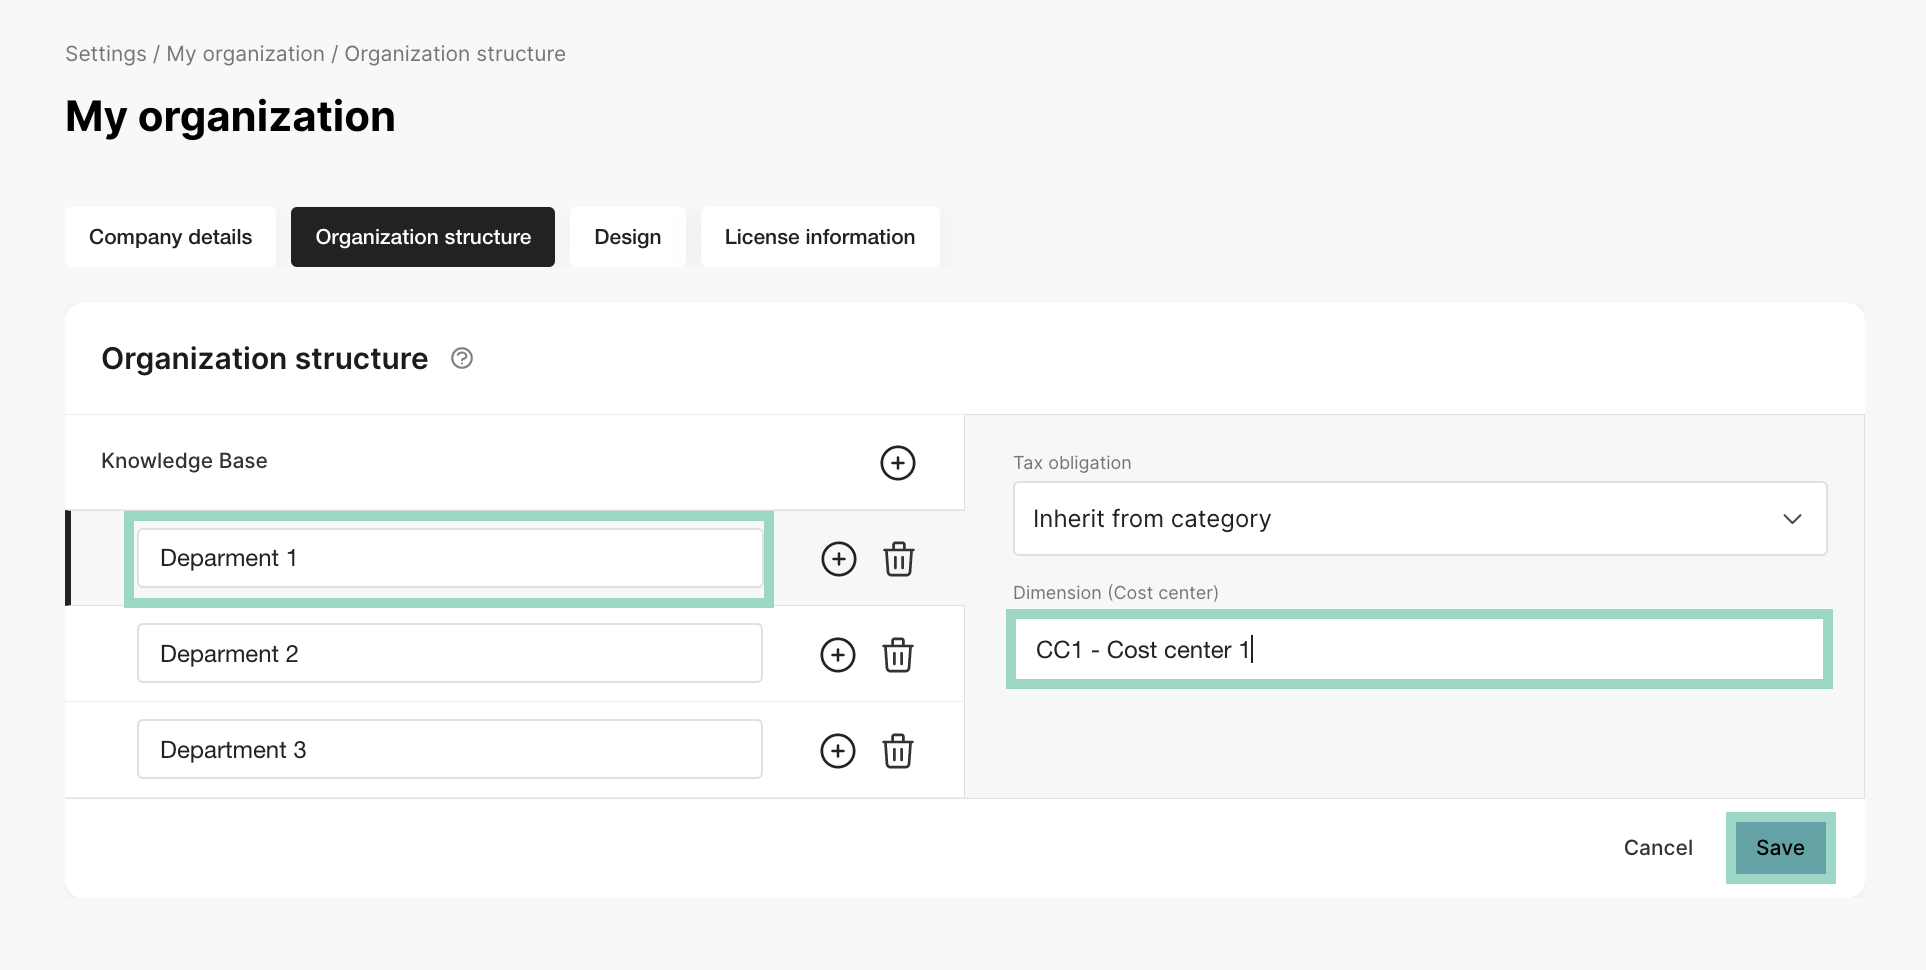
Since we chose to have the default value on the department we have to go to Settings > My organization > Organization structure to add the dimension to the department.
Click on the department and choose the value you want to add to the department and click on Save. Repeat on every department you want to add a value to.
You also have to make sure that you have added departments in the user settings under Users.
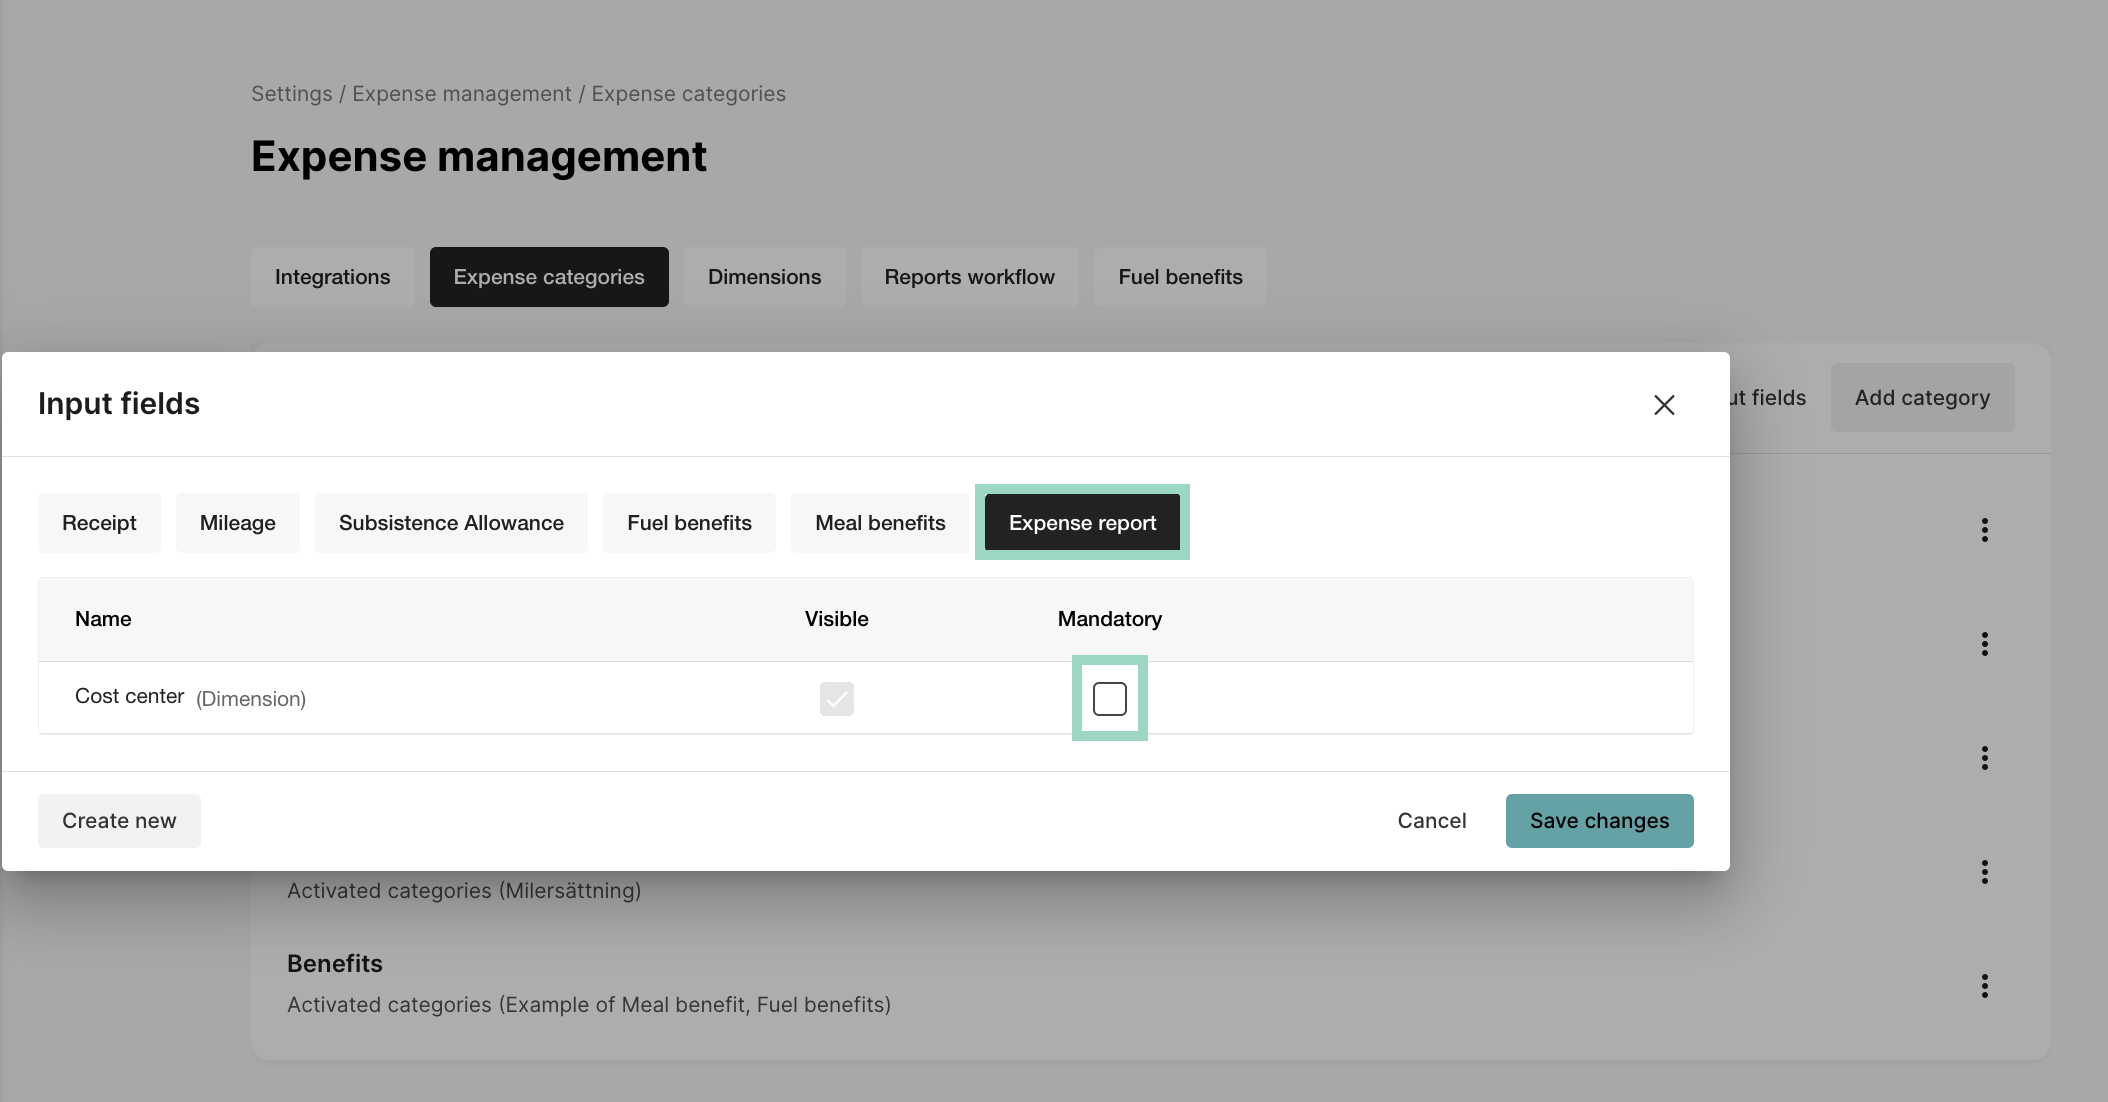
Let's also check that the settings under Edit more input fields are correct. As we don't want the dimension to be mandatory, the setting's correct.
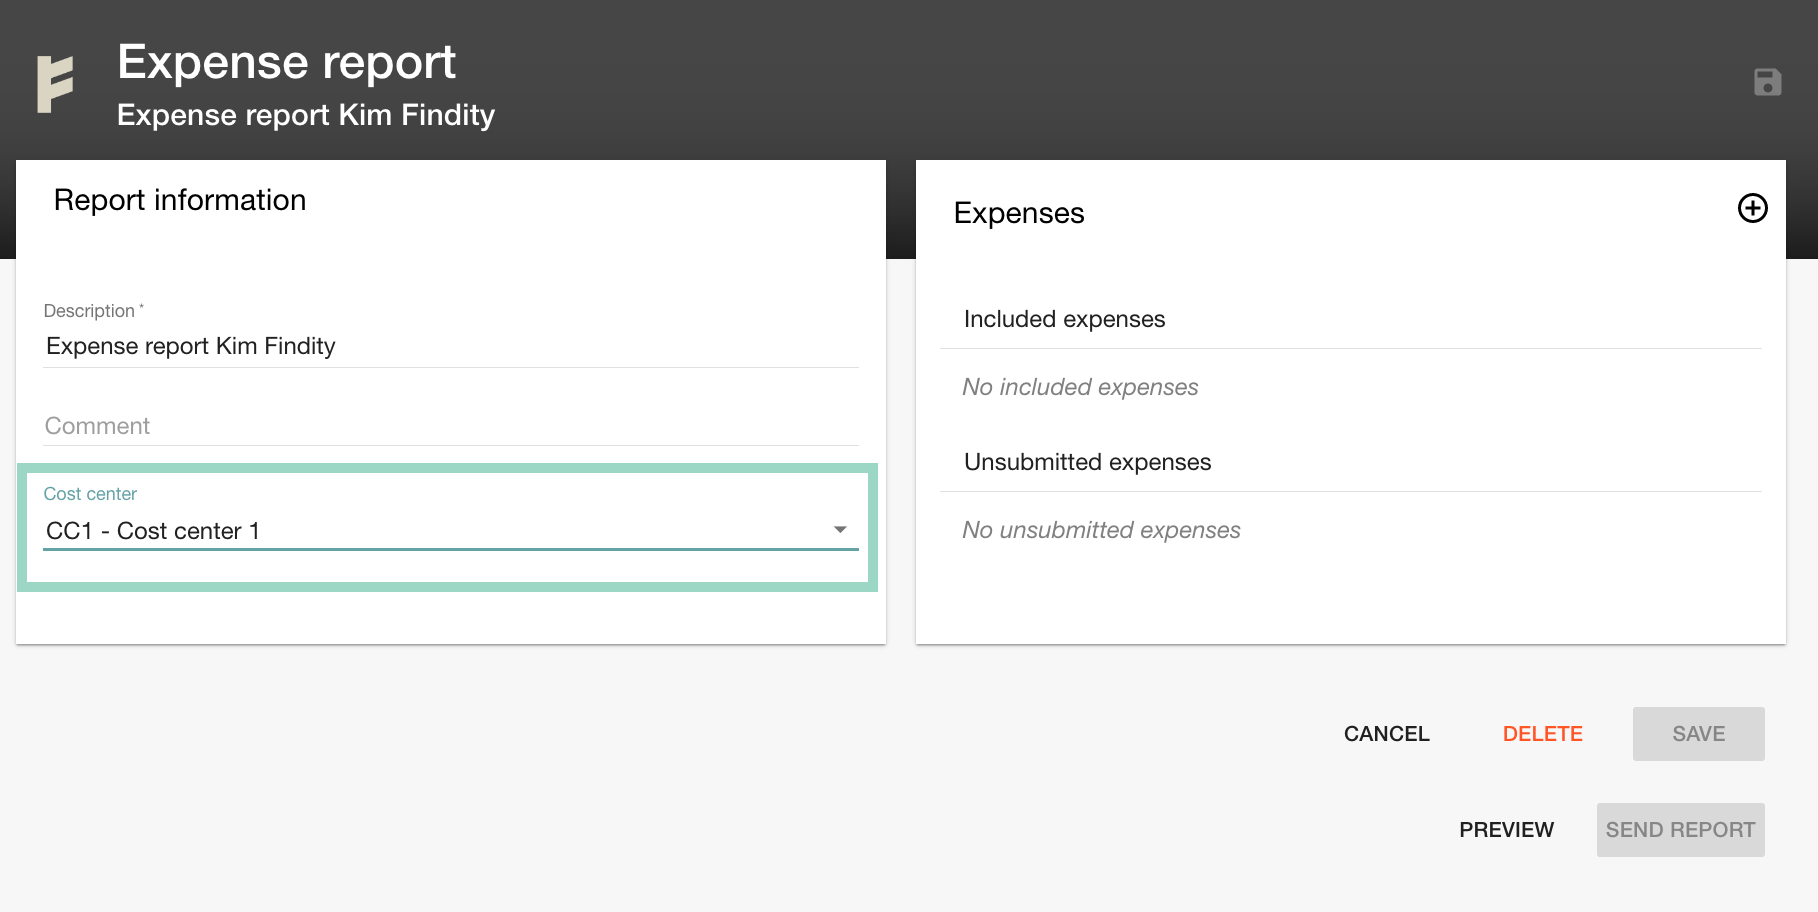
Now the settings are done and the user will see the dimension (with the settings we made) on report level:
Project
In this scenario we have the following requirements:
- Preset value on user (user can change preset value)
- Searchable list as type
- Expense level
- Mandatory on all expense categories except "Friskvård"
- Visible for user
In the configuration we choose the following settings:
Now we go to Edit more input fields and make the dimension mandatory. Also add an exception for category "Friskvård" and make it invisible and not mandatory.
Now the user has to choose a value for the dimension on every expense category except the category "Friskvård" and as you can see on the little red *, this field is mandatory. It's also possible for the user to search for the project value or name.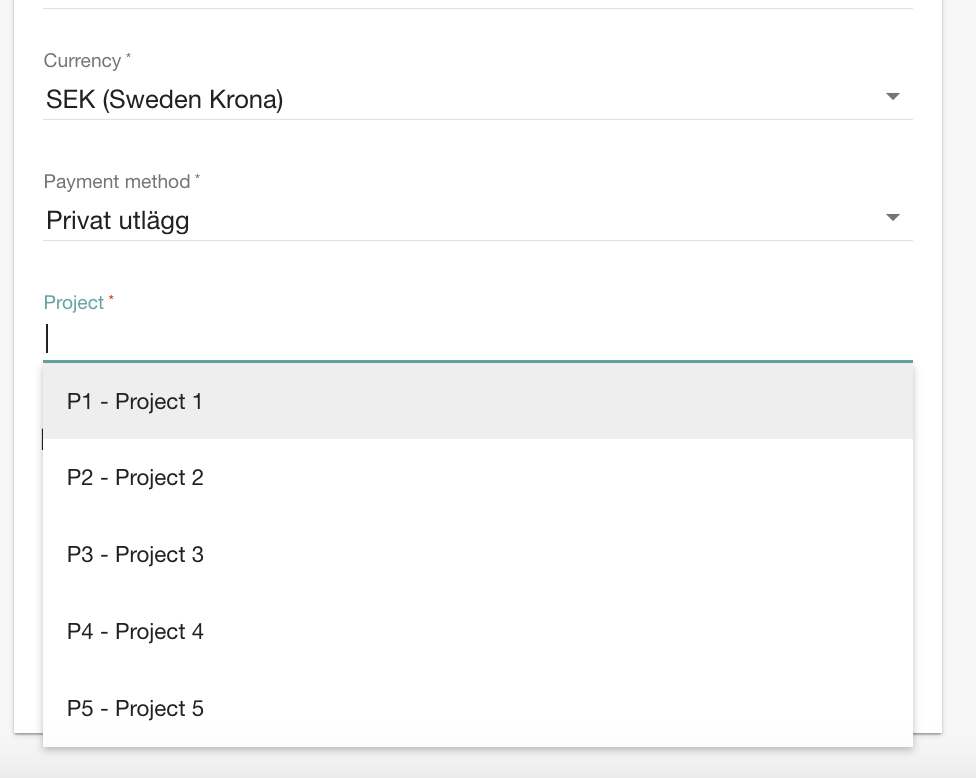
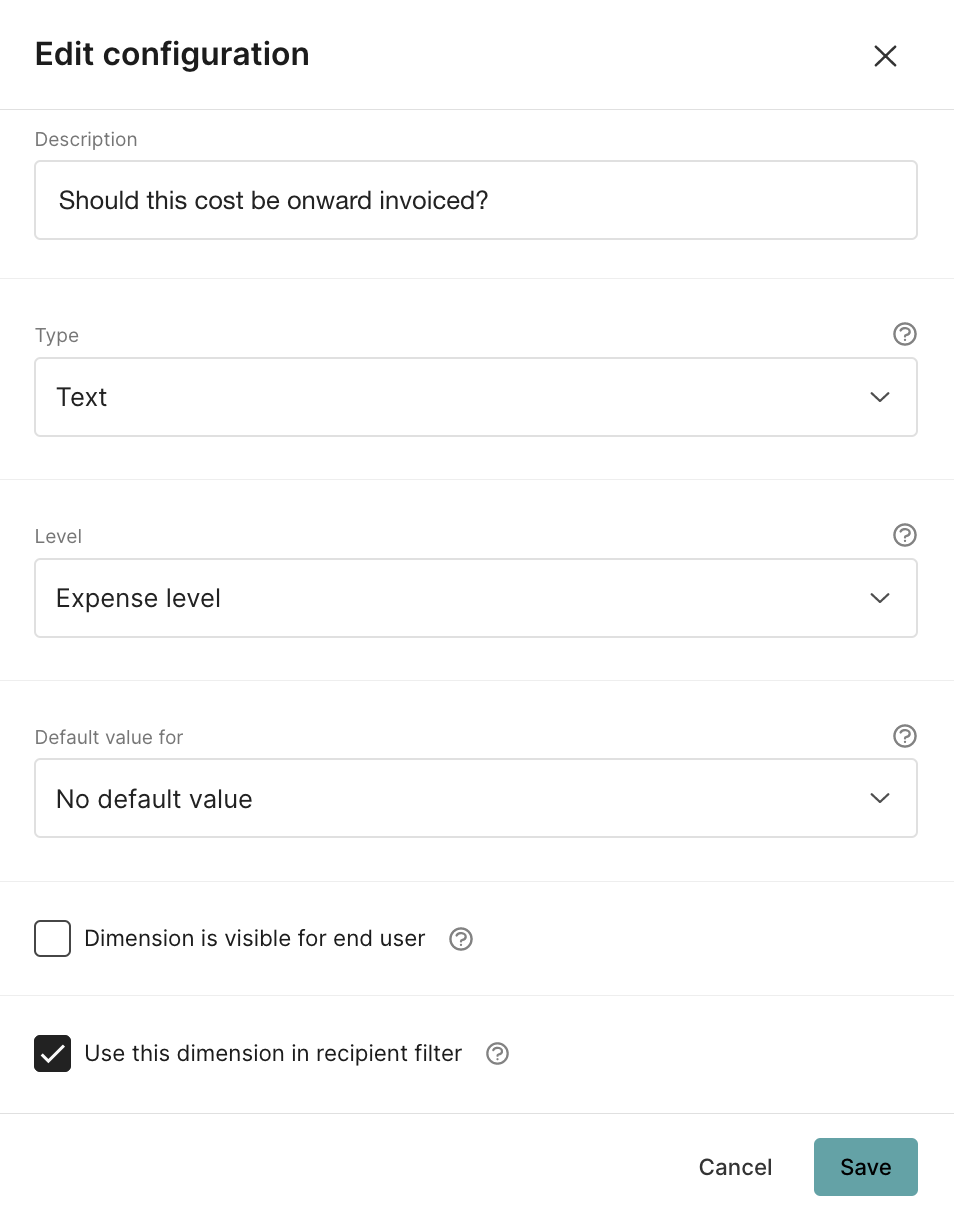
Onward invoicing
Some organizations want to know if a cost should be onward invoiced. A solution for this could be to add a dimension (which can be done with both free text and values).
- Free text
- Expense level
- Only visible and mandatory on one expense category
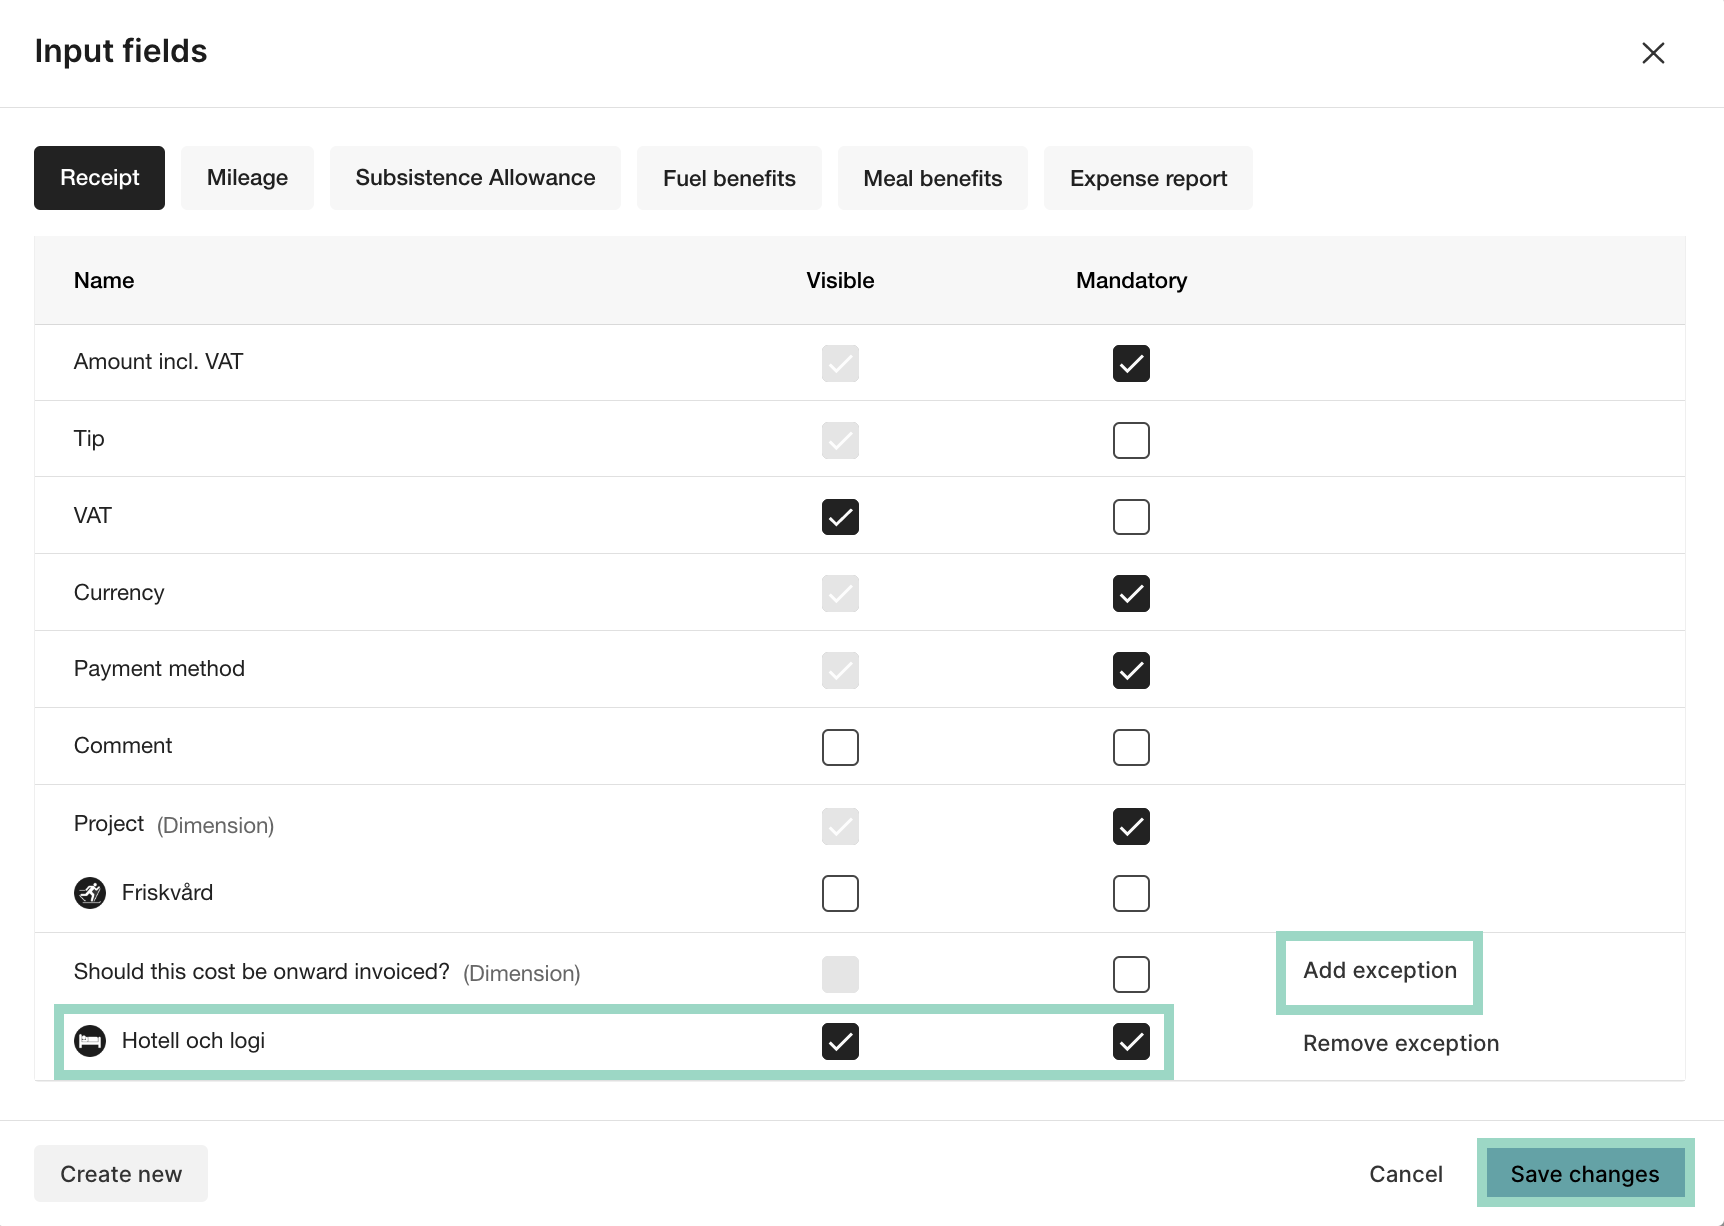
Since we have a free text we don't have to add values so we go directly to Edit more input fields. We add "Hotell och logi" as an exception and make it visible and mandatory on the category.
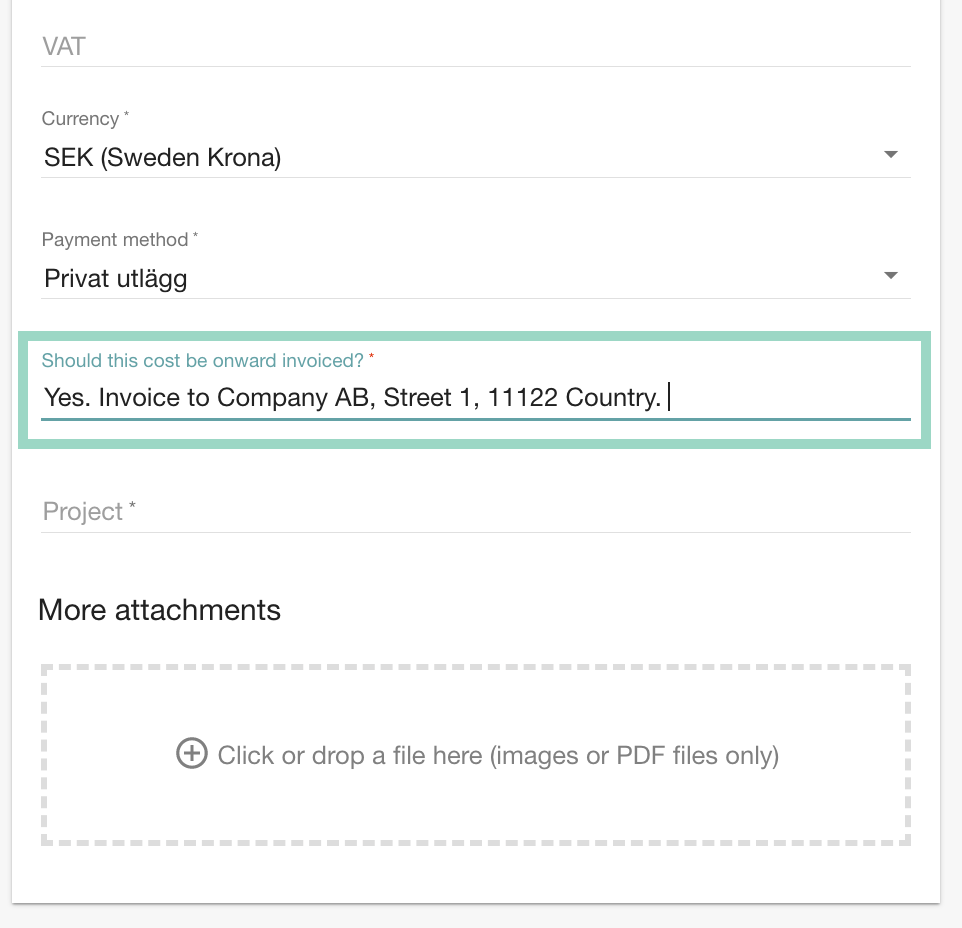
Now the settings are done and when a user choose the specific category "Hotell och logi" it will be mandatory to write a text in the input field. No other expense category will show this dimension on a new expense.
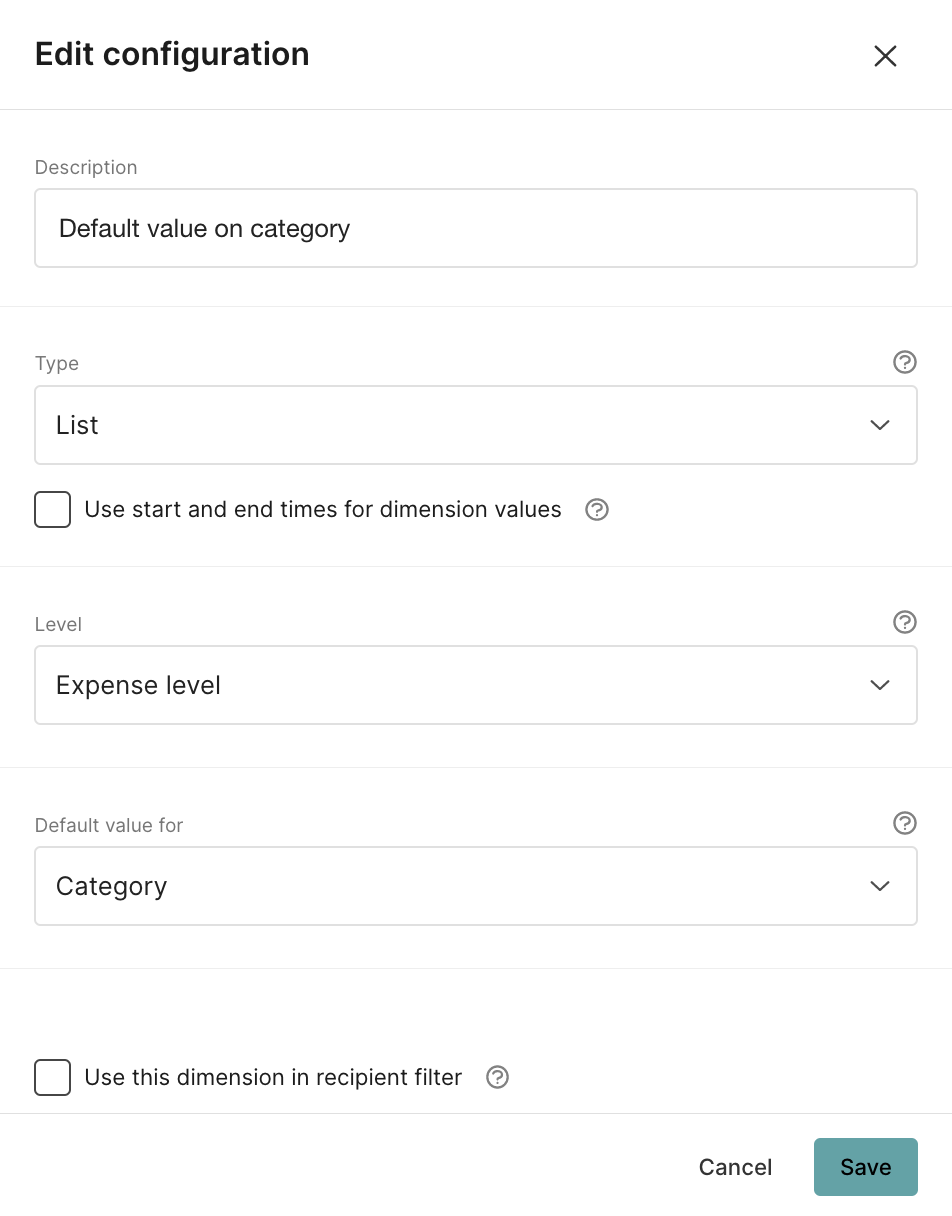
Expense codes
In case you need to, for example, connect an expense code to a expense category in your report recipient (in a separate field from the expense category), it could be a good idea to add a dimension for this and to the default value on the category.
- Default value on category
Now its time to add these values to the expense categories so we go to Settings > Expense management > Expense categories and click on General expenses. You will see input fiels for Dimension where you can search for the correct dimension/expense code for the specifc expense category.
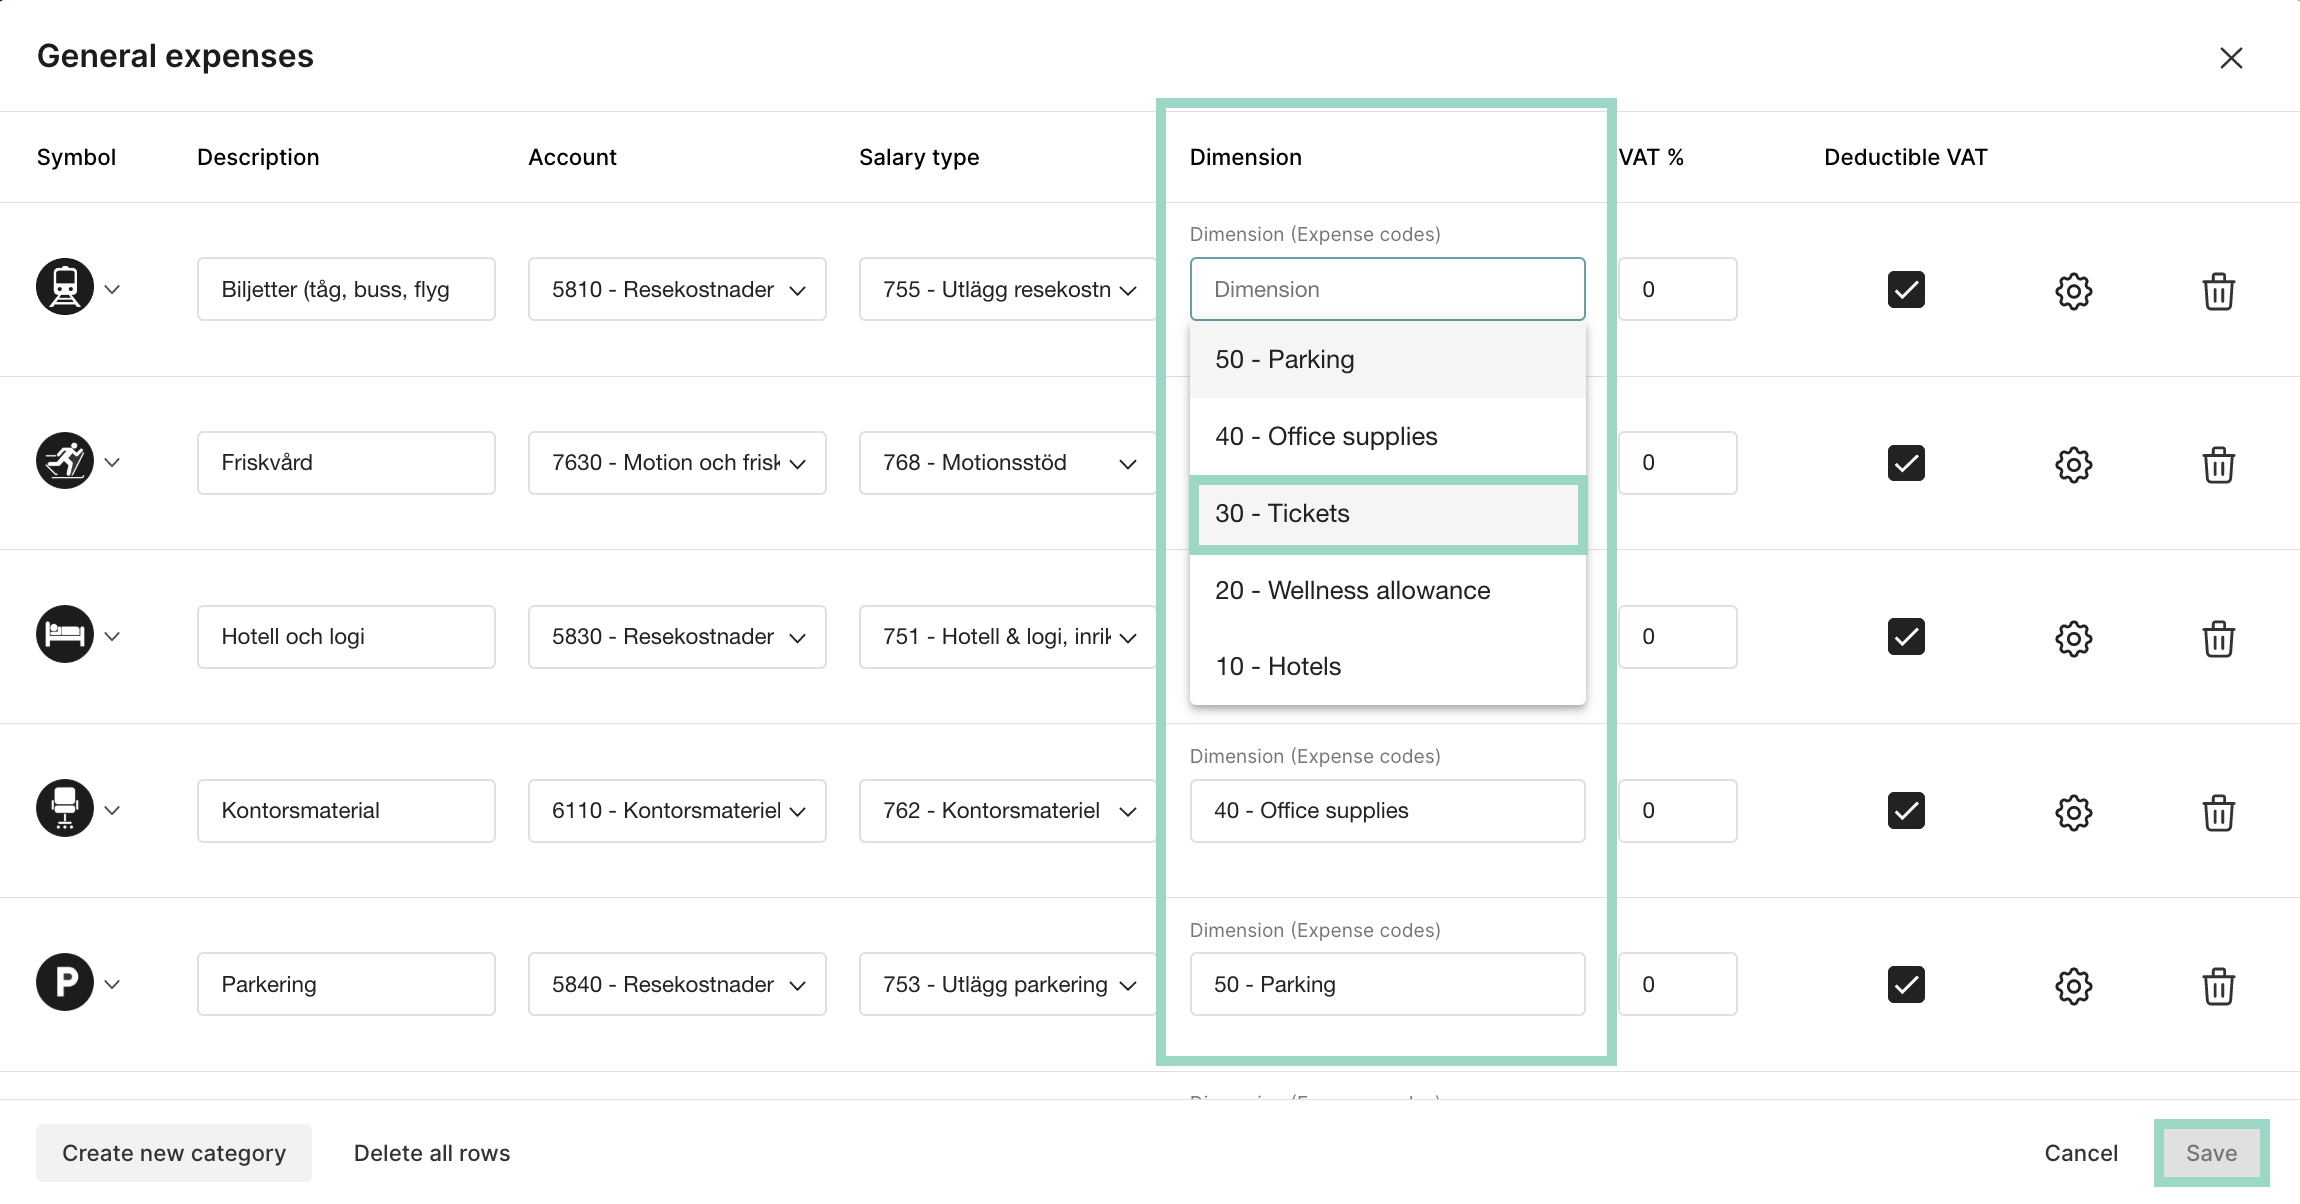
Now when the user makes an expense on the specific expense category, the connected dimension will be added to that account/salary type/category in the accounting.
See example from a report: