> ## Documentation Index
> Fetch the complete documentation index at: https://help.findity.com/llms.txt
> Use this file to discover all available pages before exploring further.
# How to set up per diem/compensation for travel time
**This article applies to the following countries**
* All countries
Travel time per diem is not a standard functionality in Findity, though, it is possible to add fields for that kind of reimbursement. To do so, the following three steps are required:
1. Add the dimensions and their values
2. Set visibility of the dimensions in connection with the expense categories
3. Add an extra report recipient and configure the file
The steps are described in separate tabs in this article.
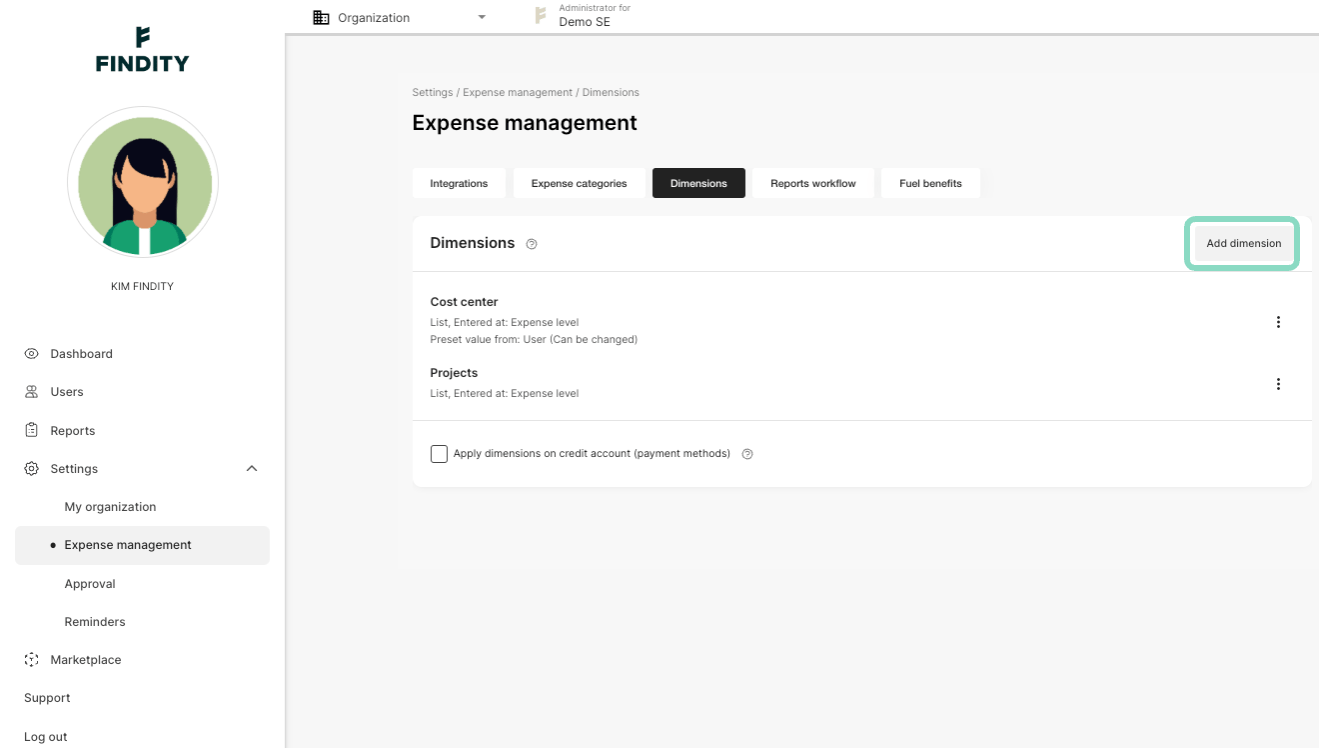
Go to Settings/Expense management/Dimensions. If the tab Dimensions doesn’t show up, it has to be activated in the Marketplace in the sectionFunctions.Click *Add dimension.*
 Now you can start to configure the dimension type:
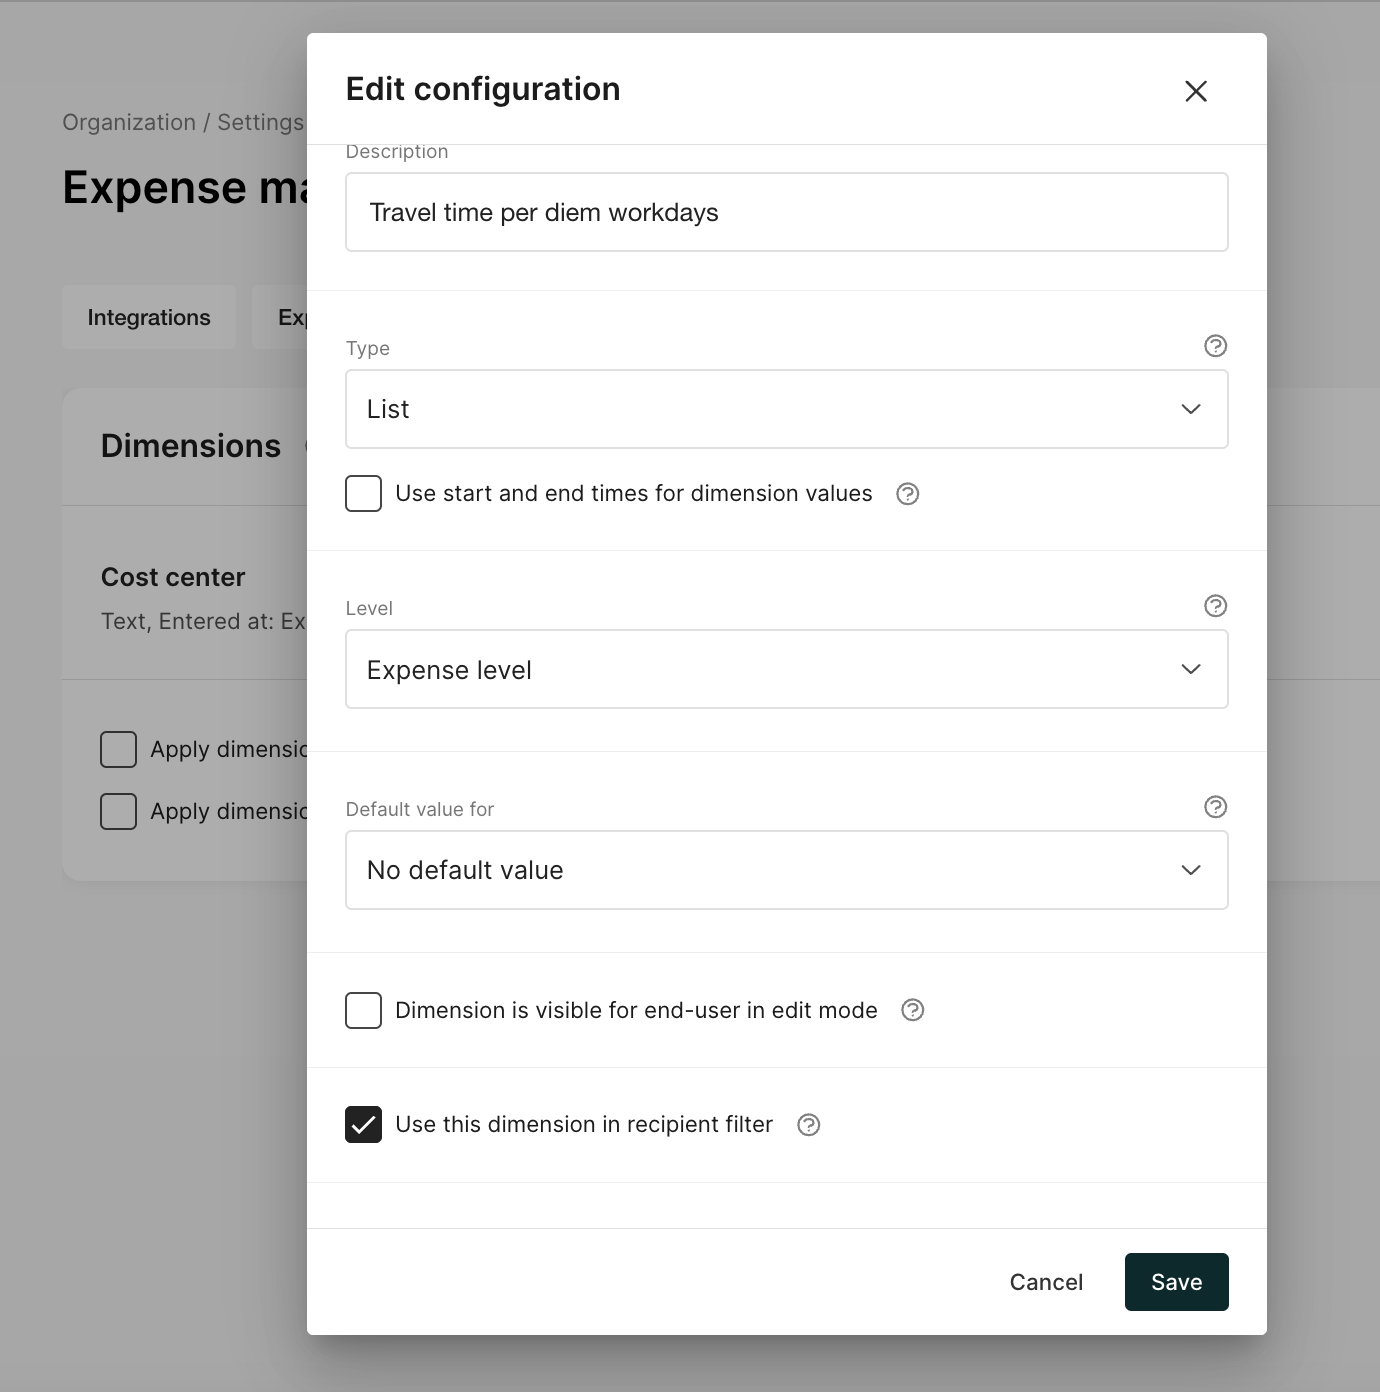
* Write aDescription, for example “Travelling time per diem Mon-Fri” or write it as a prompt to the user, for example “Please state the amount of travelling hours exceeding the usual working hours”
* ChooseType. You can choose from Text or List (List and Searchable list). Text = free text field, and List = the user will get a list with values (1h, 2h, 3h etc.) to choose from.
* Choose theLevel“Expense level”
* Default valueshould be set as “No default value”
* The dimension should not be visible for end user (so tick off the box “Dimension is visible for end user”)
* Tick the box “Use this dimension in recipient filter”
* Click *Save*.
Now you can start to configure the dimension type:
* Write aDescription, for example “Travelling time per diem Mon-Fri” or write it as a prompt to the user, for example “Please state the amount of travelling hours exceeding the usual working hours”
* ChooseType. You can choose from Text or List (List and Searchable list). Text = free text field, and List = the user will get a list with values (1h, 2h, 3h etc.) to choose from.
* Choose theLevel“Expense level”
* Default valueshould be set as “No default value”
* The dimension should not be visible for end user (so tick off the box “Dimension is visible for end user”)
* Tick the box “Use this dimension in recipient filter”
* Click *Save*.
 If you have different types of travelling time per diem, for example workdays and weekends, you can just add more dimensions.
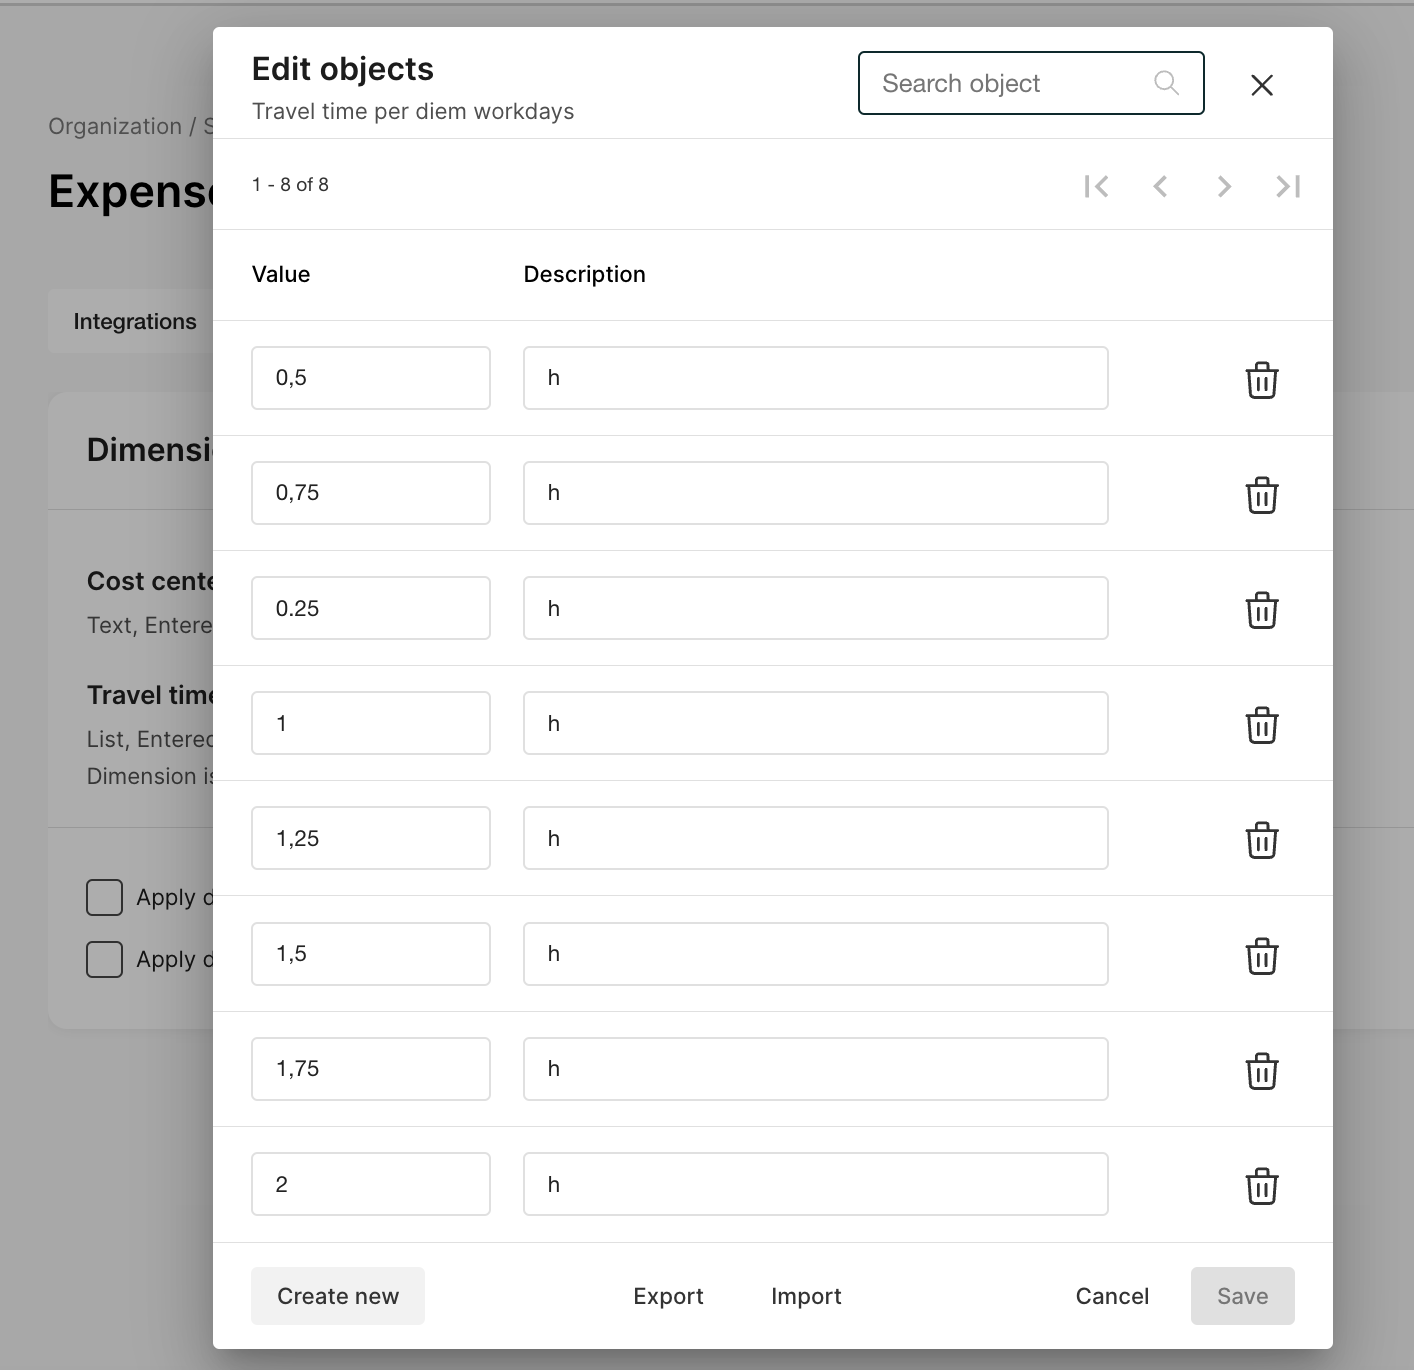
If you chose to create aListwith values when you did the configuration, you click on the name of the dimension you just created, and fill in the values you wish to have. ClickSave.
If you have different types of travelling time per diem, for example workdays and weekends, you can just add more dimensions.
If you chose to create aListwith values when you did the configuration, you click on the name of the dimension you just created, and fill in the values you wish to have. ClickSave.
 When the dimensions are created it is time to decide which categories they should be connected to, meaning that they are only visible with the chosen categories.
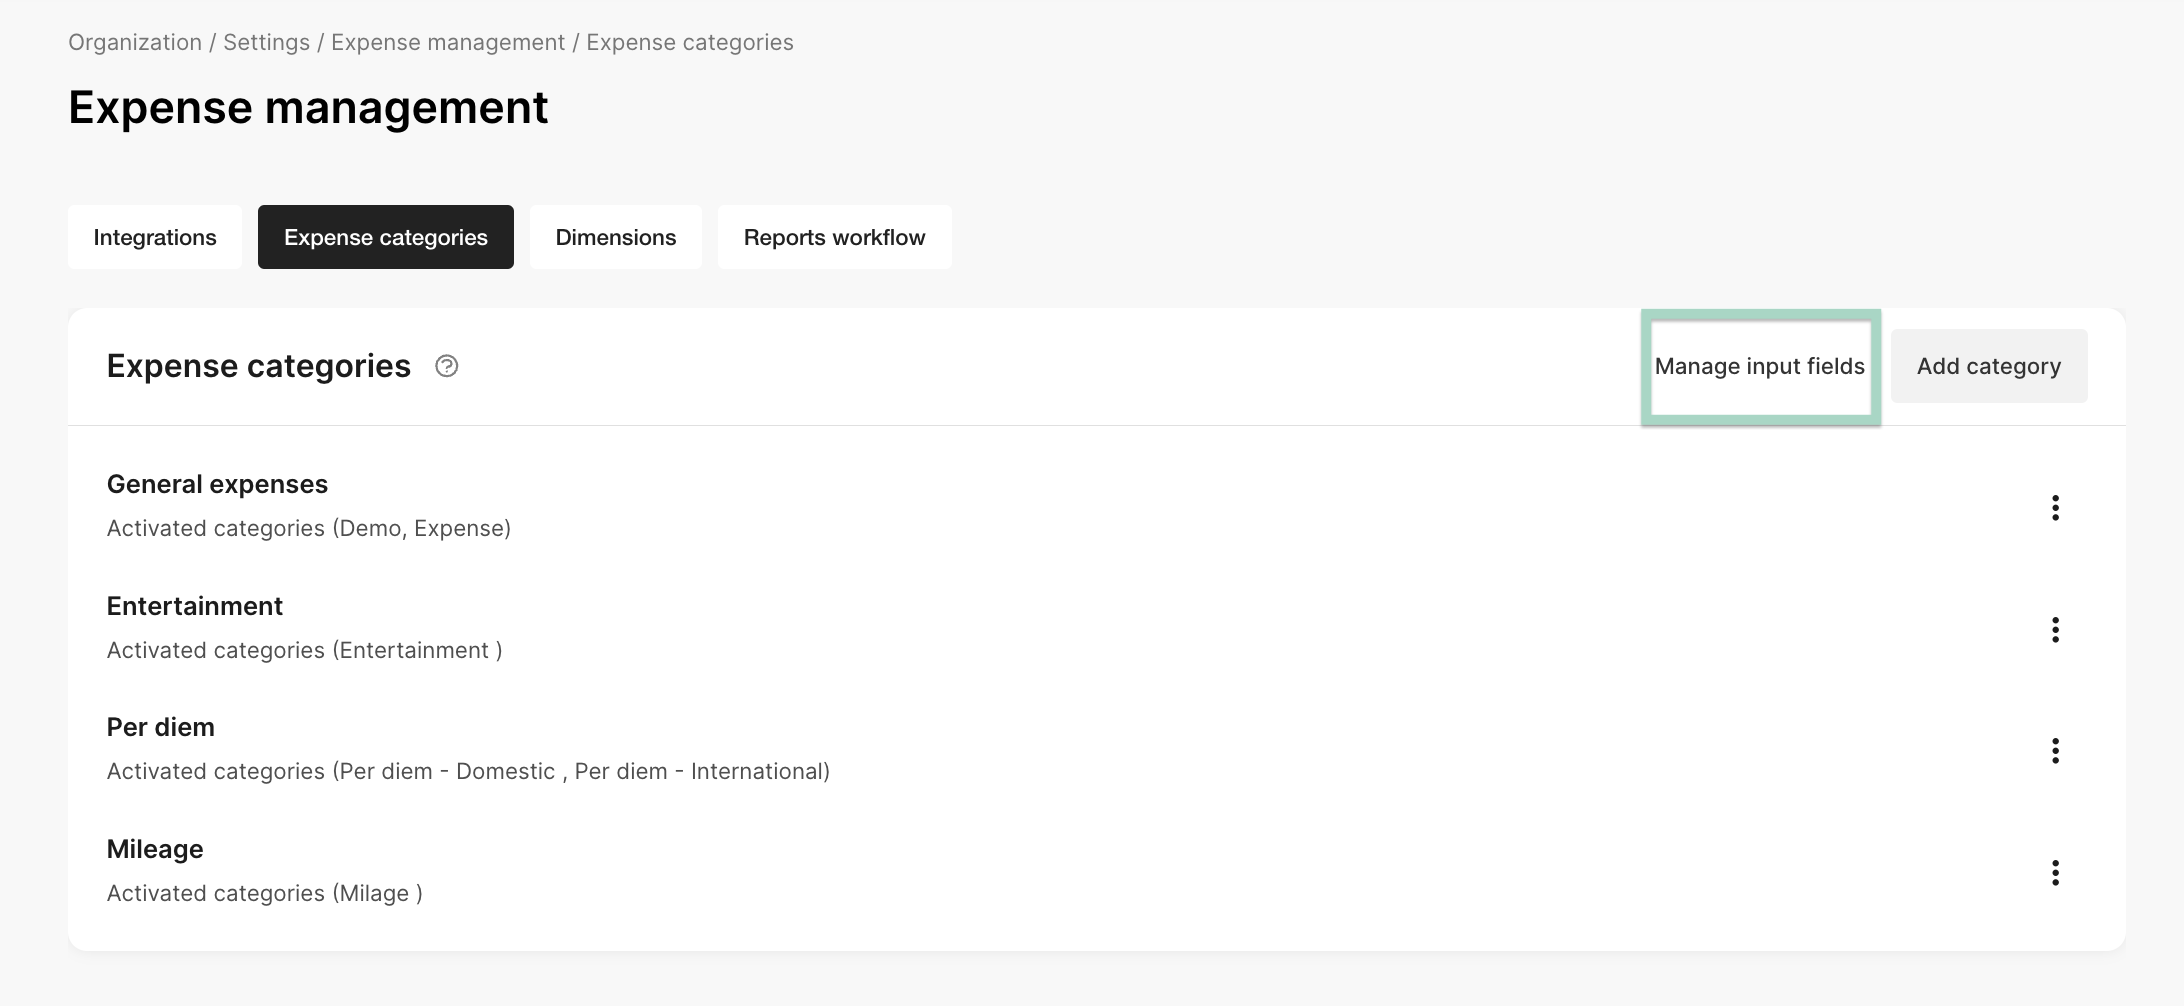
Go to Settings/Expense management/Expense categories. Click on *Manage* more input fields.
When the dimensions are created it is time to decide which categories they should be connected to, meaning that they are only visible with the chosen categories.
Go to Settings/Expense management/Expense categories. Click on *Manage* more input fields.
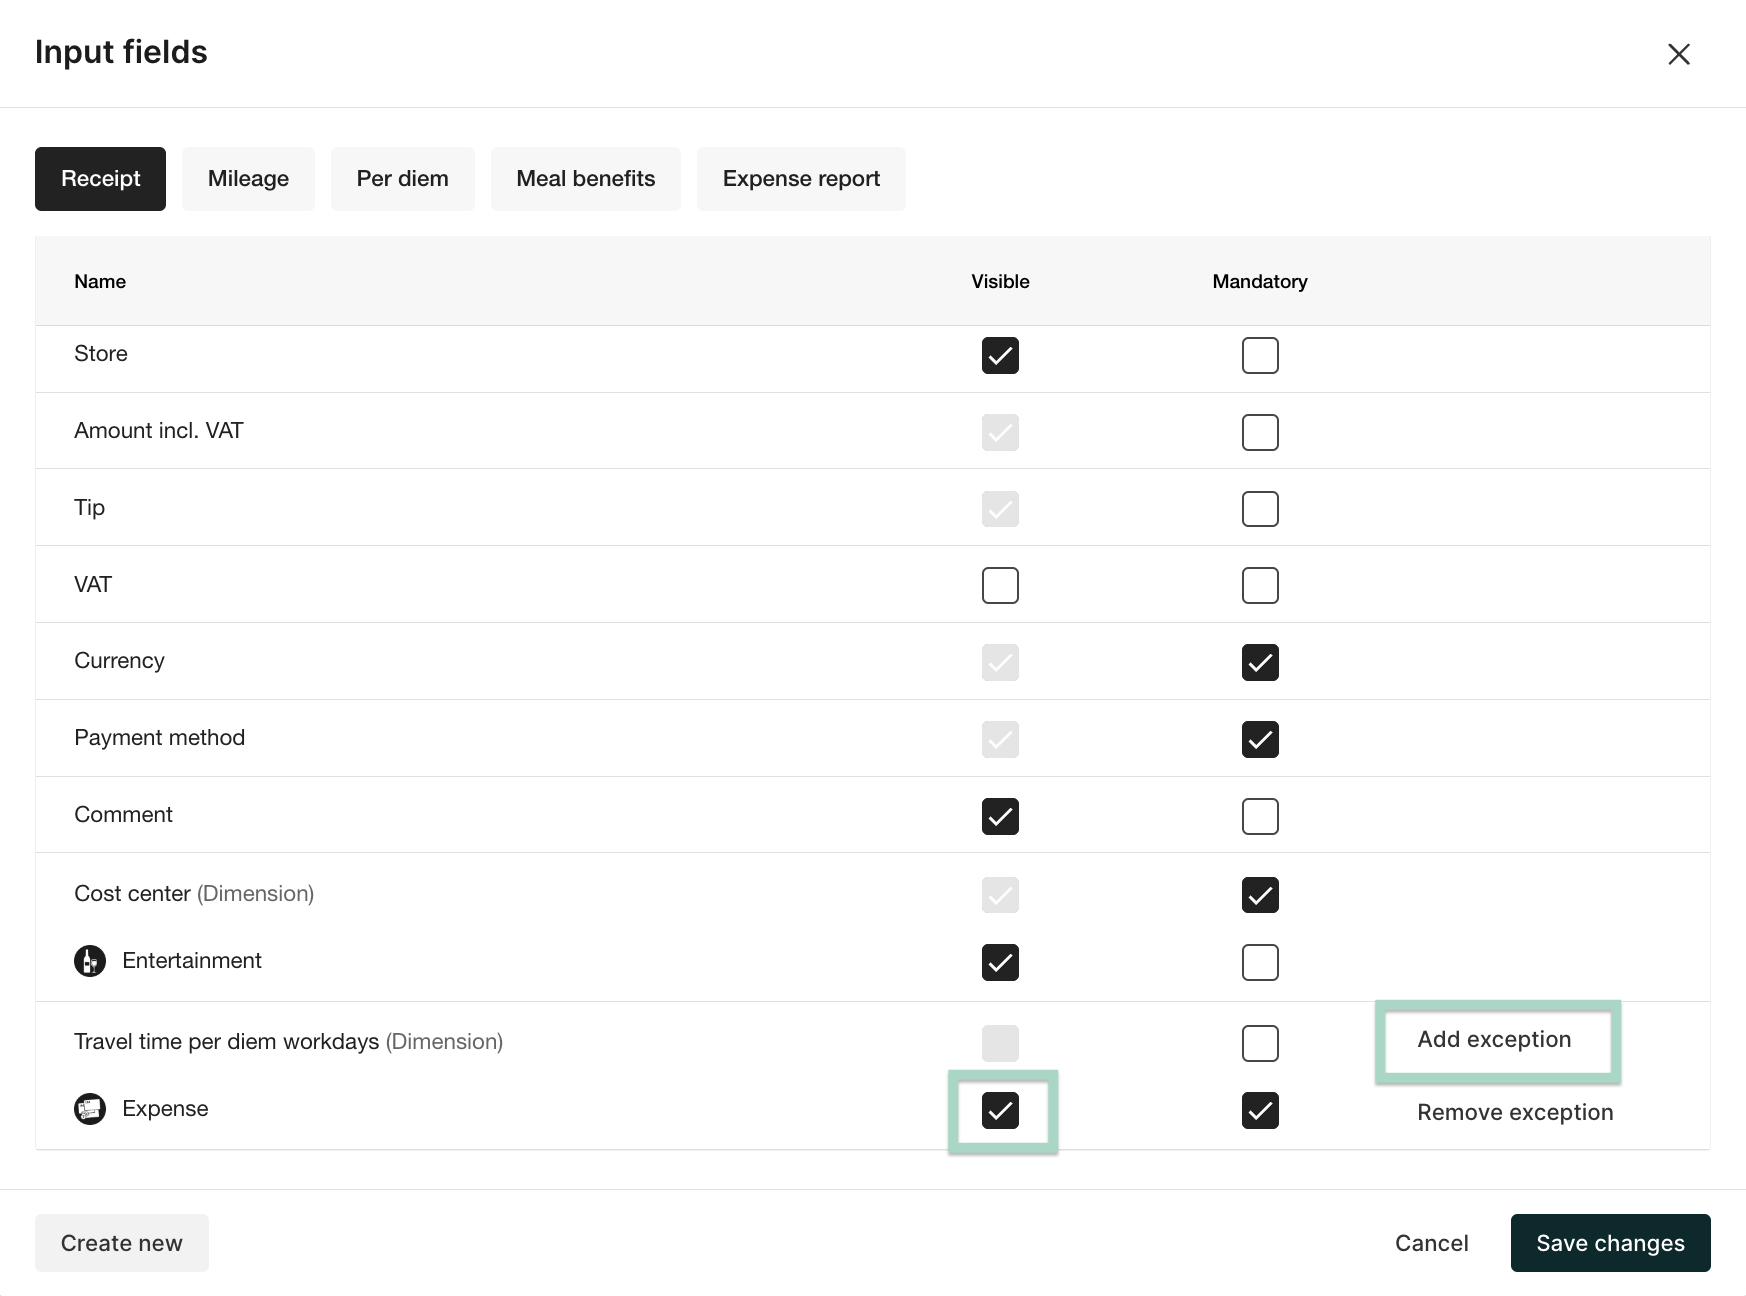
 Here you add the exception for those categories that should make the dimensions visible.
Scroll down to the travel time dimensions/s, hoover to the right (see arrow in screenshot) and click on “Add exception”. Select the relevant expense categories.
Next step is to tick the box that the dimension/s should be visible in the chosen category/ies.
Here you add the exception for those categories that should make the dimensions visible.
Scroll down to the travel time dimensions/s, hoover to the right (see arrow in screenshot) and click on “Add exception”. Select the relevant expense categories.
Next step is to tick the box that the dimension/s should be visible in the chosen category/ies.
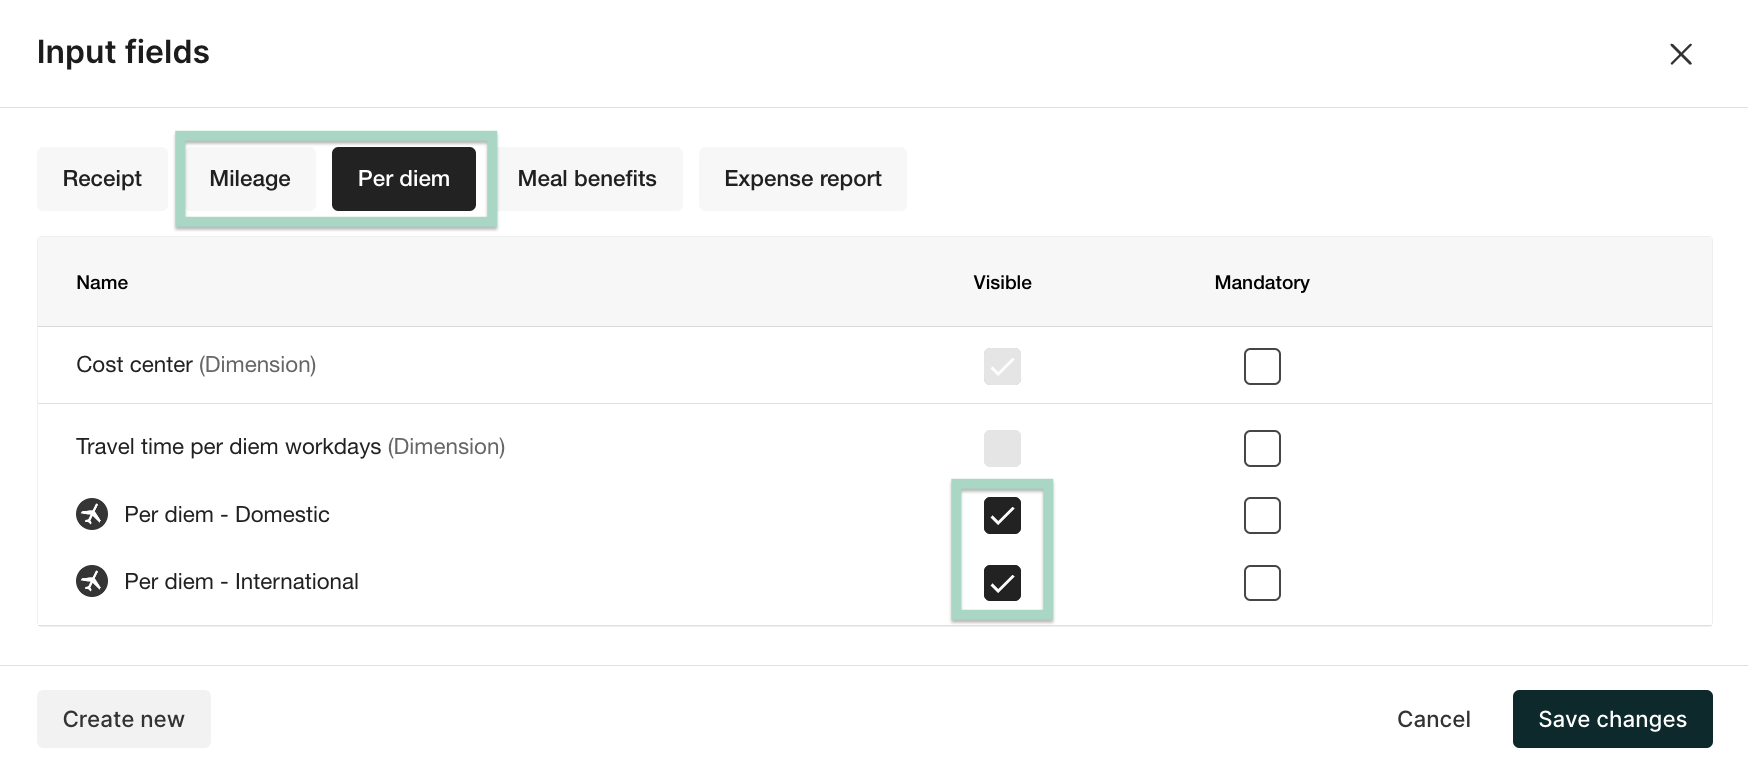
 Do the same process for Mileage and Per diem if you want the users to be able to report travel time in these categories as well.
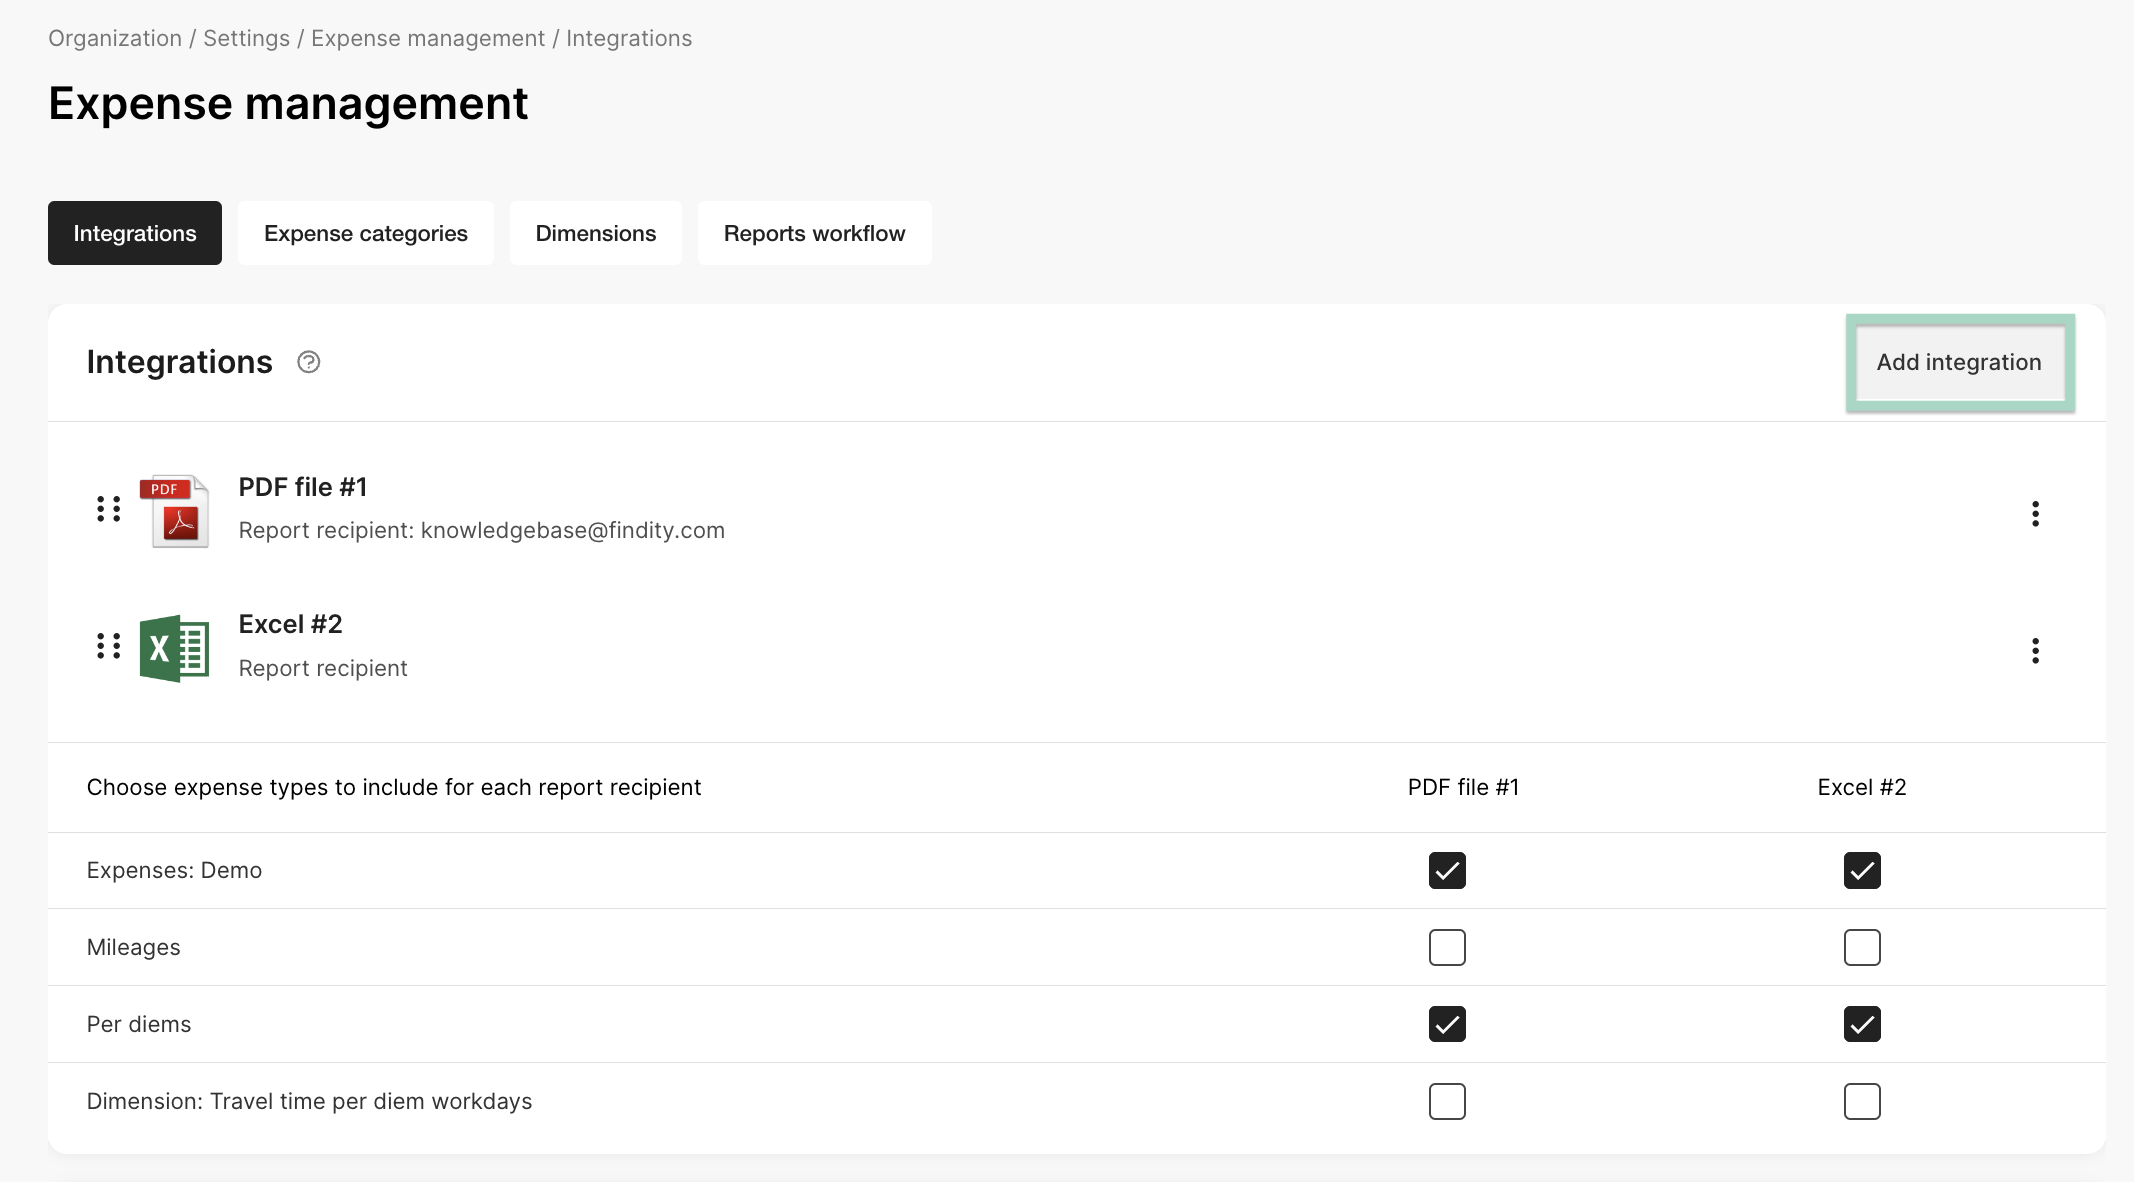
 The last step is to create a new report recipient, i.e. a specific file that will be the basis for all the reported travel time.
Go to Settings/Expense management/Integrations. Click on *Add integration* and choose Excel. Note that it has to be empty in Reports - *Ready to send* when doing this step.
The last step is to create a new report recipient, i.e. a specific file that will be the basis for all the reported travel time.
Go to Settings/Expense management/Integrations. Click on *Add integration* and choose Excel. Note that it has to be empty in Reports - *Ready to send* when doing this step.
 Click on the report recipient (Excel) and write a suitable name in the fieldRecipient name, for example “Travel time per diem”.
Tick the boxUse review modeif the administrator actively will send all the reports through the step for this recipient. If you don’t tick the box, a file will automatically be created if some of the expense reports contain travel time. I.e the file is automatically created when the administrator creates the other files (accounting or salary).
Choose Salary asAccounting type.
Do the rest of the settings as you prefer.
Click on the report recipient (Excel) and write a suitable name in the fieldRecipient name, for example “Travel time per diem”.
Tick the boxUse review modeif the administrator actively will send all the reports through the step for this recipient. If you don’t tick the box, a file will automatically be created if some of the expense reports contain travel time. I.e the file is automatically created when the administrator creates the other files (accounting or salary).
Choose Salary asAccounting type.
Do the rest of the settings as you prefer.
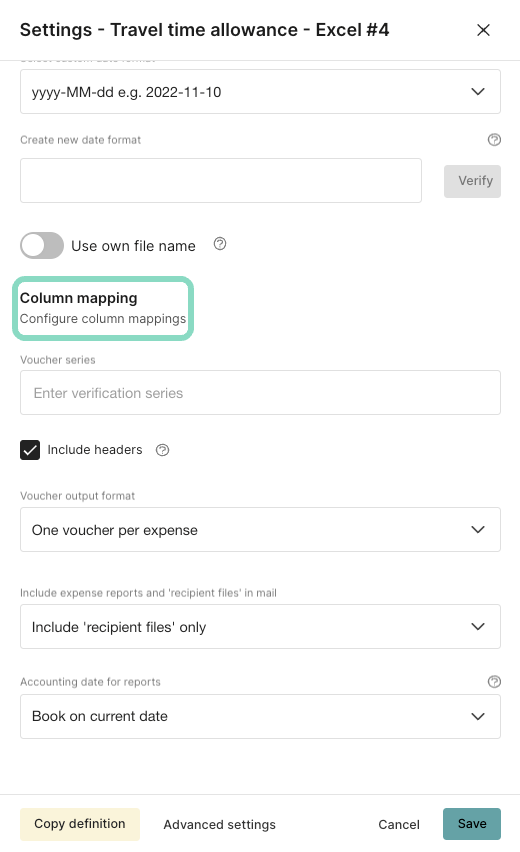
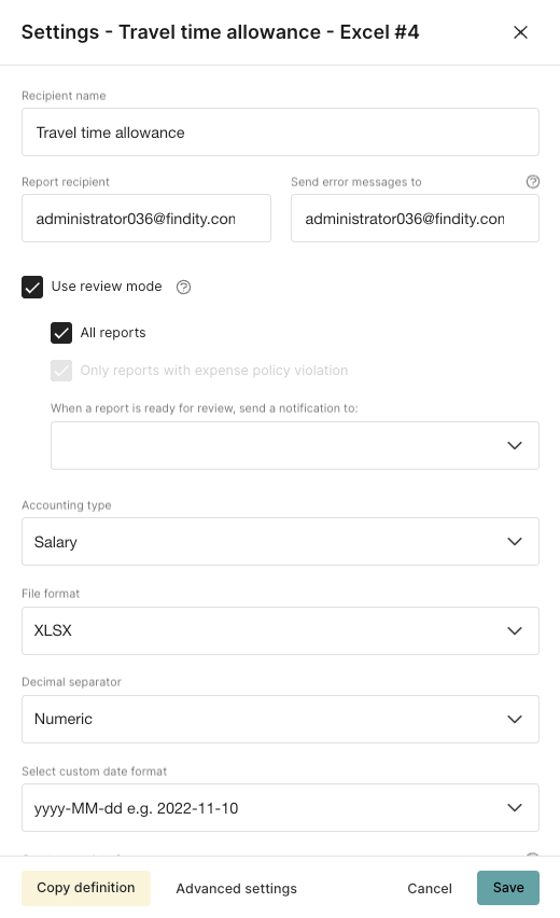 Scroll down to make more settings and fill in as in the screenshot below.
Then click onColumn mapping.
Scroll down to make more settings and fill in as in the screenshot below.
Then click onColumn mapping.
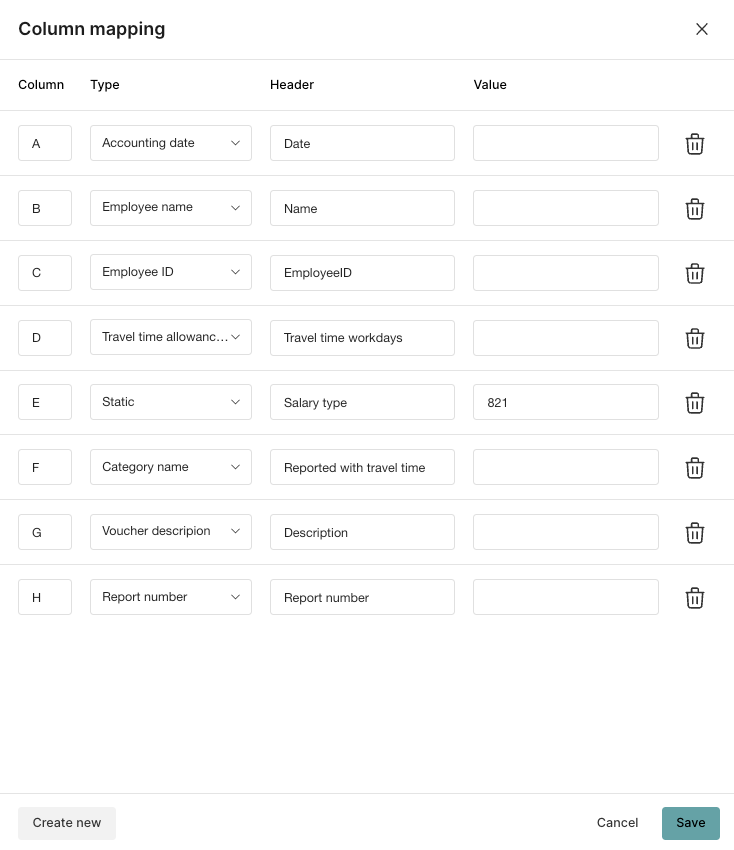
 In the column mapping you build the Excel structure, i.e. the columns and values you want to include in the file. The most important is to make sure that the travel time dimensions are included, as well as the names of the employees.
An example below:
In the column mapping you build the Excel structure, i.e. the columns and values you want to include in the file. The most important is to make sure that the travel time dimensions are included, as well as the names of the employees.
An example below:
 ClickSave.
## Related articles
* [How do I make changes in the organisation structure?](/en/settings-administrator/how-do-i-make-changes-in-the-organisation-structure)
* [Temporary approver](/en/settings-administrator/temporary-approver)
* [How do I set up approvers?](/en/settings-administrator/how-do-i-set-up-approvers)
* [How do I set up the organisation structure?](/en/settings-administrator/how-do-i-set-up-the-organisation-structure)
* [How do I change the voucher series?](/en/settings-administrator/how-do-i-change-the-voucher-series)
ClickSave.
## Related articles
* [How do I make changes in the organisation structure?](/en/settings-administrator/how-do-i-make-changes-in-the-organisation-structure)
* [Temporary approver](/en/settings-administrator/temporary-approver)
* [How do I set up approvers?](/en/settings-administrator/how-do-i-set-up-approvers)
* [How do I set up the organisation structure?](/en/settings-administrator/how-do-i-set-up-the-organisation-structure)
* [How do I change the voucher series?](/en/settings-administrator/how-do-i-change-the-voucher-series)