> ## Documentation Index
> Fetch the complete documentation index at: https://help.findity.com/llms.txt
> Use this file to discover all available pages before exploring further.
# How do we set up an Excel recipient?
**This article applies to the following countries**
* All countries
The Excel recipient gives you the opportunity to export your data to a customized Excel file, either as *.csv* or as *.xlsx.*
**Add integration**
Before you start with the setup for this integration, you need to make sure that all reports under *Reports* > *Ready to send* have been handled and that the tab is empty.
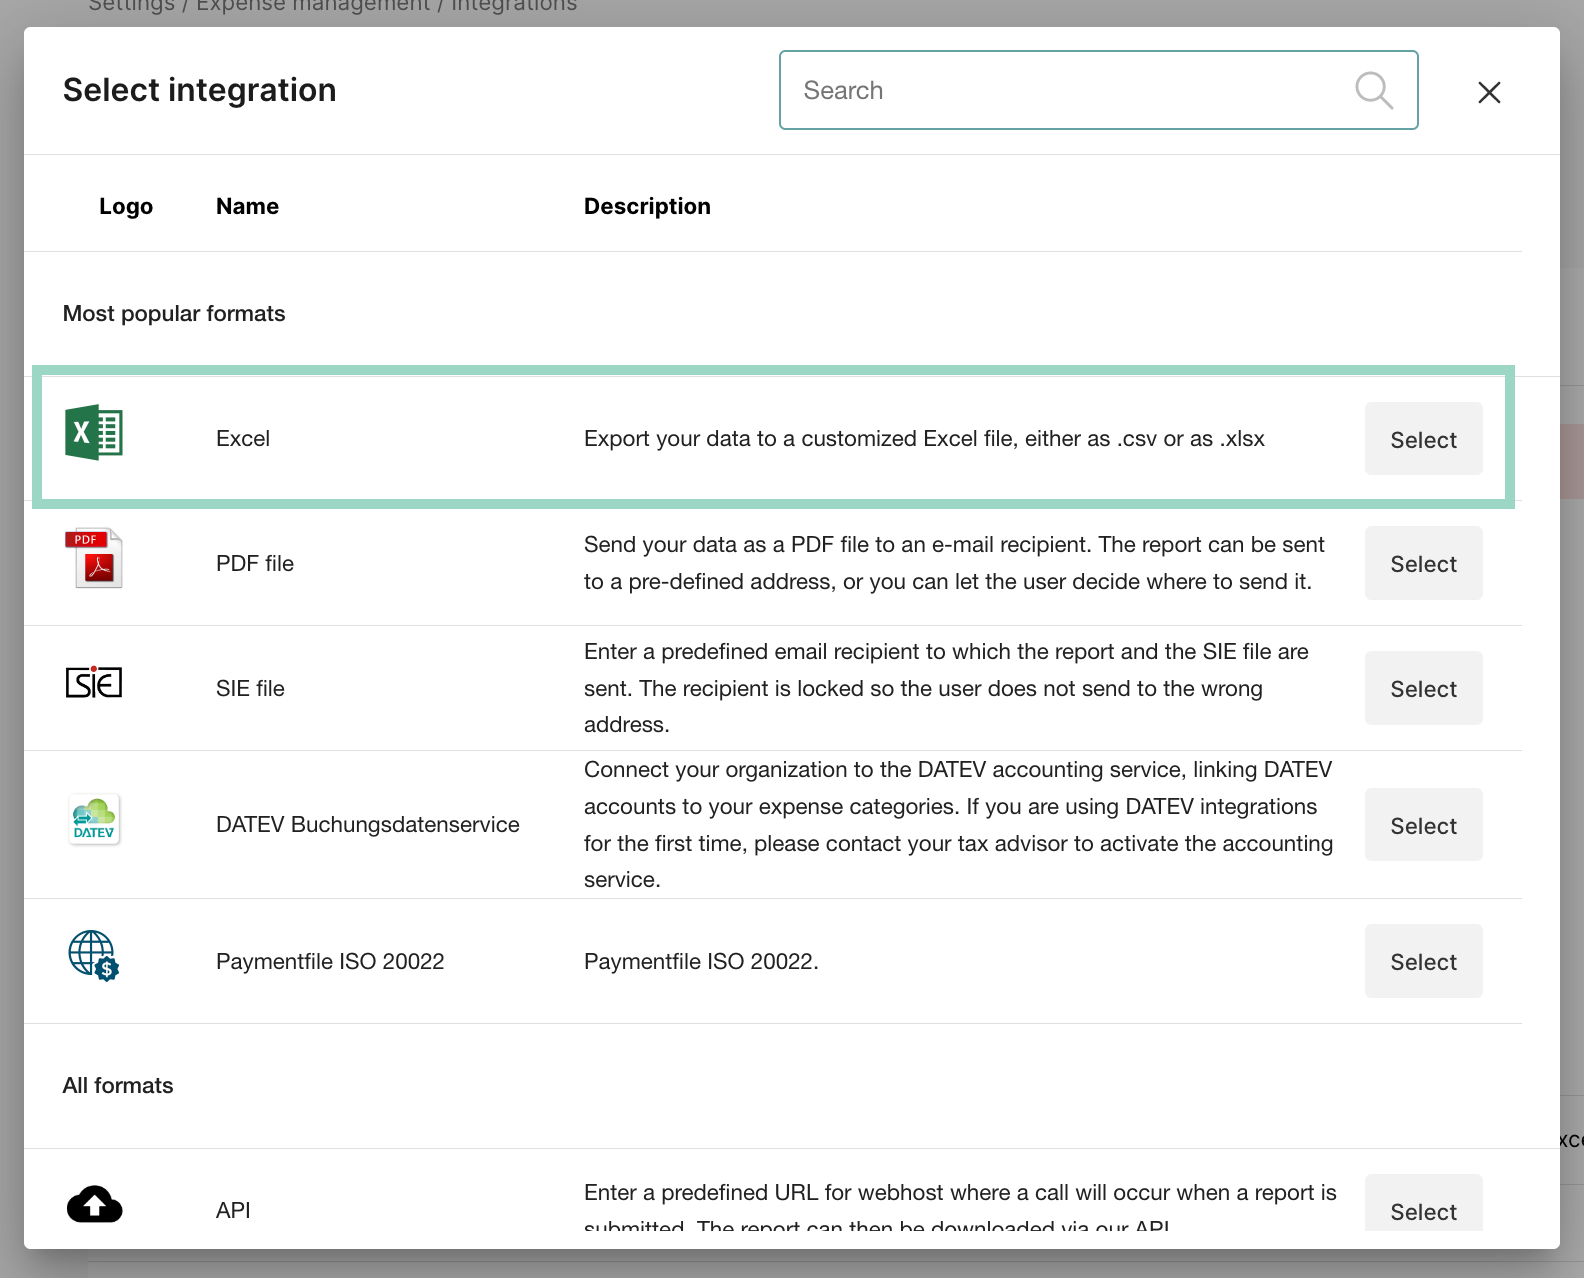
Go to *Settings* > *Expense management* > *Integrations* and click on *Add Integration.* *Select* "Excel" as integration and the new integration will be added under *Integrations* in the system.
 **Customize settings**
Now it's time to customize the settings for the integration. Click on the new integration for Excel.
**Customize settings**
Now it's time to customize the settings for the integration. Click on the new integration for Excel.
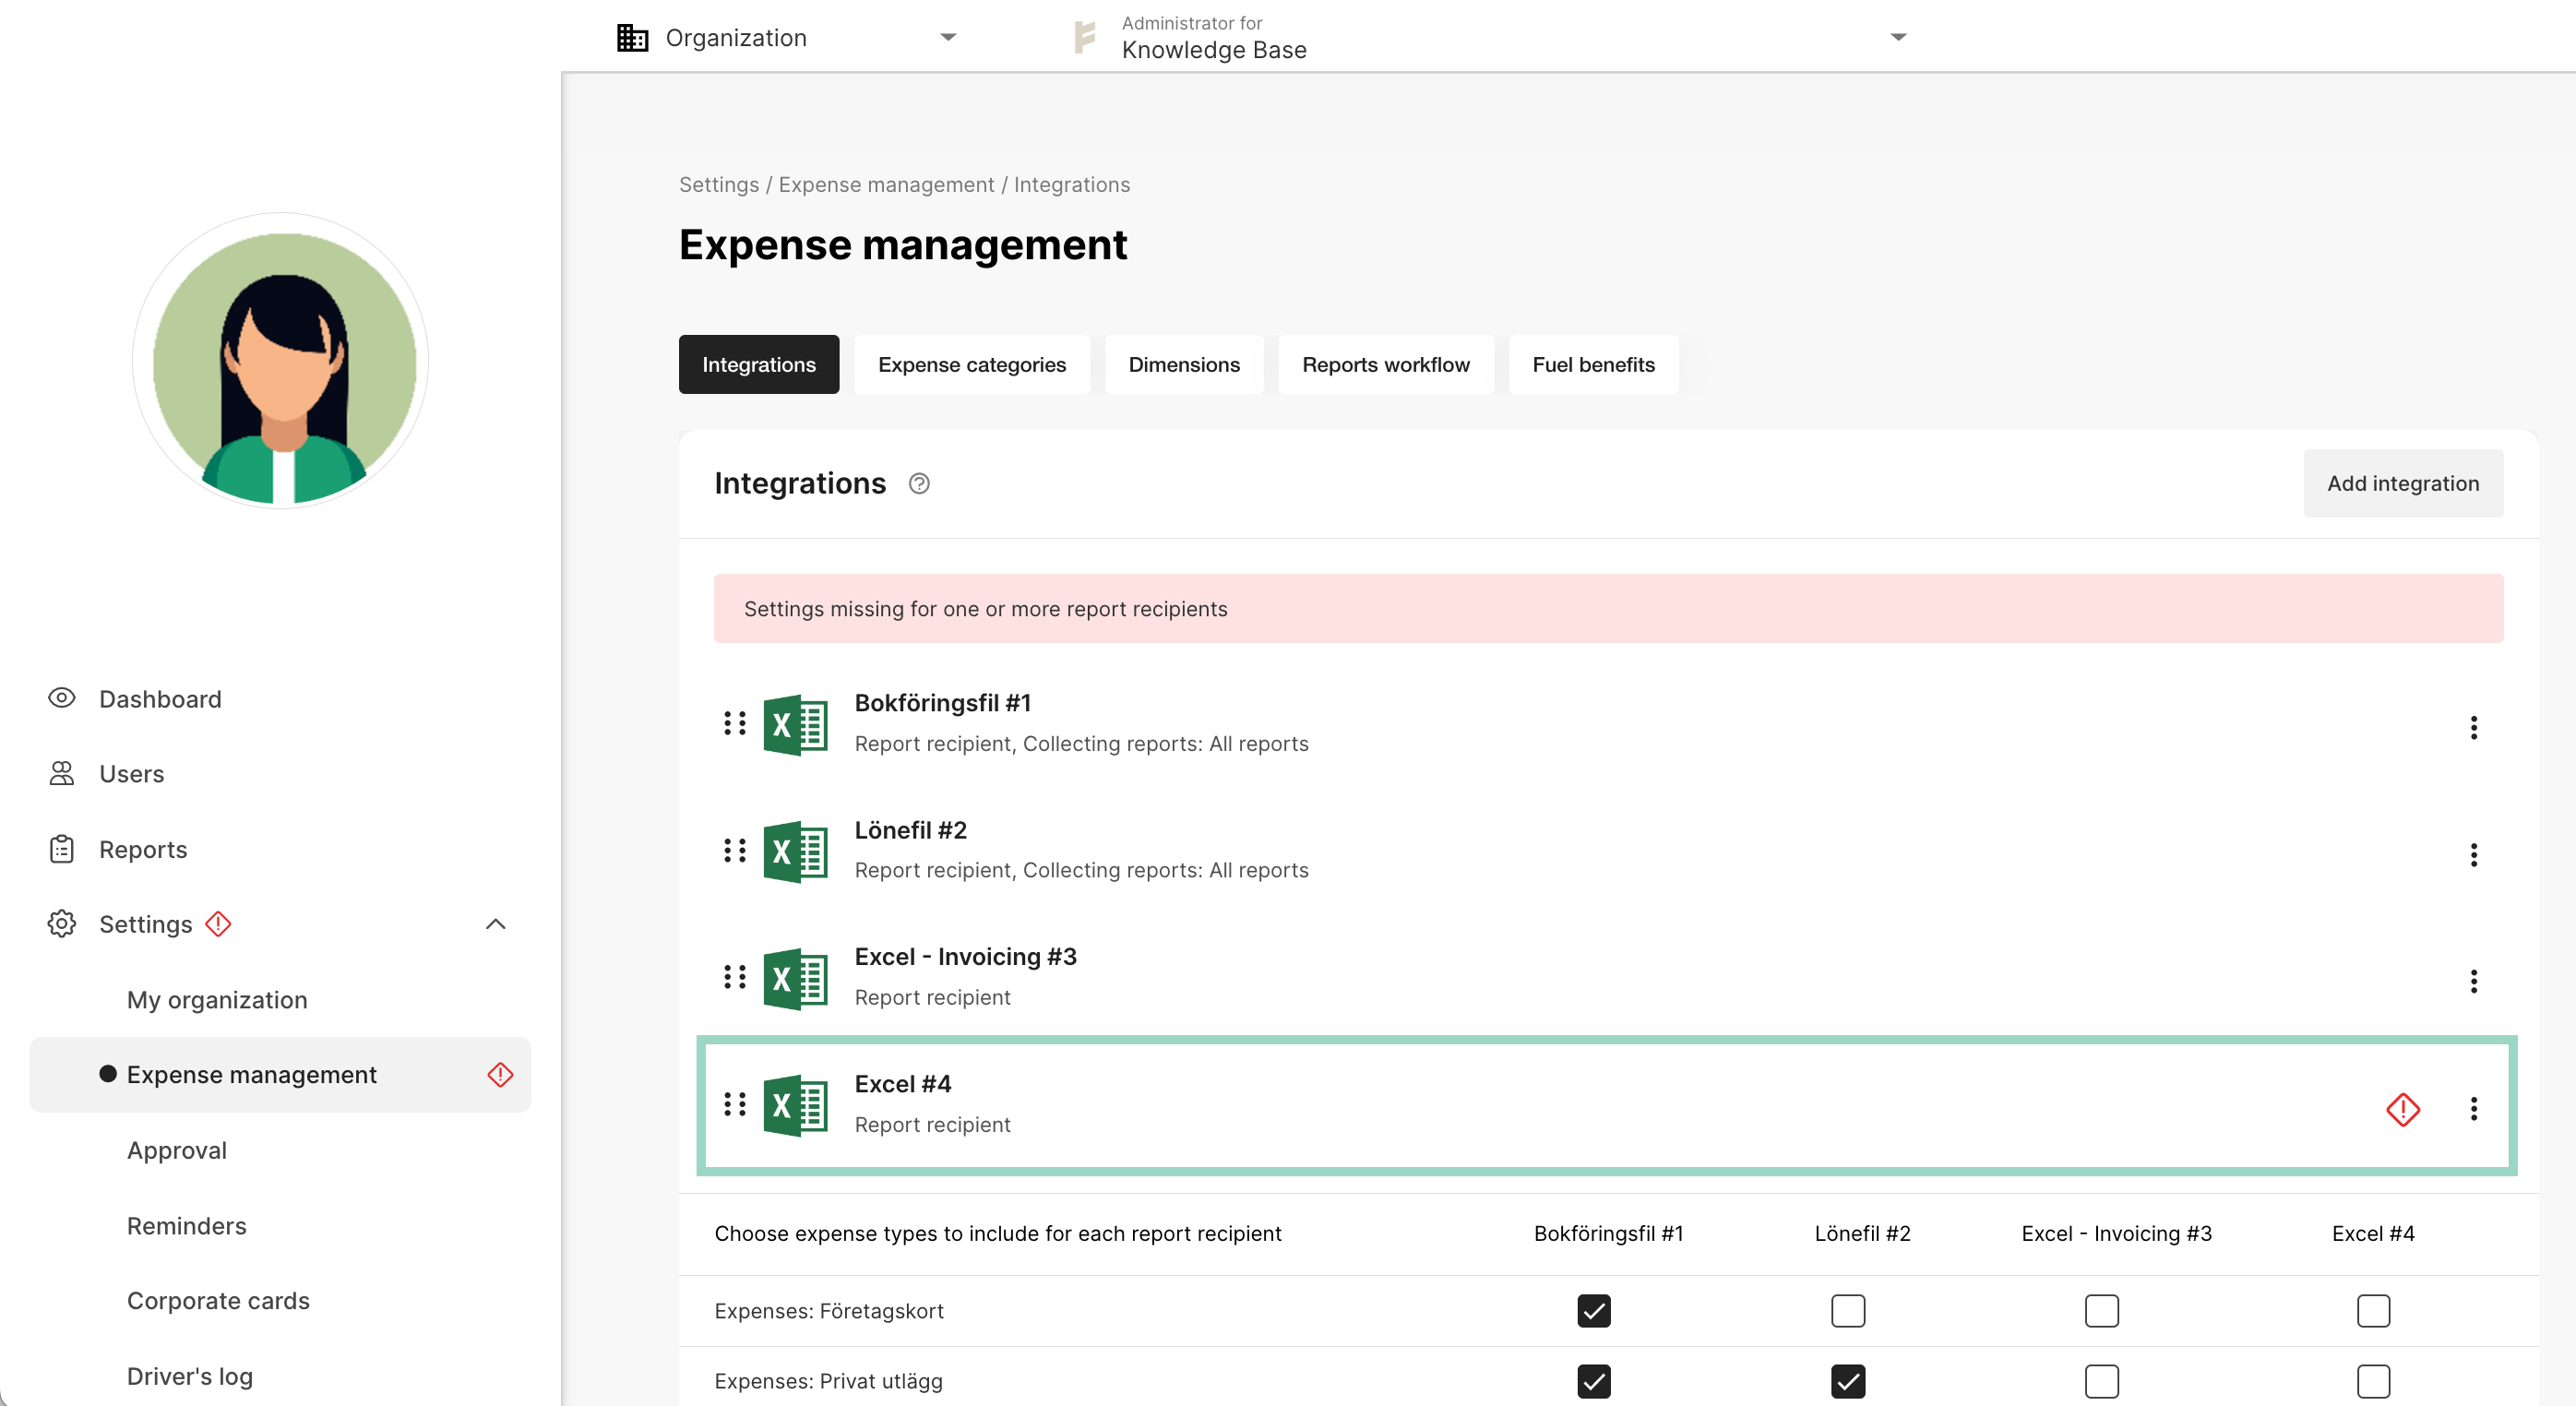 A new window will open where you can do the settings needed. These are the settings that you can do:
* **Recipient name** - Give your report recipient a name that is easier to understand, for example, "Bookkeeping file - Excel". This name will be shown under *Ready to send*-tab (if you activate the review mode) and also shown under *Files* and also in the report history in each report after sending the report to the recipient.
* **Report recipient**(e-mail) - Enter an e-mail address to where you want to send the created file to.
* **Send error message to** (e-mail) - Enter an e-mail address to where you want errors to be sent, if there are any errors when sending the reports to the report recipient. This input field is mandatory.
A new window will open where you can do the settings needed. These are the settings that you can do:
* **Recipient name** - Give your report recipient a name that is easier to understand, for example, "Bookkeeping file - Excel". This name will be shown under *Ready to send*-tab (if you activate the review mode) and also shown under *Files* and also in the report history in each report after sending the report to the recipient.
* **Report recipient**(e-mail) - Enter an e-mail address to where you want to send the created file to.
* **Send error message to** (e-mail) - Enter an e-mail address to where you want errors to be sent, if there are any errors when sending the reports to the report recipient. This input field is mandatory.
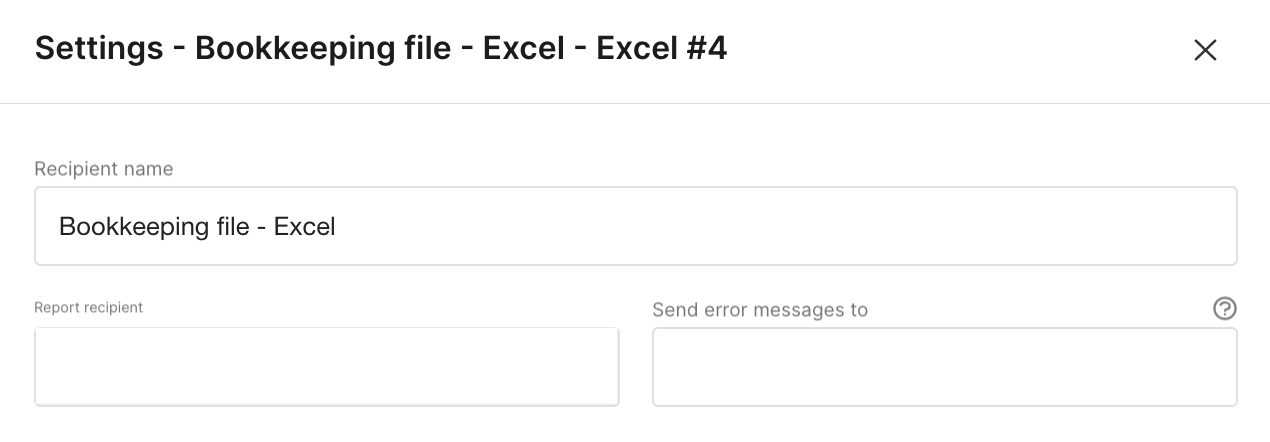 * **Use review mode** (check box) - Choose whether you want to show a tab for the report recipient under *Reports* > *Ready to send* and be able to review the reports before sending the to the recipient. If you choose this setting you will also be need to choose if you want all reports to be stopped at review mode under *Ready to send* or just reports witht expense policy violation. You can also choose if you want to add a e-mail address where a notification will be sent to, if there are new reports to review under the tab for the recipient under *Ready to send*.
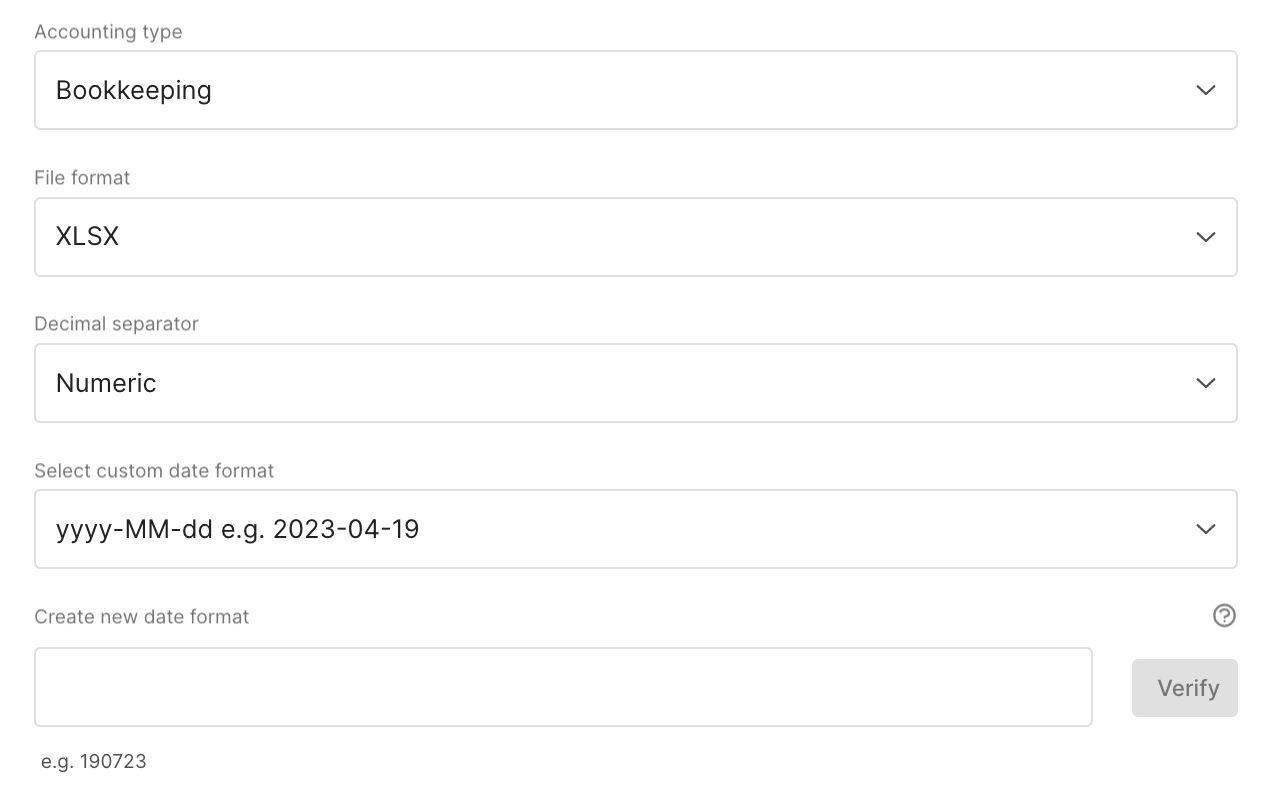
 * **Accounting type** - Choose which accounting type you will use the Excel file for - bookkeeping or salary.
* **File format** - Choose if you want to file format to be a *csv* file format or a *xlsx* file format.
* **Decimal separator** - Choose how to separate decimals in the file. Choose from numeric, dot or comma.
* **Select custom date format** - Choose how you want dates in the file to be shown as. Choose from already existing date formats in the list or create a new date format if needed.
* **Accounting type** - Choose which accounting type you will use the Excel file for - bookkeeping or salary.
* **File format** - Choose if you want to file format to be a *csv* file format or a *xlsx* file format.
* **Decimal separator** - Choose how to separate decimals in the file. Choose from numeric, dot or comma.
* **Select custom date format** - Choose how you want dates in the file to be shown as. Choose from already existing date formats in the list or create a new date format if needed.
 * **Use own file name**(on/off switch) - This function means that an expense report/file can be given a custom name. For example, you can give the file name 0040. This will then be the name on all files produced in the system for this recipient.
 * **Column mapping** - Configure column mappings. See more information about this setting further down in this article.
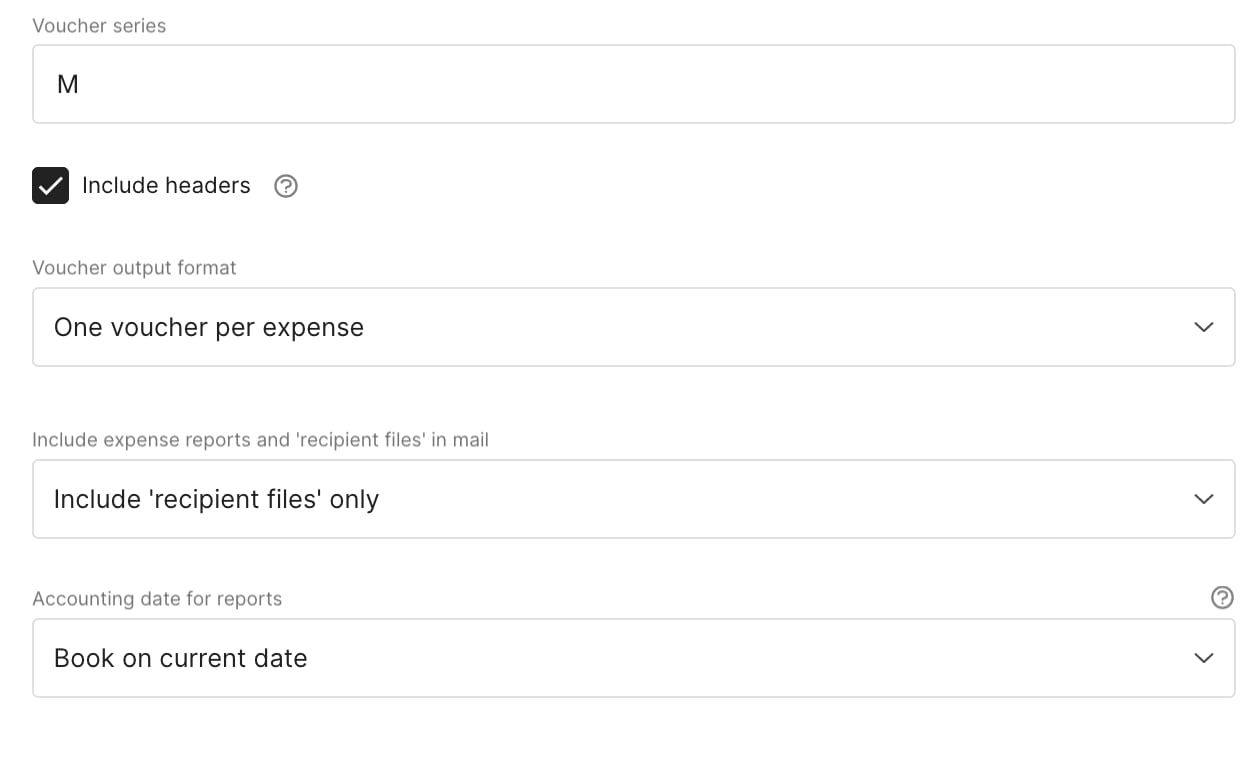
 * **Voucher series** - Enter verification series if needed. Remember to also add a column for this in the column mapping.
* **Include headers**(check box) - Choose if you want to include headers in the top of the Excel sheet or not.
* **Voucher output format** - Choose how to present the vouchers in the file - per expense, per report (grouped per account/salary type) or per user (grouped per account/salary type).
* **Include expense reports and 'recipient files' in mail** - If you earlier chose to add an e-mail address to send the recipient file to, you can here choose if you only want the recipient file to be sent in the e-mail or if you want to add the expense reports included in the file as links or attachments.
* **Accounting date for reports** - Select the date to be used for the vouchers created. To be able to select the date for submission, you must activate the "review mode" for expense reports earlier in these settings.
* **Voucher series** - Enter verification series if needed. Remember to also add a column for this in the column mapping.
* **Include headers**(check box) - Choose if you want to include headers in the top of the Excel sheet or not.
* **Voucher output format** - Choose how to present the vouchers in the file - per expense, per report (grouped per account/salary type) or per user (grouped per account/salary type).
* **Include expense reports and 'recipient files' in mail** - If you earlier chose to add an e-mail address to send the recipient file to, you can here choose if you only want the recipient file to be sent in the e-mail or if you want to add the expense reports included in the file as links or attachments.
* **Accounting date for reports** - Select the date to be used for the vouchers created. To be able to select the date for submission, you must activate the "review mode" for expense reports earlier in these settings.
 **Advanced settings**
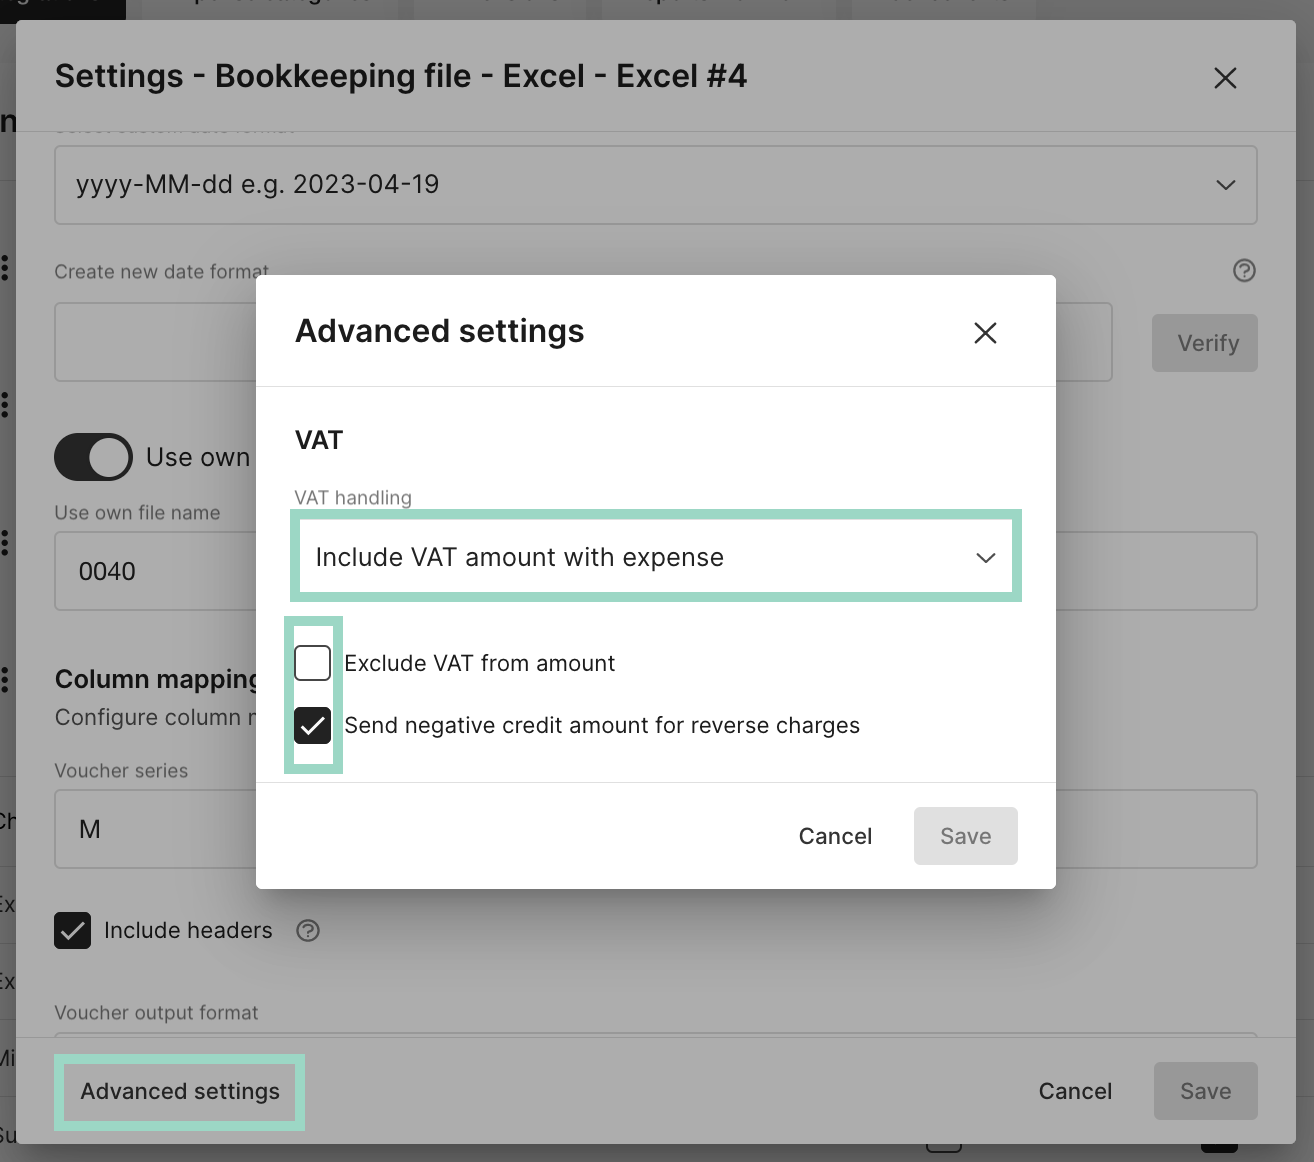
In the settings window, you can also choose to click on *Advanced settings*.
Here you can choose how the VAT should be presented in the output file and also if you want to send a negative credit amount for reverse charges.
**Advanced settings**
In the settings window, you can also choose to click on *Advanced settings*.
Here you can choose how the VAT should be presented in the output file and also if you want to send a negative credit amount for reverse charges.
 **Column mapping**
If you now go back to *Column mapping* in *Settings* and click on the name. A new window will open.
**Column mapping**
If you now go back to *Column mapping* in *Settings* and click on the name. A new window will open.
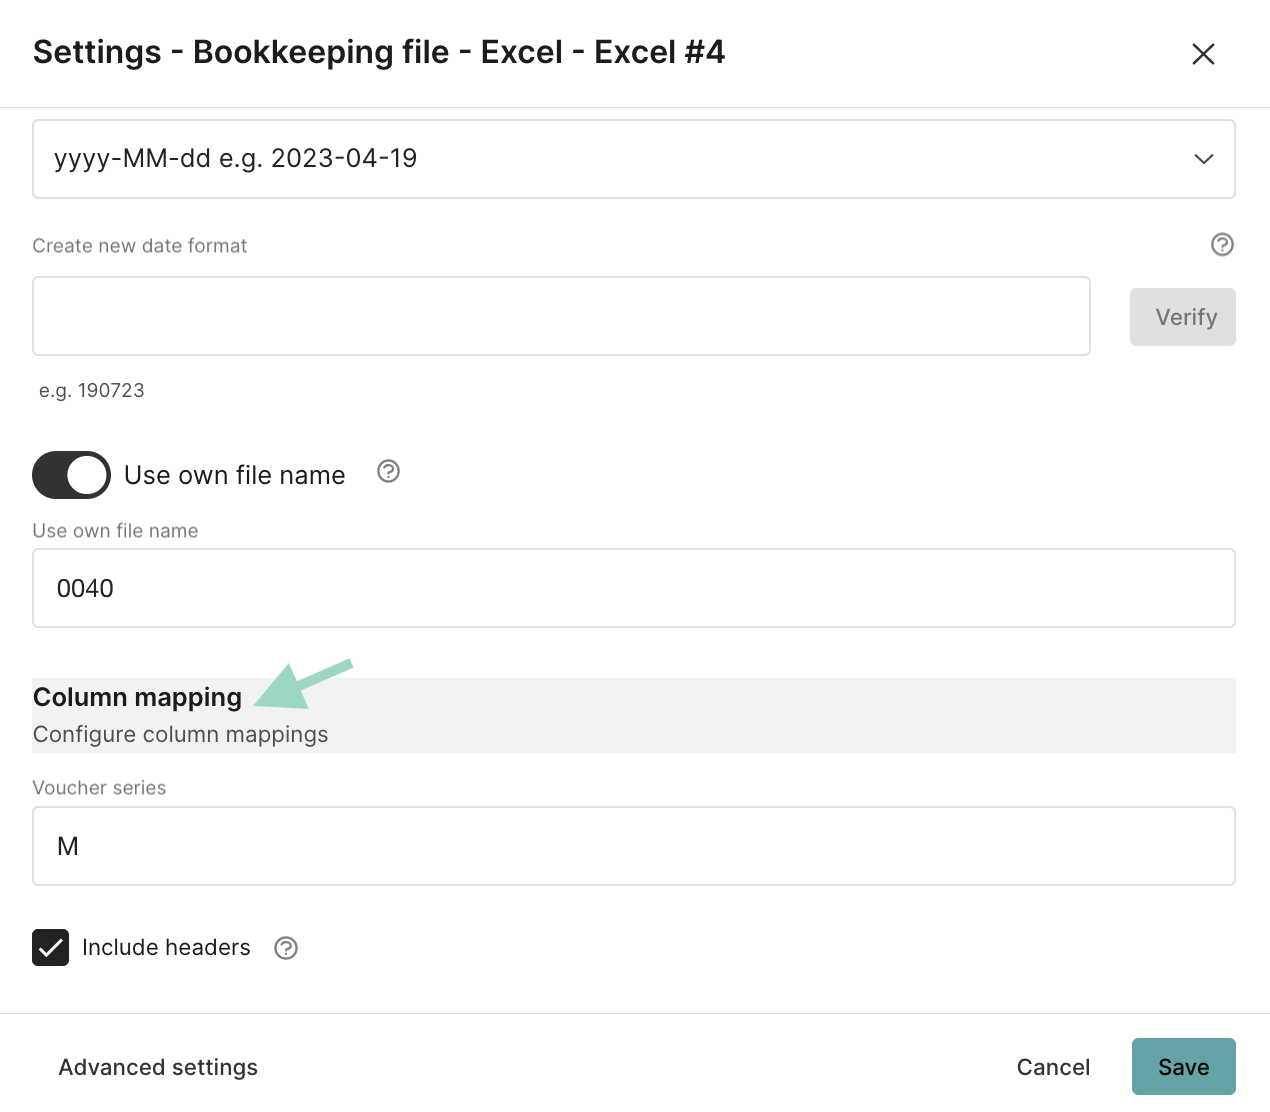 In the column mapping, you can customize how you want the expense data to be presented in columns in the Excel file. You can customize the following:
* **Column** - In which letter column in the Excel sheet you want the values to be presented
* **Type** - Choose from a list, what type of data you want to present in the column
* **Header** - Name a header for the column
* **Value** - This field can only be used if you choose *Type: Static*. This is useful when you would like to have a static value on all rows in the file. The static value should then be added in the *Value* input field
You will have some preset data in the column mapping from start:
In the column mapping, you can customize how you want the expense data to be presented in columns in the Excel file. You can customize the following:
* **Column** - In which letter column in the Excel sheet you want the values to be presented
* **Type** - Choose from a list, what type of data you want to present in the column
* **Header** - Name a header for the column
* **Value** - This field can only be used if you choose *Type: Static*. This is useful when you would like to have a static value on all rows in the file. The static value should then be added in the *Value* input field
You will have some preset data in the column mapping from start:
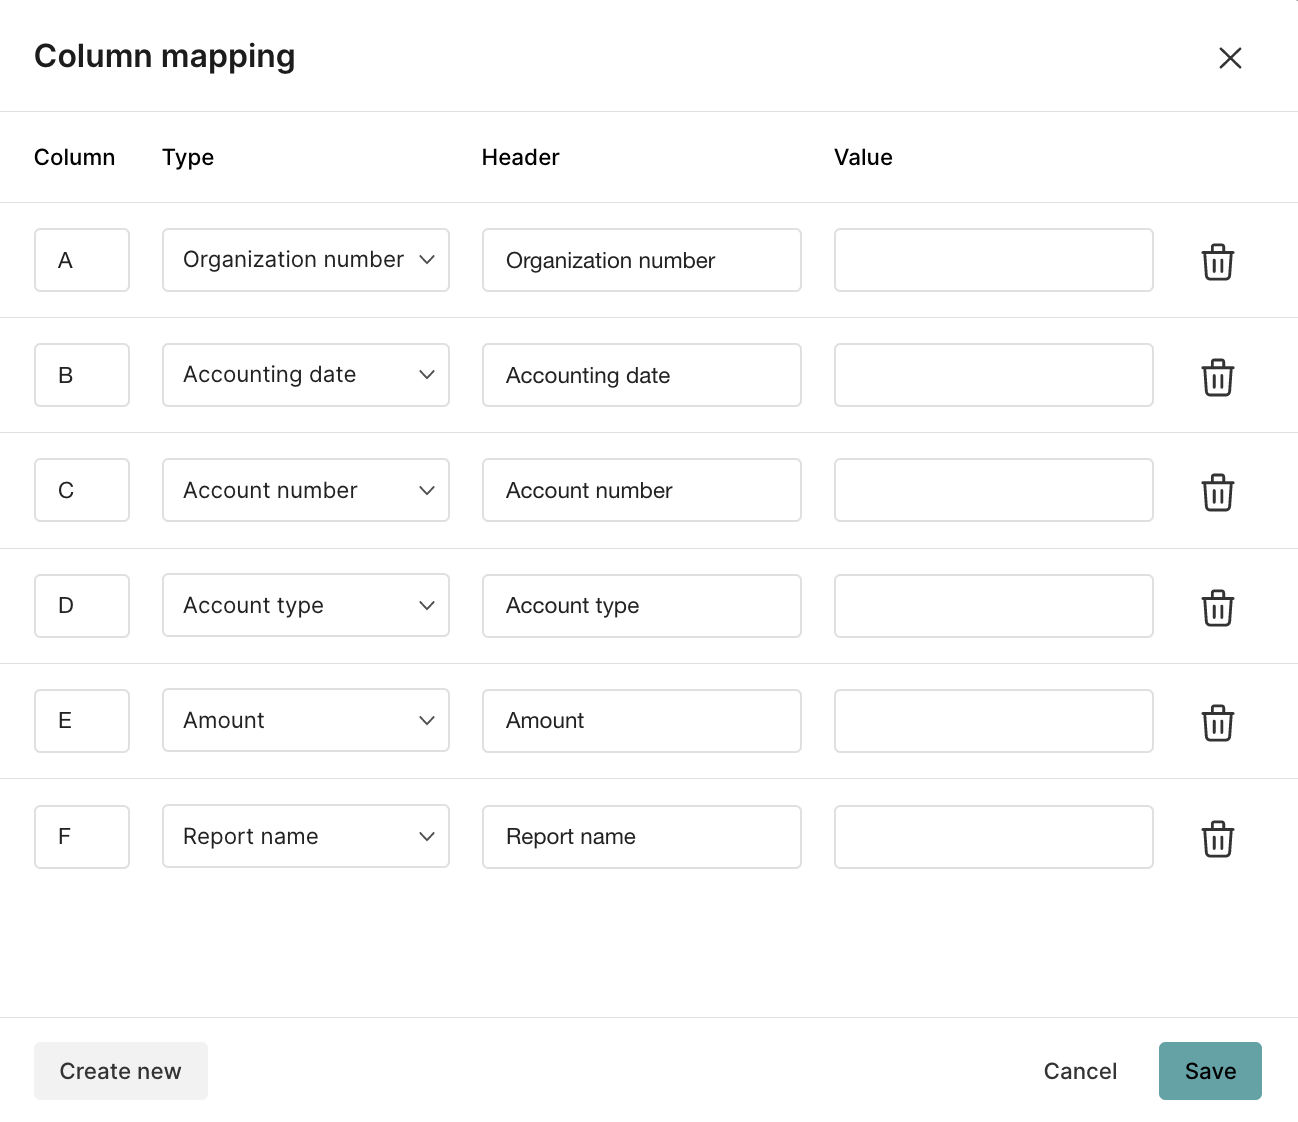 If you want to delete a column, just click on the *"trash can"* on the right side of the field for that column.
If you want to add more columns to your file you click on *Create new*.
For example, if you want to add a column for the voucher series, then you choose *Voucher series* as *Type* and choose a column letter where in the file you want to add the voucher series and a header name if wanted.
If you have dimensions that you want to add as *Type* you will have to look for the dimension name in the list of types.
If you want to delete a column, just click on the *"trash can"* on the right side of the field for that column.
If you want to add more columns to your file you click on *Create new*.
For example, if you want to add a column for the voucher series, then you choose *Voucher series* as *Type* and choose a column letter where in the file you want to add the voucher series and a header name if wanted.
If you have dimensions that you want to add as *Type* you will have to look for the dimension name in the list of types.
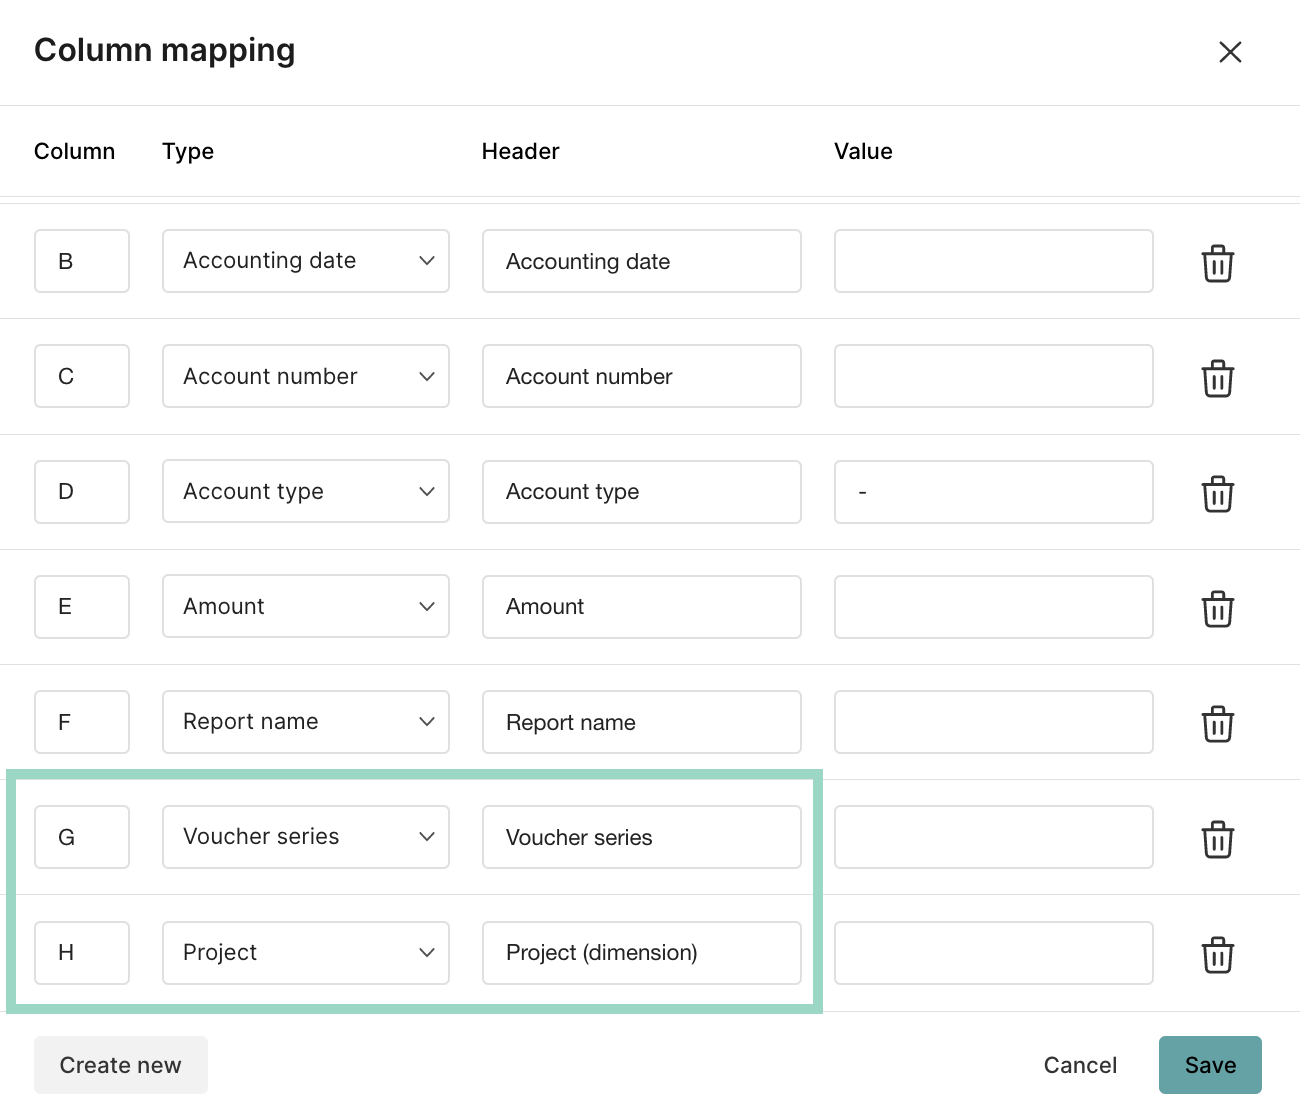 In the above example we have added both voucher series and the dimension *Project* to the file and below is an example of how the file will be presented with this column mapping:
 Now you're done with the settings for the Excel integration and you can start to use it as a report recipient.
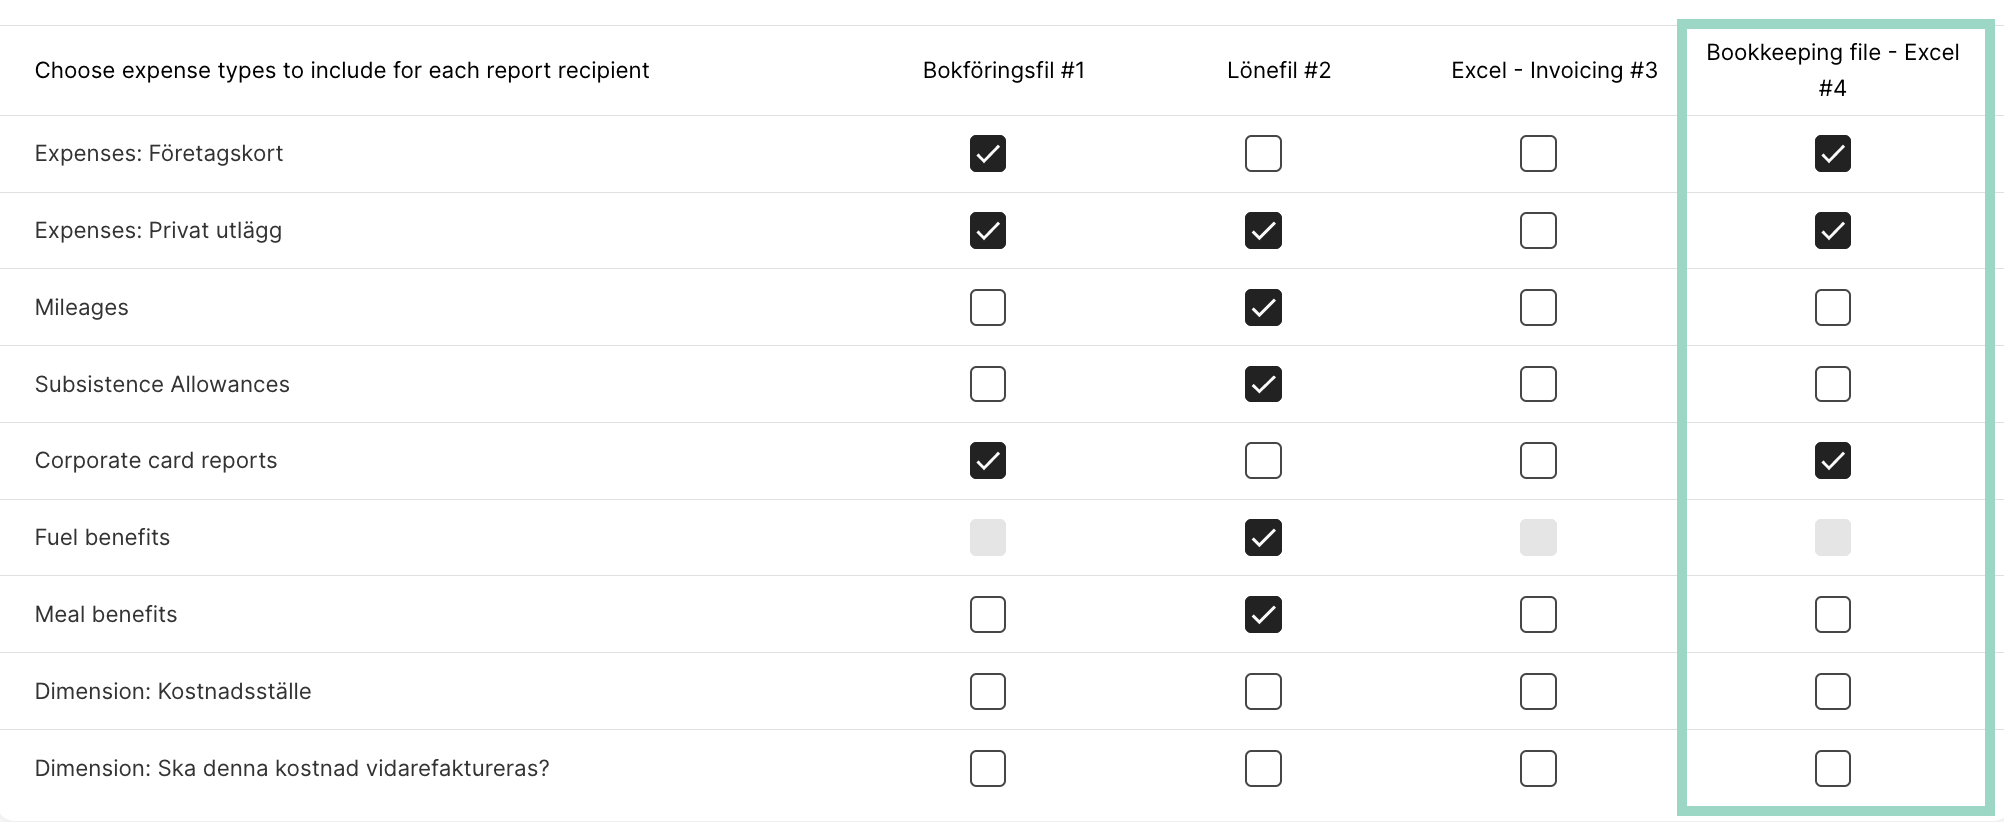
Remember to also add which expense types you want to send to the recipient under *Integrations* > *Choose expense types to include for each report recipient.*
Now you're done with the settings for the Excel integration and you can start to use it as a report recipient.
Remember to also add which expense types you want to send to the recipient under *Integrations* > *Choose expense types to include for each report recipient.*
 ## Related articles
* [Can I add/change the integration?](/en/settings-administrator/can-i-add-change-the-integration)
* [How do I add the tab "Ready to send" under reports?](/en/expense-and-reports-administrator/how-do-i-add-the-tab-ready-to-send-under-reports)
* [Where can I see which integrations that are available to choose?](/en/other-administrator/where-can-i-see-which-integrations-that-are-available-to-choose)
* [How do I manage reports under the tab Ready to Send?](/en/expense-and-reports-administrator/how-do-i-manage-reports-under-the-tab-ready-to-send)
## Related articles
* [Can I add/change the integration?](/en/settings-administrator/can-i-add-change-the-integration)
* [How do I add the tab "Ready to send" under reports?](/en/expense-and-reports-administrator/how-do-i-add-the-tab-ready-to-send-under-reports)
* [Where can I see which integrations that are available to choose?](/en/other-administrator/where-can-i-see-which-integrations-that-are-available-to-choose)
* [How do I manage reports under the tab Ready to Send?](/en/expense-and-reports-administrator/how-do-i-manage-reports-under-the-tab-ready-to-send)